
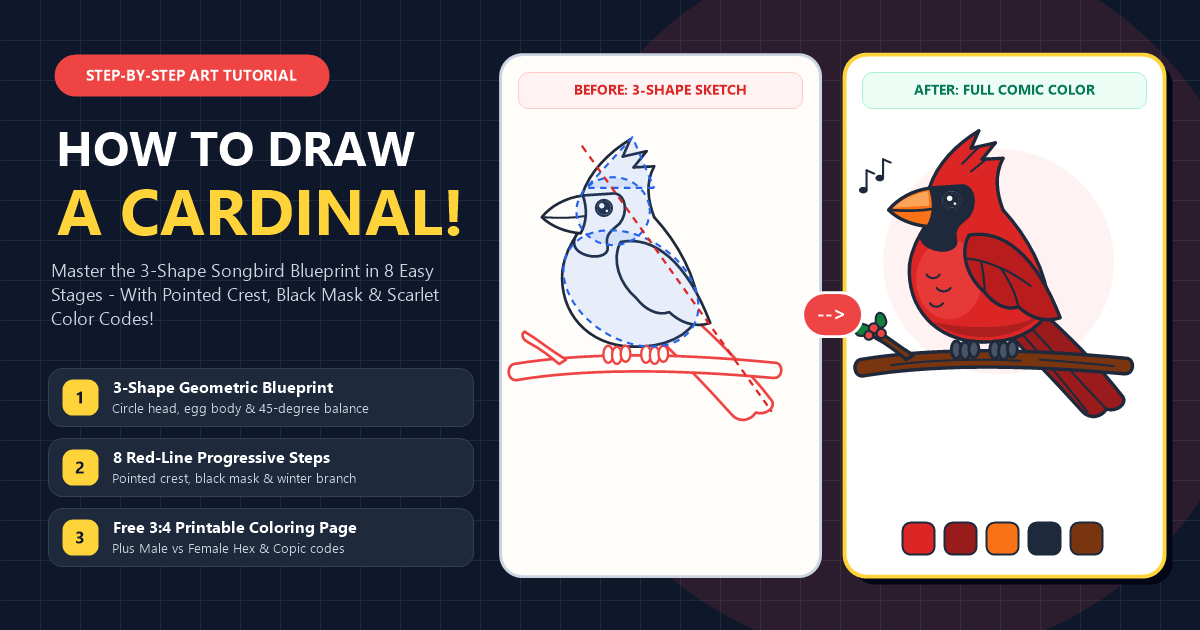
Most beginners who sit down to learn how to draw a cardinal make the exact same proportion mistake within the first ten seconds. They sketch the pointed head crest first, pull it straight up like a stiff party hat, and end up with a skinny bird that looks more like a startled woodpecker than North America's favorite winter songbird. When American modernist illustrator Charley Harper famously distilled the Northern Cardinal (Cardinalis cardinalis) into pure geometry, he proved that the bird's unmistakable silhouette actually locks around its heavy, cone-shaped seed-cracking bill and a single 45-degree diagonal balance line.
Once you anchor that thick coral-orange beak and wrap the velvet-black facial mask around the eye, the rest of the drawing flows together from everyday letter curves (V, M, C, and D). Whether you are sketching a festive holiday greeting card, completing a state-bird classroom project, or relaxing with a sketchbook by the window, this eight-stage visual blueprint guides you from light pencil ovals to brilliant crimson feathers without any guesswork.
Gathering Simple Drawing Supplies Before Your First Sketch
You only need four basic desk tools to sketch and color a crisp Northern Cardinal without smudging your dark facial mask into the bright red feathers. Picking the right paper and ink keeps your scarlet pigments glowing instead of soaking flat into the page.
If you are brand new to sketching animals from simple spheres and ovals, keeping a light grip on your pencil during the first three stages makes cleanup effortless. You can also explore our foundational pencil control and basic shape sketching guide to warm up your hand before starting.
- HB or 2B Graphite Pencil: Use whisper-light pressure for the initial head sphere and tilted egg torso so your guide lines erase without leaving ghost grooves in the paper.
- Kneaded or Soft Vinyl Eraser: Gently dab away overlapping construction lines inside the wing and beak before you touch a marker to the page.
- Waterproof Black Fineliner Pens (0.8mm and 0.5mm): Use the thicker
0.8mmtip for the outer silhouette and branch, and the finer0.5mmtip for wing covert bars, chest feather ticks, and musical notes. - Scarlet Red, Deep Crimson, Coral-Orange, and Slate Markers or Pencils: A two-tone red pairing (
#DC2626bright scarlet and#991B1Bdeep crimson) prevents your bird from looking flat while keeping shadows rich and warm.
Understanding Why Illustrators Build a Northern Cardinal From Three Simple Shapes
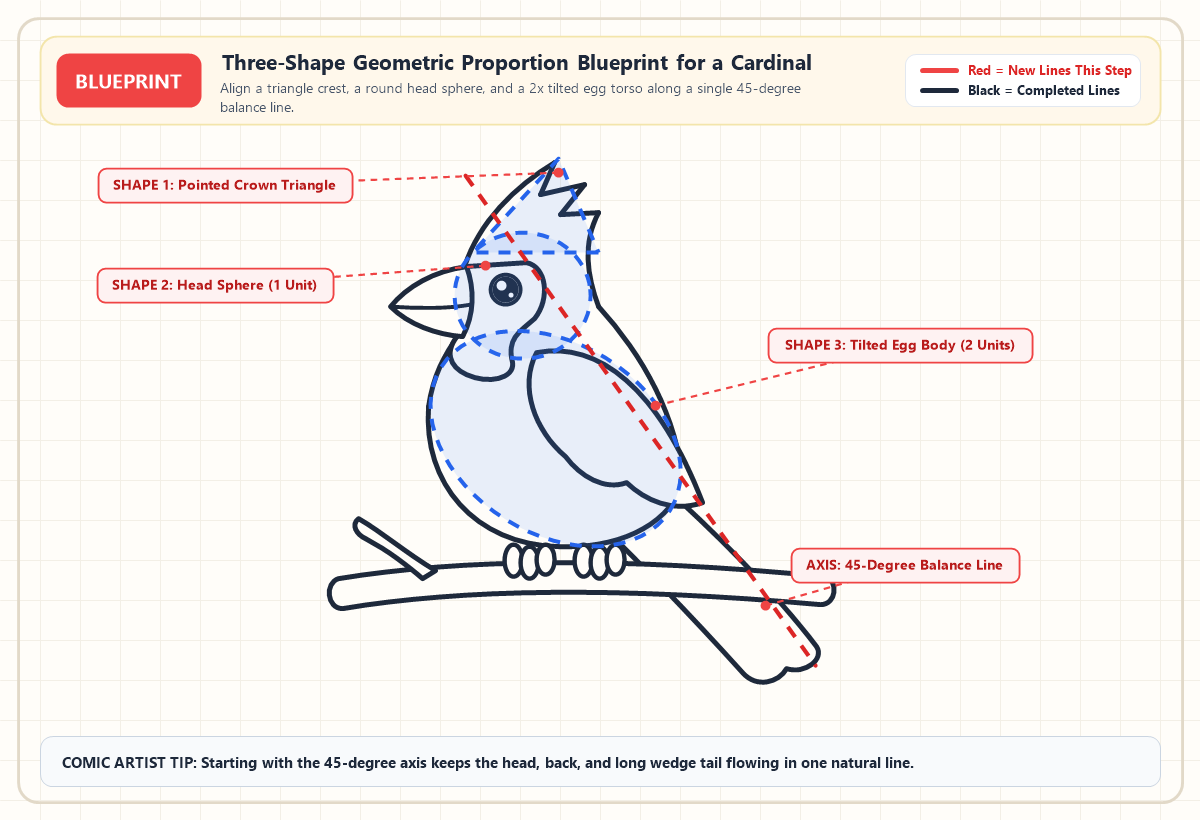
Professional wildlife illustrators never draw a songbird's outline in one continuous freehand loop. They construct a northern cardinal drawing by stacking three simple geometric shapes along a 45-degree diagonal axis: a 1-unit circle for the head, a 2-unit tilted egg oval for the plump torso, and a backward-swept triangle for the crown crest.
When naturalist John James Audubon painted plates for The Birds of America, he tilted perching songbirds along a strong diagonal line from the forehead through the tip of the tail. That 45-degree tilt is what makes a cardinal look alive and balanced on a branch rather than frozen like a wooden decoy. Notice in the blueprint below how the front chest puffs generously outward past the chin line cardinals fluff their breast down feathers in cold weather to trap warm air while the back and stepped wedge tail form one smooth, continuous slide.
Following the Eight Step Visual Blueprint for How to Draw a Cardinal
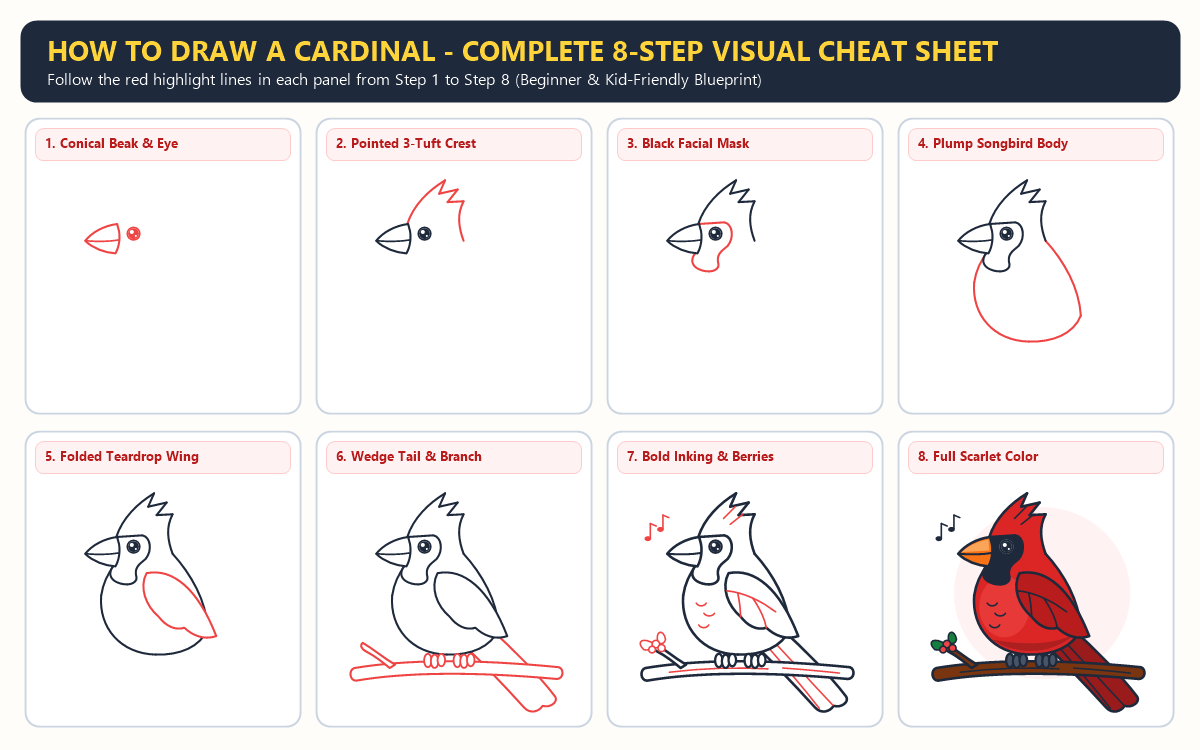
To make every stroke effortless to follow, each card below highlights new lines for that stage in bright red and shows completed lines from earlier stages in dark charcoal black. Keep your pencil strokes light until Step 7.
Easy Cardinal Drawing Step by Step
The new lines in each picture show what to add next. Simple shapes will come together to make your cardinal. Let’s begin!
Step 1: Anchoring the Conical Beak and Bright Bead Eye
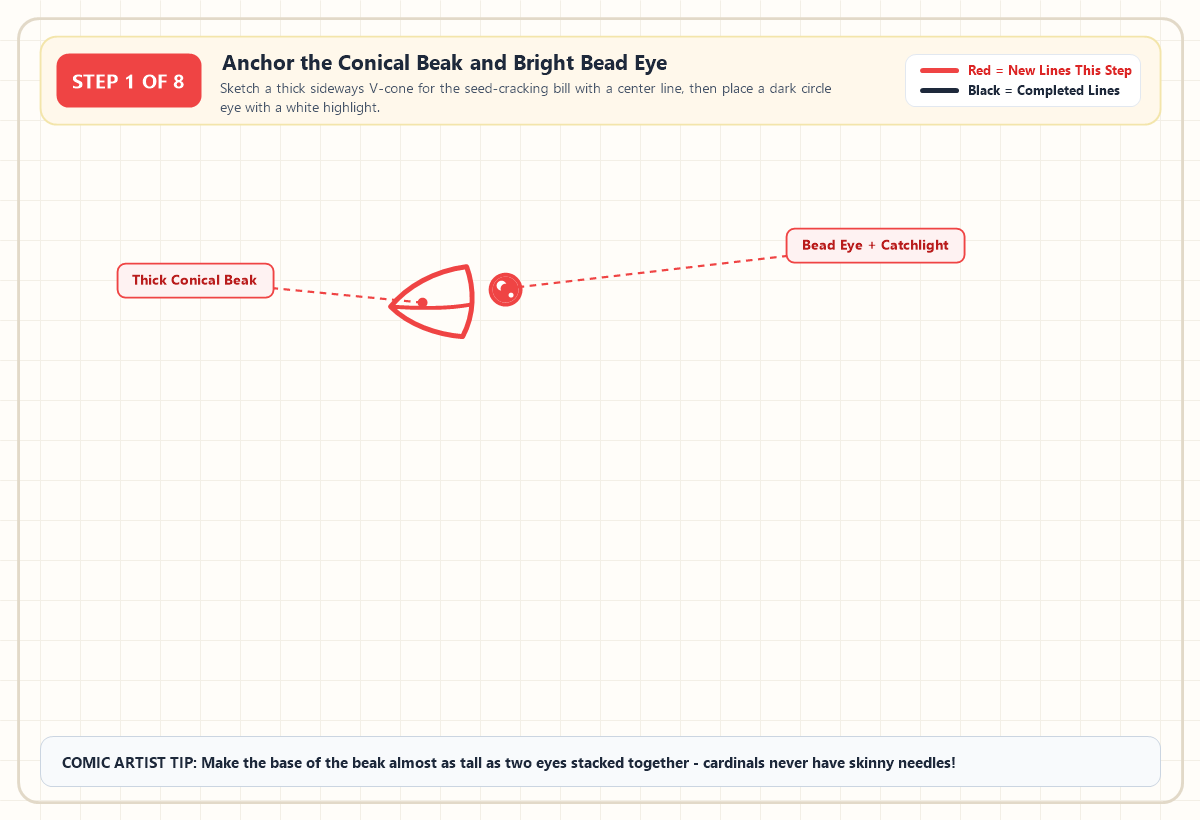
Start in the upper-left quadrant of your paper by drawing a thick, sideways V-shaped cone pointing left for the cardinal's heavy seed-cracking bill. Divide the upper and lower mandibles with a gentle horizontal smile line so the upper beak looks slightly larger than the lower jaw. Just to the right of the upper beak bridge, draw a round dark eye and leave two tiny white circles uncolored inside for a lively catchlight gleam.
Step 2: Sweeping the Signature Pointed Crest and Head Contour
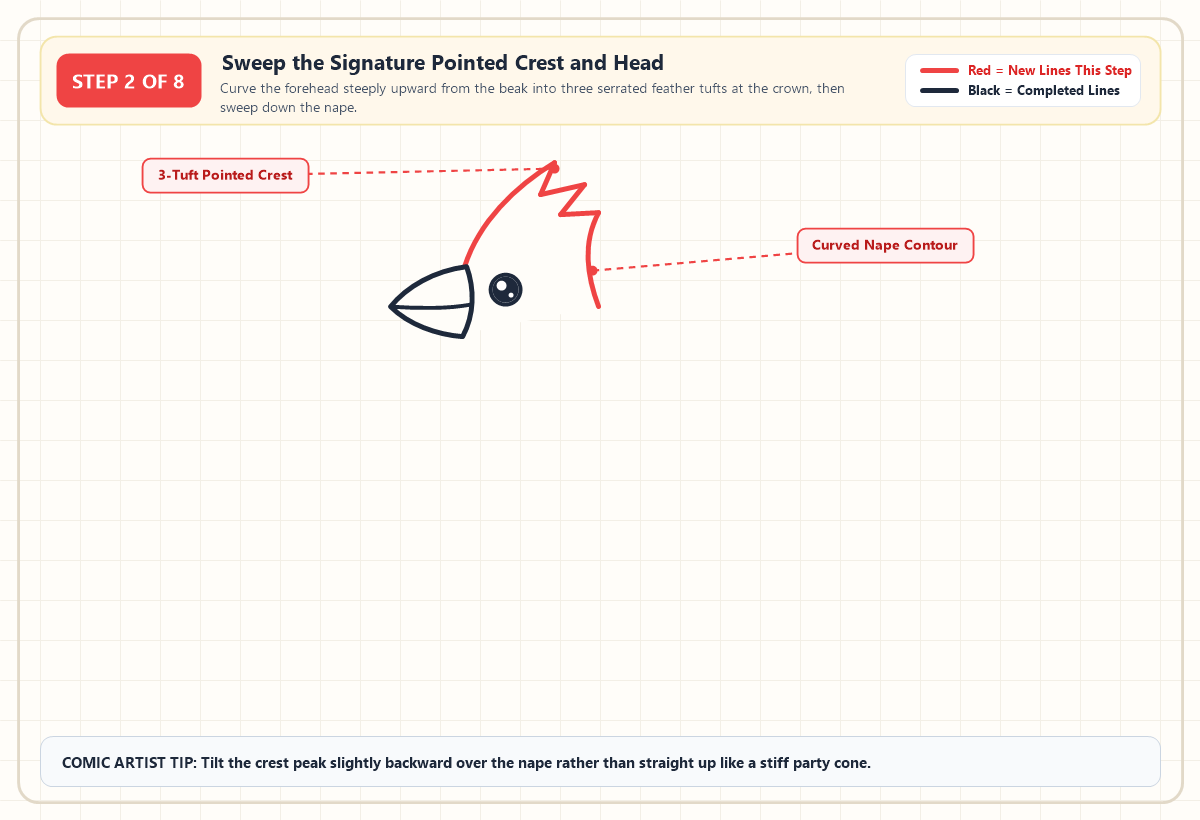
From the top bridge of the beak, sweep a steep forehead curve upward and to the right to form the front of the crown crest. Instead of drawing a single stiff spike, notch the peak into three overlapping M-shaped feather tufts that tilt backward over the head. Curve the third tuft smoothly down the back of the nape, stopping level with the bottom of the beak.
Step 3: Framing the Iconic Black Facial Mask Around the Bill
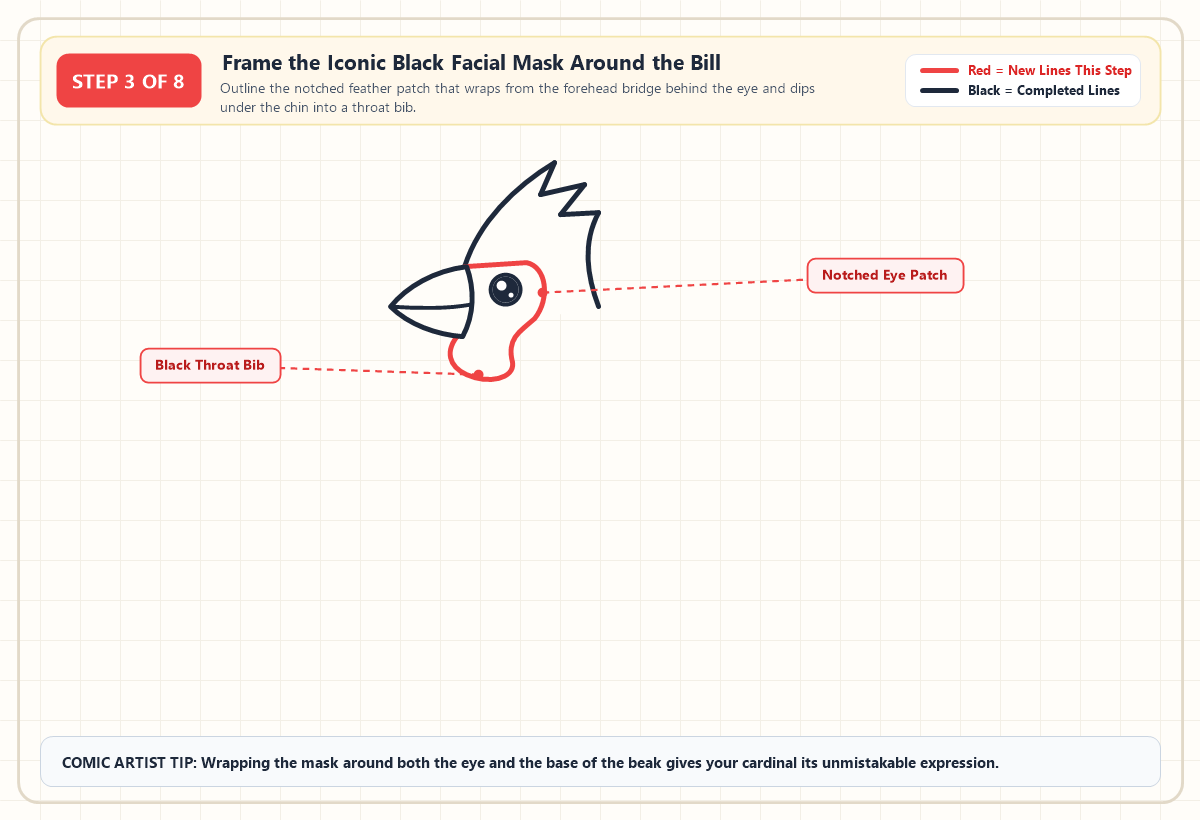
Now trace the boundary of the cardinal's signature black mask. Start right where the forehead meets the top of the beak, curve a horizontal line back above the eye, and loop snugly behind the cheek. Dip the line inward slightly below the cheek before rounding it underneath the lower jaw to create a neat black throat bib that connects back to the chin.
Step 4: Rounding the Plump Songbird Chest and Sloping Back
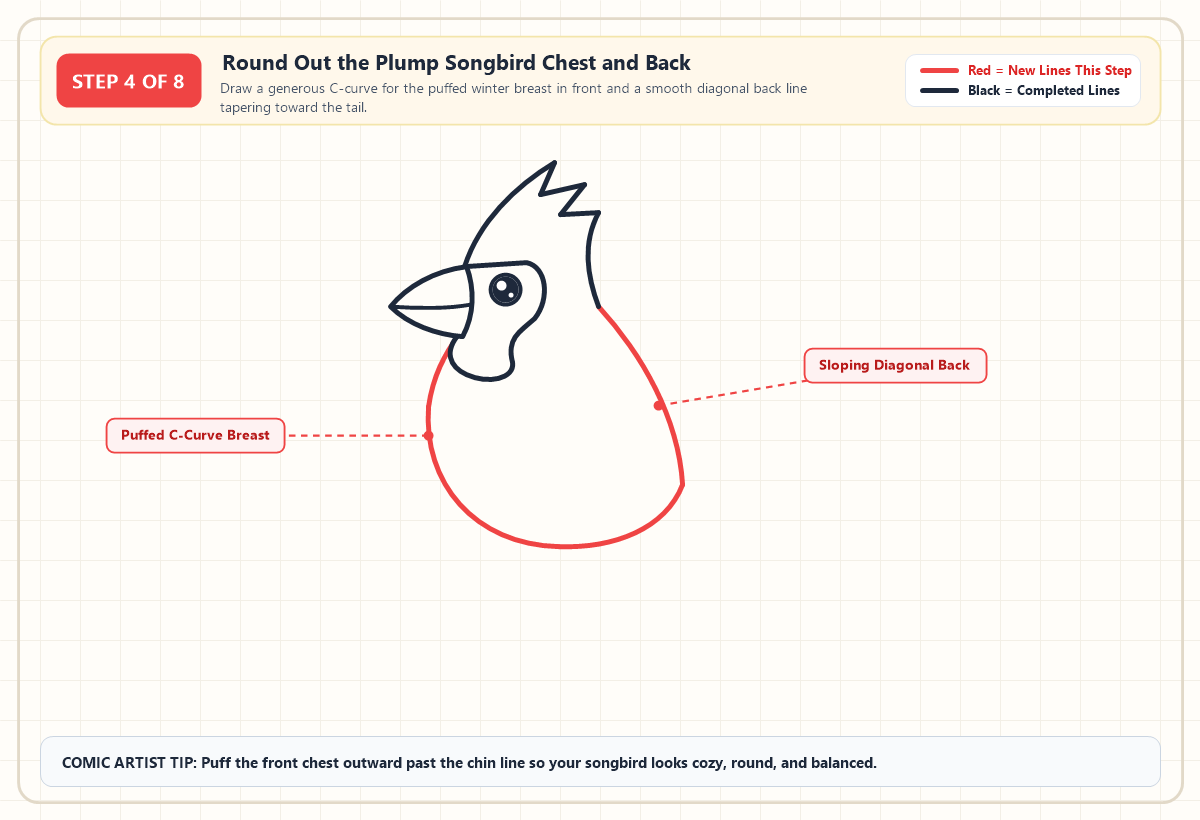
Beneath the black throat bib, pull a bold, rounded C-curve outward to the left and sweep it down into a plump, cozy belly. Make sure the front of the chest extends nearly as far left as the middle of the beak so your bird has a warm winter puff. From the bottom of the nape on the right, draw a long, sloping diagonal back line that curves around the lower rump to join the belly.
Step 5: Layering the Folded Teardrop Wing Over the Side
Tuck the folded wing inside the upper torso by starting a curved D-shaped arch just below the nape. Pull the top edge of the wing down and to the right until the primary wingtip slightly overlaps the lower back contour. Close the bottom edge of the wing with three soft, scalloped U-curves that mimic layered secondary flight feathers resting against the flank.
Step 6: Extending the Long Wedge Tail and Gripping Pine Branch
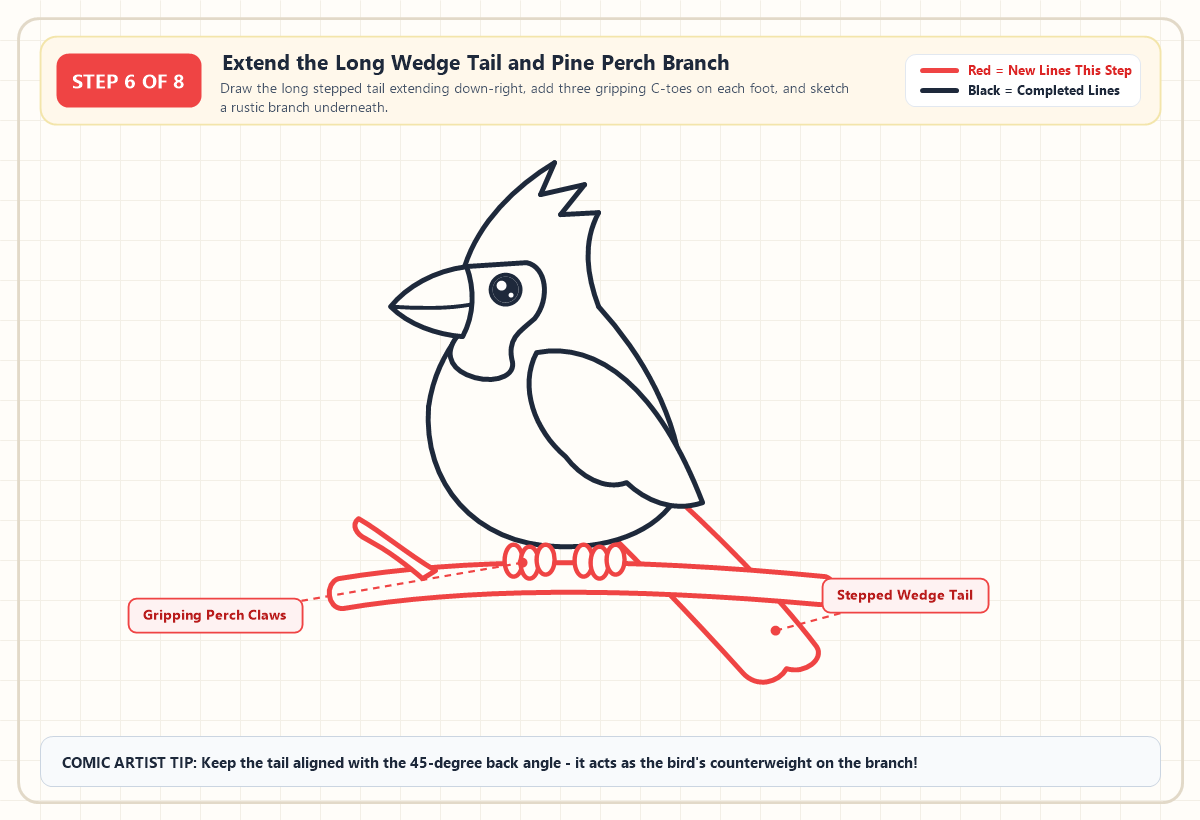
Underneath the plump belly, draw two sets of three small vertical oval toes (C-arcs) side by side. Run two parallel, slightly arched lines horizontally right beneath those toes to create a sturdy winter pine branch, adding a short upward twig on the left. Finally, extend two long, straight lines down and to the right from the lower rump along your 45-degree axis, closing the end with two rounded steps to form the cardinal's long wedge tail dipping behind the branch.
Step 7: Adding Bold Comic Feather Texture and Winter Berries
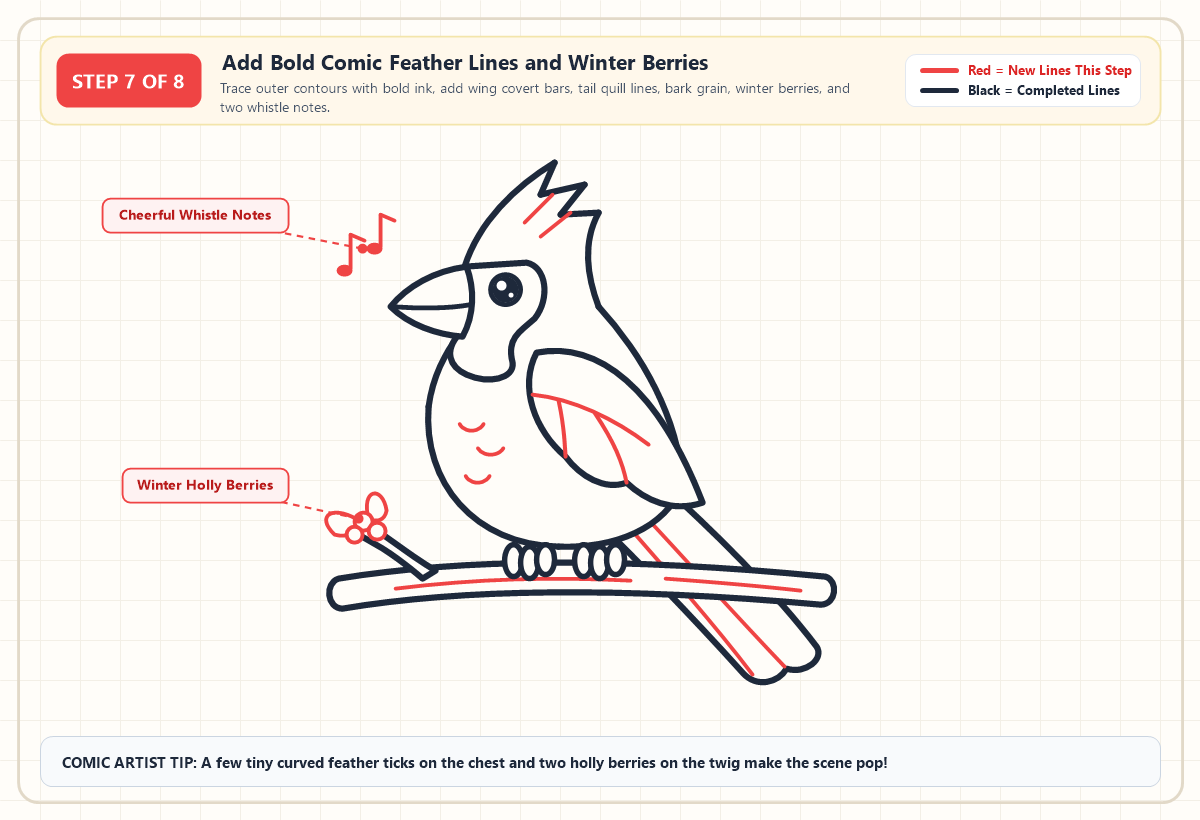
Switch to your black fineliner and trace confidently over your outer pencil contours, erasing any leftover guide ovals once the ink dries. Inside the folded wing, add a curved covert bar and two feather separation lines, then draw two long quill lines down the length of the tail. Finish the scene with three small curved feather ticks on the chest, bark grain lines along the wood, three cluster berries with two leaves on the left twig, and a pair of floating musical notes near the beak.
Step 8: Filling Brilliant Scarlet Plumage and Warm Undertone Shading
Bring your perched songbird to life by laying down a vibrant coat of Cardinal Scarlet (#DC2626) across the crest, head, nape, and plump breast. Shade the folded wing, long tail, and lower belly curve with Deep Wing Crimson (#991B1B) so the wing stands out cleanly against the body without needing muddy gray shadows. Fill the facial mask with Obsidian Charcoal (#1E293B) leaving a thin rim around the dark eye so it sparkles and color the conical bill a glowing Coral Seed Orange (#F97316) with a lighter apricot highlight along the top ridge. If you plan to print multiple copies on heavy marker paper, check out our complete guide to printing crisp coloring sheets at home for paper weight tips.
Printable Cardinal Drawing PDF
Download the printable PDF to use now or save for later — it prints on A4 and Letter paper.
Print PDFComparing Vibrant Male Scarlet Plumage With Warm Female Cardinal Tones
One of the best secrets of backyard bird illustration is that male and female Northern Cardinals share the exact same body proportions, pointed crest, and conical coral beak. In biology, this difference in feather color between sexes is called sexual dichromatism. Once you master the eight-step outline above, you can draw a pair of cardinals on the same branch simply by swapping your red body markers for warm buff-tan tones on the female!
Use the reference matrix below to match exact digital Hex codes, professional Copic Sketch markers, and classic Crayola crayons for both male and female cardinals:
| Anatomical Zone | Classic Male Cardinal (Scarlet) | Female Cardinal Variant (Warm Buff) | Copic Sketch Marker Match | Crayola Crayon Equivalent |
|---|---|---|---|---|
| Crown Crest & Puffed Breast | #DC2626 (Brilliant Scarlet Red) |
#B48A60 (Warm Fawn-Buff Tan with Red Crest Tips) |
R29 (Lipstick Red) / E33 (Sand) |
Scarlet / Tan |
| Folded Wing & Stepped Tail | #991B1B (Deep Burgundy Crimson) |
#8C3B2B (Russet Red-Tinted Olive Brown) |
R59 (Cardinal) / E18 (Copper) |
Brick Red / Chestnut |
| Conical Seed-Cracking Beak | #F97316 (Vibrant Coral Orange) |
#F97316 (Vibrant Coral Orange entical!) |
YR07 (Cadmium Orange) |
Red-Orange |
| Facial Mask & Throat Bib | #1E293B (Jet Obsidian Black) |
#475569 (Soft Slate Charcoal Gray) |
100 (Black) / C7 (Cool Gray) |
Black / Timberwolf |
| Winter Pine Branch & Leaves | #78350F (Cedar Bark) + #15803D (Pine Green) |
#78350F (Cedar Bark) + #15803D (Pine Green) |
E59 (Walnut) + G17 (Forest Green) |
Sepia + Forest Green |
Fixing Three Proportion Mistakes Beginners Make When Sketching a Cardinal
If your sketch looks slightly off-balance before inking, check these three quick anatomical checkpoints before reaching for your pen:
- Drawing a Tiny Needle Beak Instead of a Heavy Cone: Cardinals crack tough sunflower and safflower seeds all winter, so their bill is remarkably deep at the base. Make sure the vertical height of the beak where it meets the face is roughly equal to two eye diameters stacked together.
- Pointing the Crest Straight Up Like a Traffic Cone: Unless a cardinal is startled, its crown feathers sweep backward at an angle parallel to the forehead bridge. Tilting your three feather tufts toward the upper-right corner immediately gives the head a sleek, natural flow.
- Making the Tail Too Short or Vertical: A real Northern Cardinal's tail makes up nearly half its total length and acts as a seesaw counterweight over the branch. Always follow the 45-degree line from the back straight down through the tail tip behind the perch.
Frequently Asked Questions About Sketching Northern Cardinals
How do you start drawing a cardinal for beginners?
The easiest way to start drawing a cardinal is to sketch a light 45-degree diagonal balance line, place a small circle for the head near the top, and overlap a tilted egg oval twice as large for the body before anchoring the thick conical beak and eye.
What makes a cardinal look like a cardinal in a drawing?
Three anatomical landmarks make a cardinal drawing immediately recognizable: the tall, backward-swept crown crest made of three pointed feather tufts, the heavy cone-shaped seed-cracking bill, and the high-contrast black facial mask wrapping around the eye and throat.
What is the difference between drawing a male and female cardinal?
Male and female northern cardinals share the exact same silhouette, pointed crest, and coral-orange beak, so your pencil outline staysentical. Only the coloring changes: males wear brilliant scarlet plumage (#DC2626) with a jet-black mask, while females wear warm fawn-buff feathers (#B48A60) with reddish wing and crest accents.
How do you shade a red cardinal without making the feathers look muddy?
Never shade red feathers with gray or black pencil, which turns scarlet plumage dull and muddy. Instead, layer a rich burgundy or deep crimson tone (#991B1B / Copic R59) under the belly, wing crease, and tail, and blend a warm coral-red highlight (#EF4444) across the puffed chest.
Bringing Your Winter Songbird Scene to Life With More Animal Guides
Now that your scarlet Northern Cardinal is perched proudly on its pine branch, try sketching a second bird facing the opposite direction on the same bough and coloring it in warm fawn-tan tones to create a complete winter pair. Once you feel comfortable building animals from simple spheres and tilted ovals, keep your sketchbook open and try our step-by-step cartoon puppy drawing tutorial next!