Most beginners who sit down to learn how to draw toast start by sketching a stiff, four-sided box with sharp corners. That single habit makes your drawing look like a ceramic bathroom tile or a slice of cheddar cheese before you even pick up a brown marker. When a real Pullman loaf bakes in a metal pan, the yeast dough puffs upward over the rim and splits into a soft, twin-peaked crown while the lower walls taper gently toward the base. Cartoonists and kawaii illustrators exaggerate that "muffin-top" silhouette to make a humble slice of breakfast bread look pillowy, warm, and full of personality. You don't need an perspective ruler or culinary school training to capture that cozy morning charm on paper. If you can write the letters C, U, and W, you can build a three-dimensional slice of buttered toast in under ten minutes. Grab a pencil, keep your wrist relaxed, and let's toast your sketchbook page line by line.
Gathering Simple Drawing Supplies Before Your First Sketch
You only need a standard 2B graphite pencil, a soft kneaded eraser, two waterproof black fineliner pens, and five warm breakfast markers or crayons to draw cartoon toast cleanly. Keeping your desk setup simple prevents stiff, overworked lines and helps you achieve crisp comic contours that pop off the page.
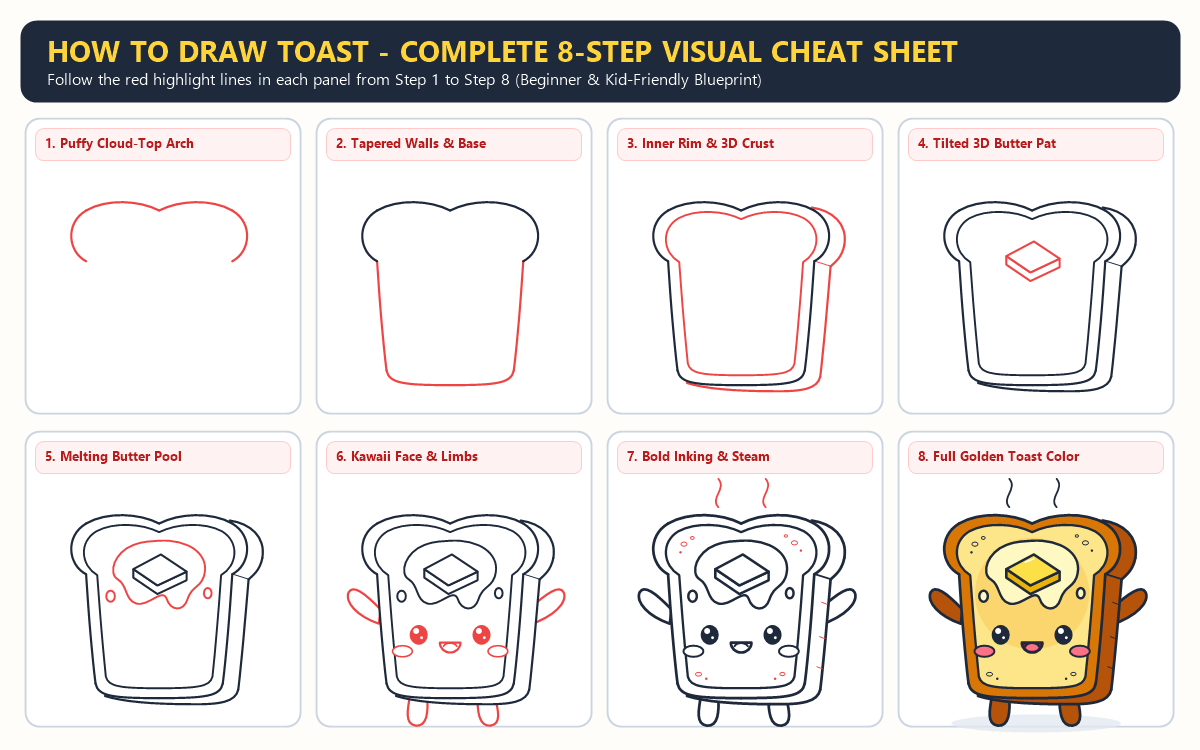
Cute food illustrations rely on clean contrast between thick outer crust lines and delicate interior details like melting butter puddles or toasted crumb pores. If you press too hard with a scratchy H-grade pencil during the early construction phase, erasing the overlap lines inside your butter square will leave muddy gray grooves across the toast face. Pairing a light pencil touch with smooth alcohol markers for comic shading lets you blend a warm golden Maillard browning glow right across the center of the bread without streaking.
- 2B Graphite Pencil Glides smoothly across paper with feather-light pressure so you can block in the cloud-top arch and trapezoid base before committing to ink.
- Kneaded or Vinyl Eraser Lifts away graphite guidelines underneath the melting butter pat without roughening the paper fibers before coloring.
- Waterproof Black Fineliners (0.8mm and 0.4mm) Use the bold
0.8mmnib for the outer crust silhouette and switch to the fine0.4mmtip for tiny crumb pores and rising steam curls. - Heavyweight Smooth Paper (120 gsm or Bristol Board) Prevents warm honey and yellow marker ink from bleeding past your black outlines.
Understanding How Two Simple Shapes Create Perfect Cartoon Toast Proportions
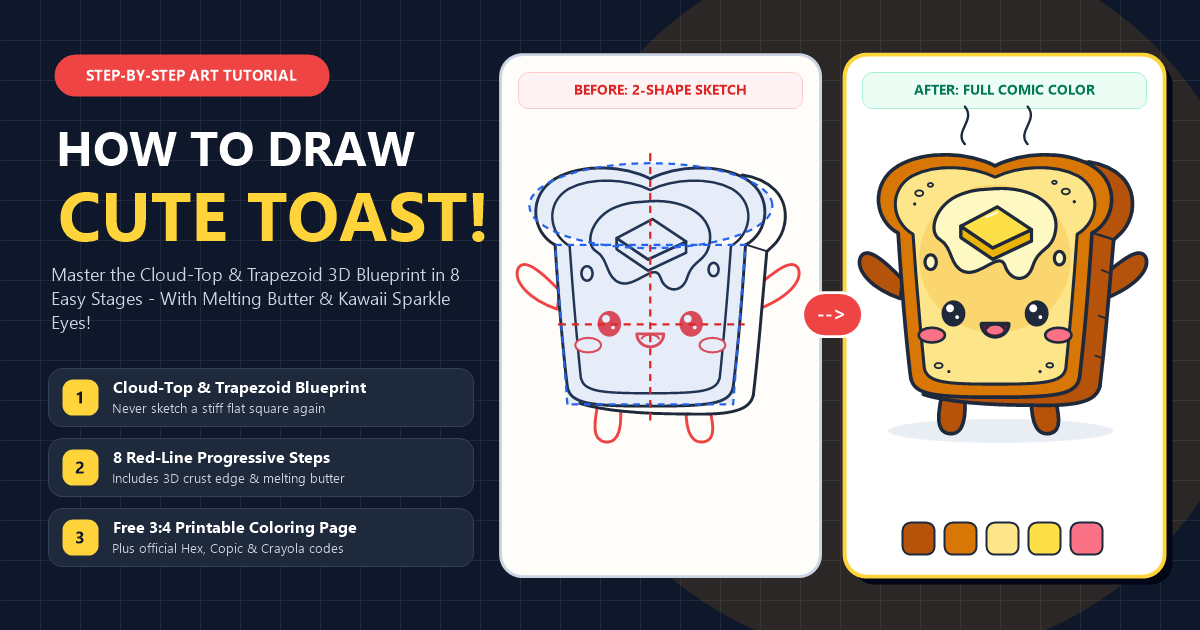
Every convincing slice of cartoon toast is built from two overlapping geometric shapes a wide, horizontal cloud oval on top and a softly tapered trapezoid underneath split down the middle by a vertical symmetry line. Sketching these two foundation guides first prevents the stiff, boxy look that flattens most beginner food drawings.
When you practice fundamental 3D shape construction for beginners, you quickly notice how tiny pinch points create the illusion of softness and weight. Where the wide upper bread crown meets the vertical side walls, the crust tucks inward to form two distinct "neck" indents at roughly one-third of the total height down from the top. Below those indents, angling the left and right walls inward by just five degrees makes the bread slice look bouncy rather than rigid. Adding a narrow parallel strip along the right side and bottom edge then projects the flat silhouette into oblique three-dimensional space, giving your toast chunky diner-style thickness.
Following the Eight Step Visual Blueprint for How to Draw Toast
Learning how to draw toast step by step is easiest when you work from the outer bread silhouette inward to the melting butter and kawaii face. In every stage card below, the bright red strokes highlight the exact new lines to draw right now while earlier lines turn solid black.
Easy Toast Drawing Step by Step
The new lines in each picture show what to add next. Simple shapes will come together to make your toast. Let’s begin!
Step 1: Starts With the Puffy Cloud Top Arch of the Bread
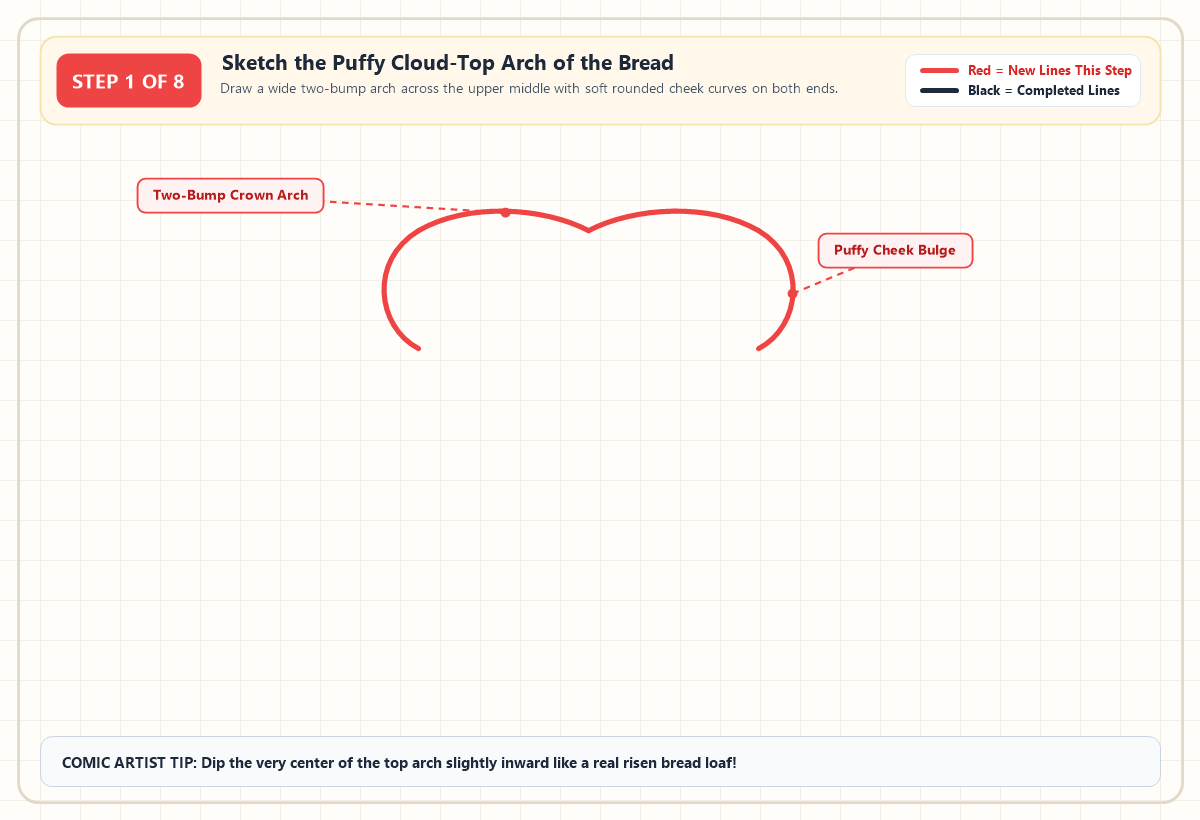
Begin near the upper middle of your paper by sketching a wide, two-bump arch that dips gently in the exact center like a soft bird's wing or the top of a Valentine heart. Instead of stopping at sharp corners, loop both ends of that top arch outward and downward into plump, C-shaped cheek bulges that tuck back inward at the base. That tiny inward pinch at both ends is what gives sliced bread its unmistakable bakery silhouette. Keep your wrist loose so the two upper domes feel airy and symmetrical.
Step 2: Drops the Softly Tapered Side Walls and Rounded Base
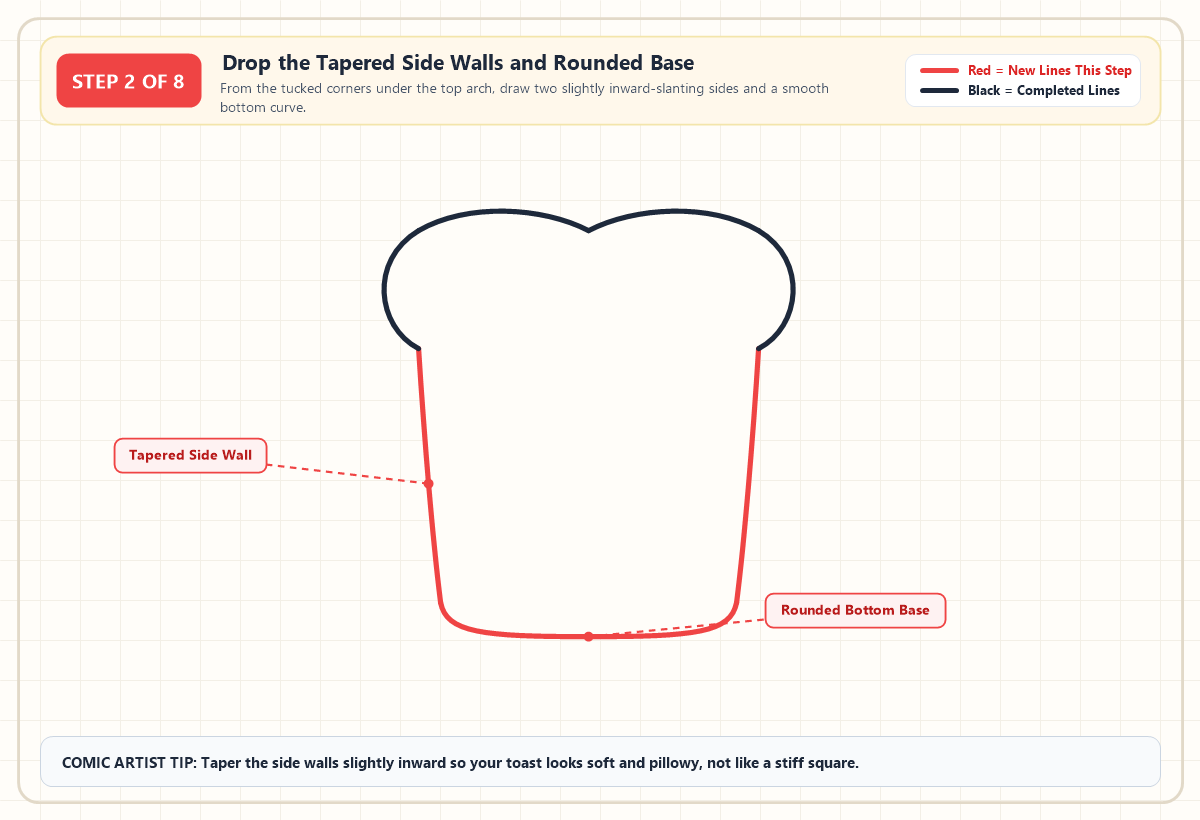
Place your pencil tip right at the left neck indent where your Step 1 arch tucked inward, and pull a smooth, nearly vertical line downward that leans inward toward the center by just a whisper. Repeat that exact gentle inward taper from the right neck indent so the bottom of your slice sits slightly narrower than the shoulders. Connect the two side walls across the bottom with a long, shallow U-shaped curve, rounding off both lower corners smoothly like the edges of a smartphone screen. Never use a ruler here a slight hand-drawn curve makes the bread look freshly baked and squishy.
Step 3: Adds the Inner Rim and Three Dimensional Side Crust
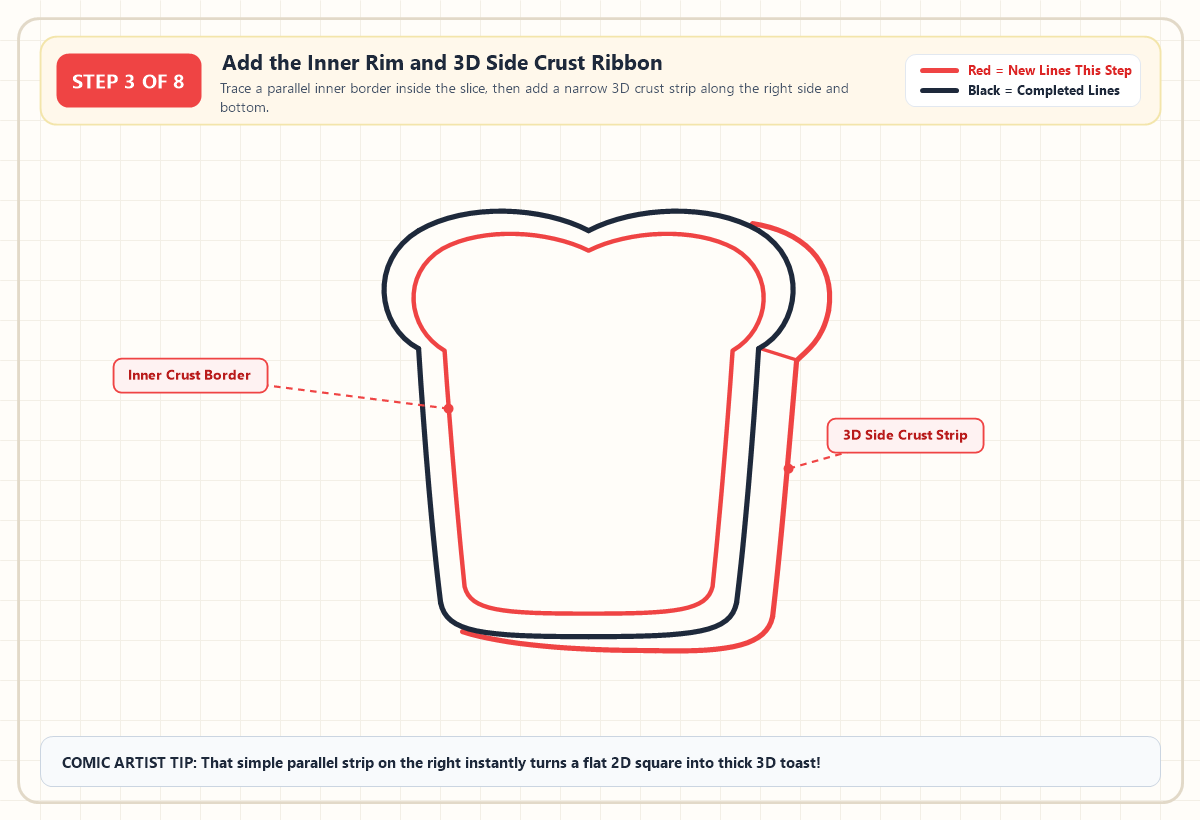
Inside your main bread outline, trace a second parallel line that follows the top cloud arch, the tucked neck indents, the tapered side walls, and the bottom curve about a quarter-inch from the outer edge. This inner frame separates the chewy golden crust rim from the soft crumb face inside. Next, turn your flat drawing into a three-dimensional slice by starting near the top-right crown peak and drawing a parallel outer ribbon down the right side and underneath the bottom base. Add one short diagonal crease line connecting the front right neck indent to the outer 3D edge to lock in the corner perspective.
Step 4: Places the Tilted Square of Butter on the Upper Center
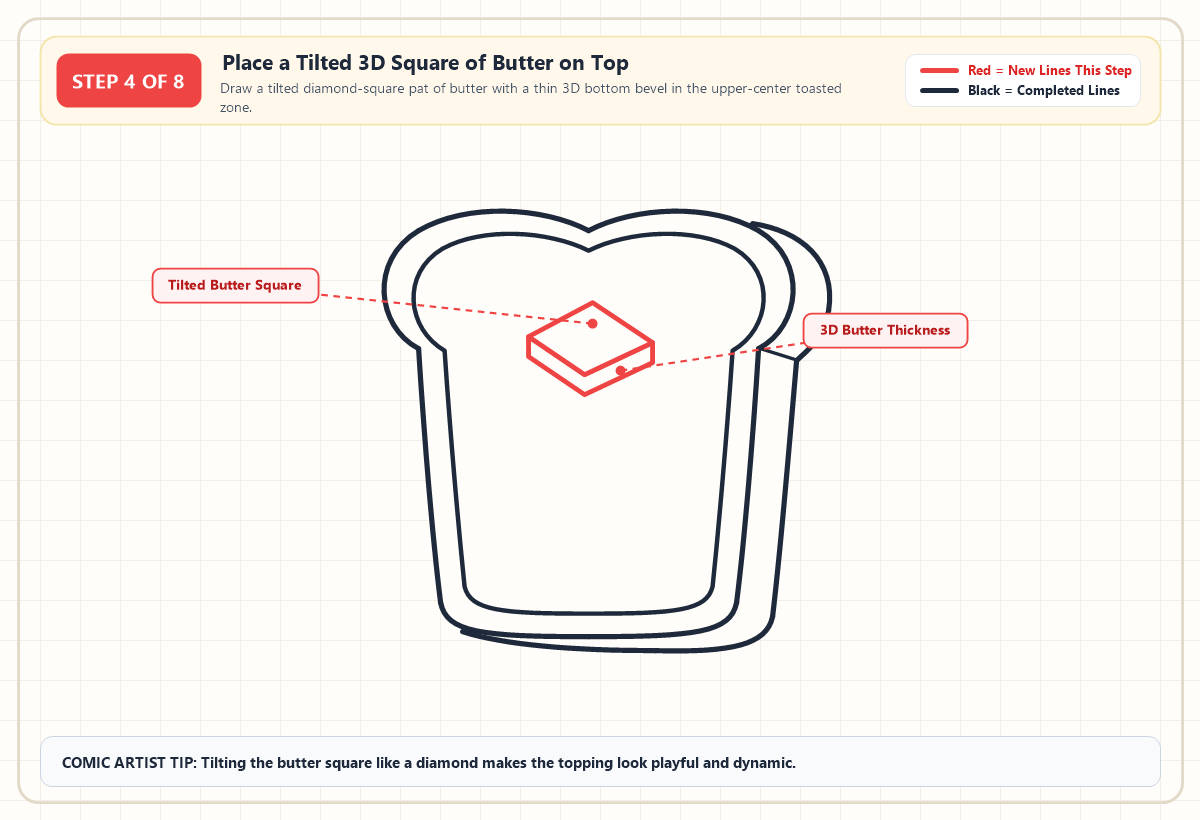
Move into the upper center of the inner crumb area just below the dip of the top arch and draw a slightly tilted diamond-square for the pat of butter. Tilting the square at an angle instead of aligning it horizontally with the bottom crust makes the topping feel dynamic and freshly dropped onto hot bread. Below the two lower edges of that diamond, drop three short vertical lines and connect their bottoms with a parallel V-shape to give the butter pat realistic three-dimensional thickness.
Step 5: Draws the Creamy Melting Butter Pool and Glossy Drops
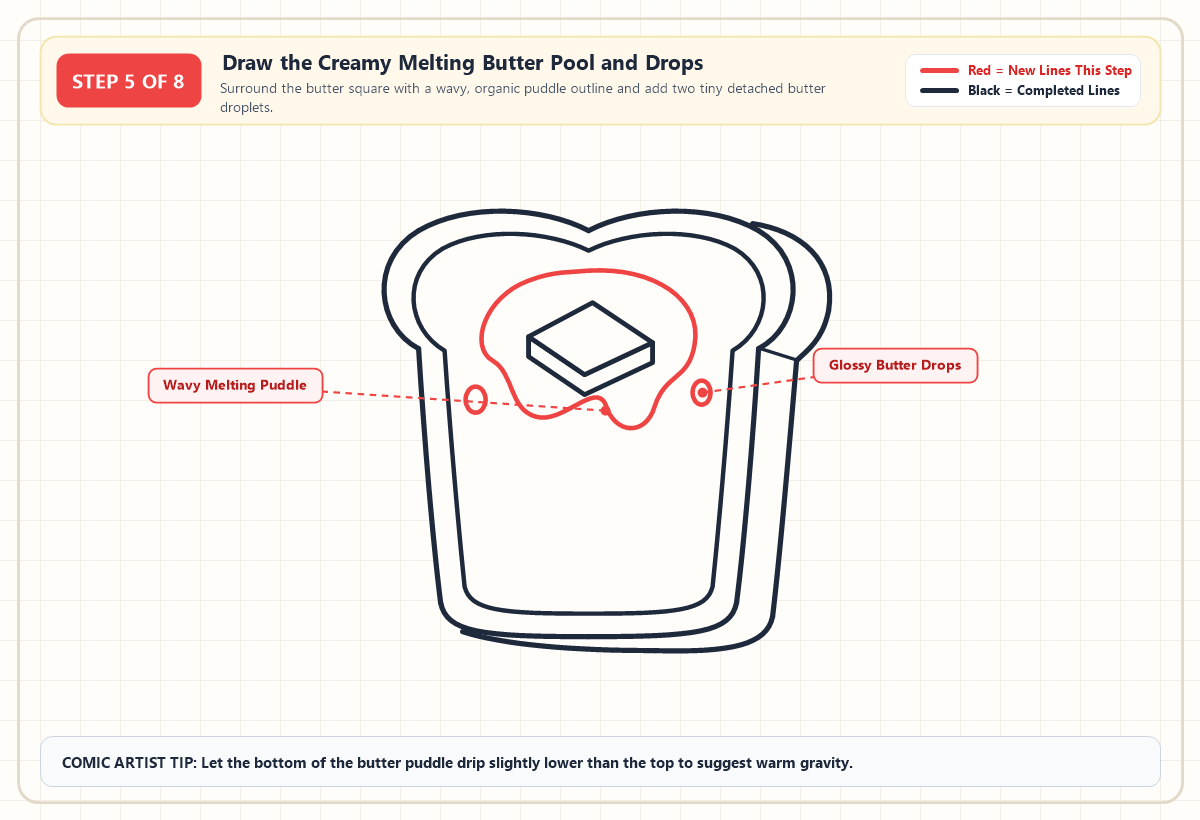
Without a melting puddle, a square on top of bread just looks like a yellow postage stamp. Starting behind the upper edges of your butter pat, sweep a loose, wavy outline around the square that loops downward into two soft, uneven drips underneath its front corner. Let the bottom loops hang slightly lower than the top curve so gravity pulls the melted butter down the face of the slice. Just outside the main puddle on the left and right, sketch two tiny vertical ovals for detached glossy butter droplets.
Step 6: Brings Out the Sparkle Eyes Rosy Cheeks and Happy Smile
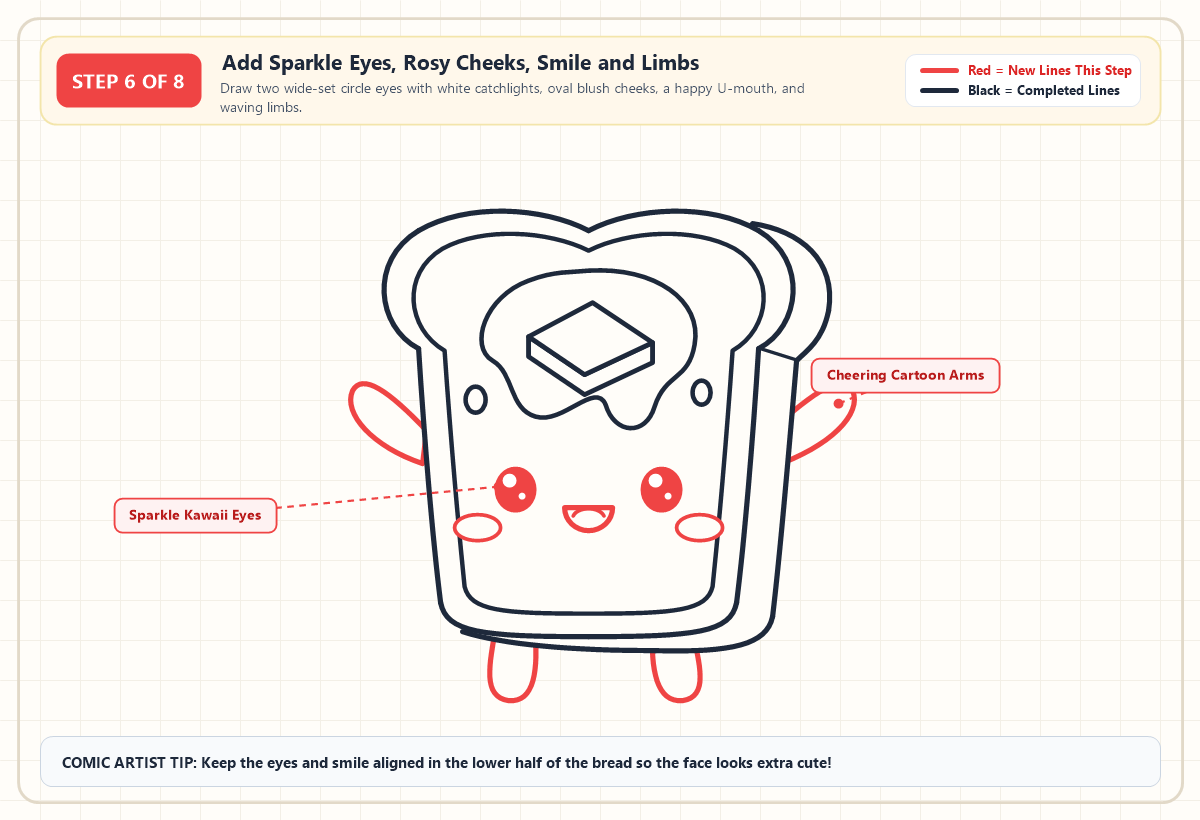
Now bring your breakfast character to life in the open lower half of the bread slice, directly below the melting butter pool. Sketch two large, wide-set circles for the eyes on the same horizontal line, and fill them in dark while leaving one big white circle near the top and one tiny white dot near the bottom of each eye for a glossy kawaii sparkle. Tuck a plump horizontal oval underneath the outer edge of each eye for rosy blush cheeks, and place a small, open U-shaped mouth with a curved tongue line right between the eyes. Finish the pose by adding two stubby cheering arms waving from the left and right crusts and two little rounded feet peeking out beneath the bottom crust.
Step 7: Locks In Bold Comic Ink Lines Crumb Texture and Steam
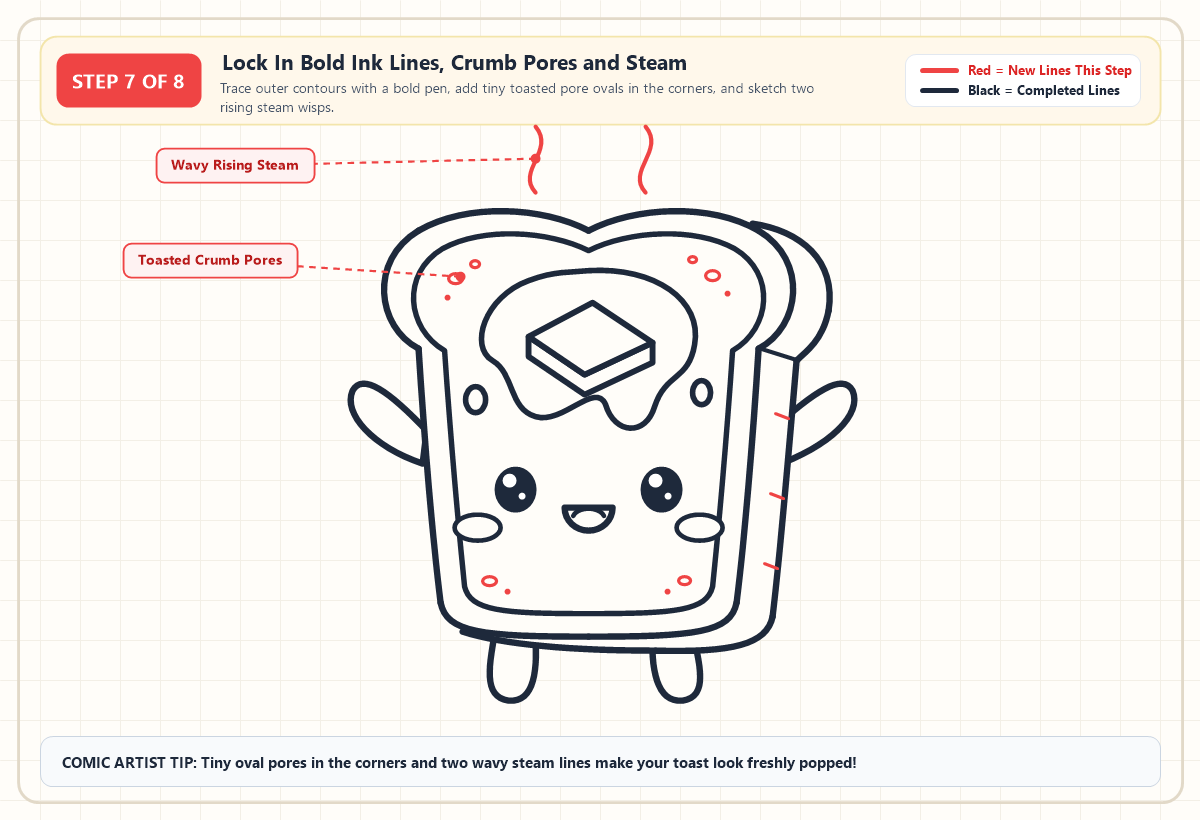
Switch to your 0.8mm black fineliner pen and trace confidently over the outer bread silhouette, the 3D crust edge, the arms, and the legs. Use your finer 0.4mm pen for the inner crust rim, the butter pat, and the facial features so the line hierarchy stays crisp and readable. Once the ink dries completely, erase any remaining pencil marks. To make your drawing read unmistakably as hot toast, scatter two or three tiny open ovals and stipple dots inside the four inner corners of the bread face for airy crumb pores, add three short hash marks along the 3D side crust, and draw two graceful S-curve steam wisps rising above the top crown.
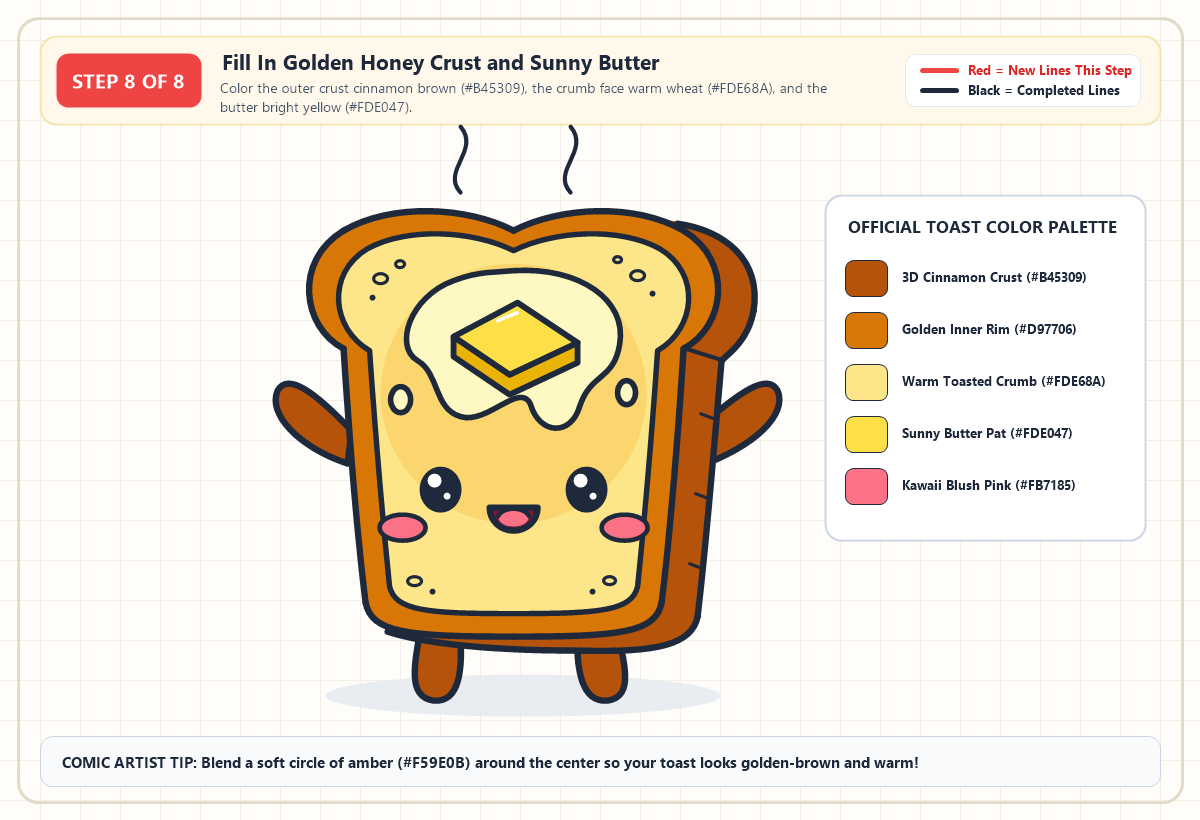
Step 8: Fills In Golden Honey Crust and Sunny Melting Butter
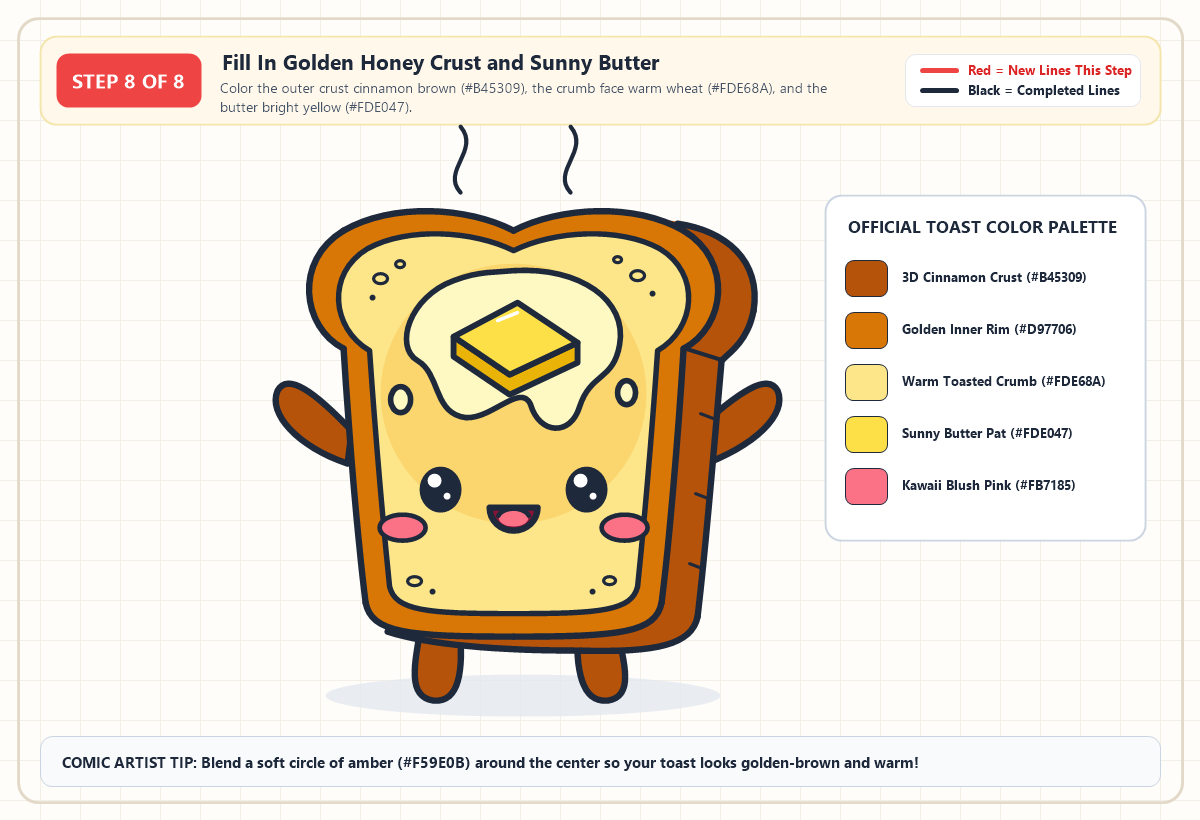
Bring your inked toast into full comic color by laying down a rich cinnamon brown (#B45309) across the 3D right-side crust ribbon, the arms, and the feet to anchor the shadow side of the slice. Color the front crust rim a brighter golden caramel (#D97706), then fill the main crumb face with warm toasted wheat (#FDE68A) and blend a soft circular halo of honey amber (#F59E0B) around the center to mimic oven browning. Fill the melting puddle with pale cream (#FEF9C3), shade the top of the butter pat sunny yellow (#FDE047) with a deeper golden bevel (#EAB308), and pop in coral pink (#FB7185) on the cheeks and tongue.
Printable Toast Drawing PDF
Download the printable PDF to use now or save for later — it prints on A4 and Letter paper.
Print PDFComparing Classic Diner Buttered Toast With Kawaii Jam and Avocado Variations
Once you master the two-shape bread slice and 3D crust ribbon, you can transform the exact same ink drawing into three different breakfast characters simply by swapping your center topping and marker palette. Whether you prefer classic diner buttered toast, glossy strawberry jam, or café-style smashed avocado, the color matrix below gives you exact Hex codes, Copic markers, and Crayola crayon matches for every zone.
| Toast Feature & Zone | Classic Buttered Toast (Hex) | Copic Marker Match | Crayola Crayon Match | Strawberry Jam or Avocado Toast Swap |
|---|---|---|---|---|
| 3D Outer Crust & Limbs | Deep Cinnamon (#B45309) |
E37 (Sepia) |
Raw Sienna / Bittersweet |
Keep E37 for jam toast; swap to darker E59 (Walnut) for rustic whole-wheat avocado toast |
| Front Inner Crust Rim | Golden Caramel (#D97706) |
YR24 (Pale Sepia) |
Goldenrod |
Add tiny white and black sesame seed ovals along the top arch for artisanal café bread |
| Warm Toasted Crumb Face | Toasted Wheat (#FDE68A) + Honey Glow (#F59E0B) |
Y21 (Buttercup Yellow) + YR21 |
Peach / Dandelion |
Lightly stipple E53 (Raw Silk) dots around the edges to mimic multigrain wheat flecks |
| Center Topping & Puddle | Sunny Butter (#FDE047) + Cream Pool (#FEF9C3) |
Y15 (Cadmium Yellow) + Y00 |
Lemon Yellow / Canary |
Skip the square pat and color the wavy puddle glossy ruby (#E11D48) for jam or sage green (#84CC16) for avocado |
| Kawaii Cheeks & Tongue | Coral Blush Pink (#FB7185) |
RV23 (Pure Pink) |
Carnation Pink |
Add a tiny curved white gel-pen highlight inside each pink cheek oval for an extra glossy sticker finish |
Fixing Three Common Mistakes Beginners Make When Sketching Bread Slices
Even experienced cartoonists can accidentally draw a stiff, lifeless piece of bread if geometric shortcuts creep into the early pencil stage. Watching out for these three common proportion traps will keep your toast looking warm, thick, and expressive on your very first try.
- Drawing a flat horizontal roof instead of a dipped cloud crown Real bread dough rises higher on the left and right lobes than in the center crease. Always dip the middle of your Step 1 top arch slightly downward and pinch the two neck corners inward where the crown meets the side walls.
- Forgetting to taper the bottom corners of the 3D crust ribbon If your right-side 3D thickness strip ends in a sharp 90-degree point at the bottom-right corner, the perspective will clash with your rounded front slice. Curve the outer 3D corner smoothly so it hugs the inner contour at a steady, even width.
- Crowding the kawaii eyes up into the melting butter puddle Placing the eyes in the upper half of the bread makes the character look cramped and cross-eyed. Anchor both eyes on the horizontal lower-third line so the melting butter pat has plenty of breathing room above the forehead.
Frequently Asked Questions About Sketching Cute Breakfast Characters
How do you make a drawing of toast look like toast instead of plain bread?
To make a drawing read instantly as warm toast rather than raw sandwich bread, add three unmistakable visual cues: a tilted square of butter sitting in a wavy melting puddle, two rising S-curve steam wisps above the top crust, and clusters of tiny oval crumb pores stippled inside the toasted corners.
How do you draw a slice of toast in 3D for beginners?
You can turn a flat 2D bread drawing into 3D toast in ten seconds by adding a narrow, parallel crust ribbon along the right side and bottom edge. Connect the outer top-right bulge and neck indent to this second parallel line with a short diagonal crease, then shade that side strip a darker cinnamon brown.
Where should you place the eyes and mouth on cute kawaii toast?
Always place the eyes, rosy cheeks, and mouth along the horizontal lower-third line of the bread slice, directly underneath the melting butter puddle. Setting the eyes wide apart and placing the tiny U-shaped mouth right between their bottom edges creates the classic Japanese kawaii baby-schema proportion.
What exact colors do I need to color cartoon toast realistically?
You need five warm breakfast shades to color cartoon toast with convincing depth: deep cinnamon brown (#B45309) for the 3D side crust, golden caramel (#D97706) for the front crust rim, warm toasted wheat (#FDE68A) with honey amber shading (#F59E0B) for the crumb face, sunny yellow (#FDE047) for the butter, and coral pink (#FB7185) for the cheeks.
Bringing Your Own Breakfast Comic Strip to Life With Cute Food Friends
Now that a warm, butter-topped slice of toast is cheering up from your sketchbook page, don't leave it sitting all by itself on a blank table. Sketch a smiling ceramic coffee mug right beside its left arm, or draw a sunny-side-up fried egg high-fiving its right hand to build a full morning diner scene. Once you finish coloring your breakfast crew, keep your cartooning momentum rolling by jumping over to our step-by-step guide on how to draw Odie so you can add a floppy-eared comic strip pup begging for a bite at the edge of the breakfast table.