Most beginners who sit down to learn how to draw a kayak make the mistake of sketching a flat, horizontal banana shape from a stiff side view. That single habit flattens your watercraft into a two-dimensional surfboard or a hollowed-out log before you even add the paddle. Thousands of years ago, Indigenous Inuit, Yup'ik, and Aleut hunters across the Arctic engineered the original qajaq a sleek, enclosed skin-on-frame hunting boat built to slice silently through icy swells without taking on water. Modern fiberglass and rotomolded touring kayaks inherit that exact aerodynamic spindle geometry, pairing a pointed bow and stern with a raised central cockpit rim and a double-bladed paddle. You don't need a marine blueprint or complex perspective grids to capture that buoyant three-dimensional form on paper. If you can sketch simple O, U, S, and X curves, you can build a vibrant adventure kayak in under twelve minutes. Grab a pencil, tilt your wrist at a relaxed angle, and let's launch your drawing stroke by stroke.
Gathering Simple Drawing Supplies Before Your First Sketch
You only need a standard 2B graphite pencil, a soft kneaded eraser, two waterproof black fineliner pens, and five high-visibility outdoor markers or crayons to draw a cartoon kayak cleanly. Keeping your art kit minimal stops you from overworking the hull curves and guarantees crisp comic linework that pops off the page.
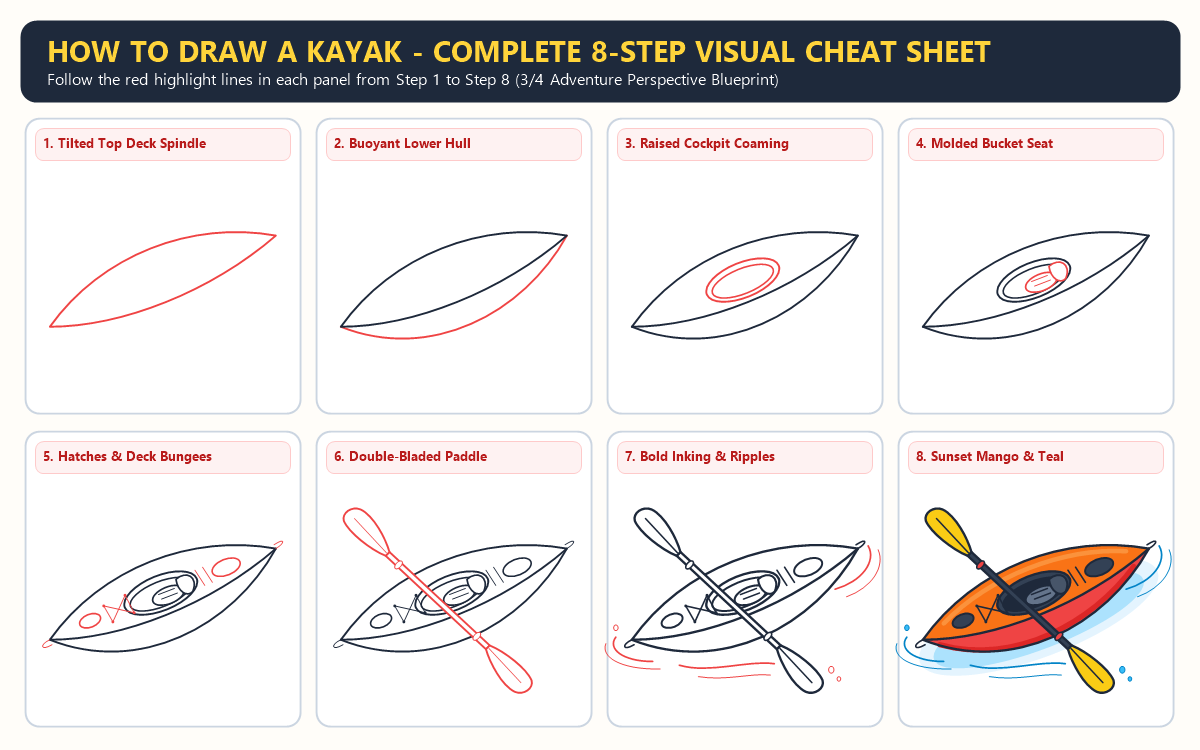
Watercraft illustrations live or die by the smoothness of the long sweeping curves running from bow to stern and the clean overlap where the paddle shaft crosses the forward deck. If you press too hard with a scratchy H-grade pencil during the early layout stage, erasing the deck lines underneath your diagonal paddle in Step 6 will leave grey ghost tracks across your boat. Using a soft graphite lead first and finishing with waterproof ink pens lets you layer bright sunset orange, coral red, and glacier teal marker washes without a single smudge.
- 2B Graphite Pencil Glides smoothly across your sketchbook page with feather-light pressure so you can map out the 22-degree centerline axis and spindle oval before committing to ink.
- Kneaded or Vinyl Eraser Lifts away the hidden deck and bungee lines underneath the overlapping paddle shaft without roughing up the paper grain.
- Waterproof Black Fineliners (0.8mm and 0.4mm) Use the bold
0.8mmtip for the outer hull silhouette and paddle blades, then switch to the fine0.4mmnib for crisscross deck bungees, seat ribs, and water ripples. - Heavyweight Smooth Paper (120 gsm or Marker Pad) Keeps vibrant orange, red, and blue alcohol markers or gel pens from feathering outside your inked contours.
Understanding Why Boat Designers Build Kayaks From Three Simple Shapes
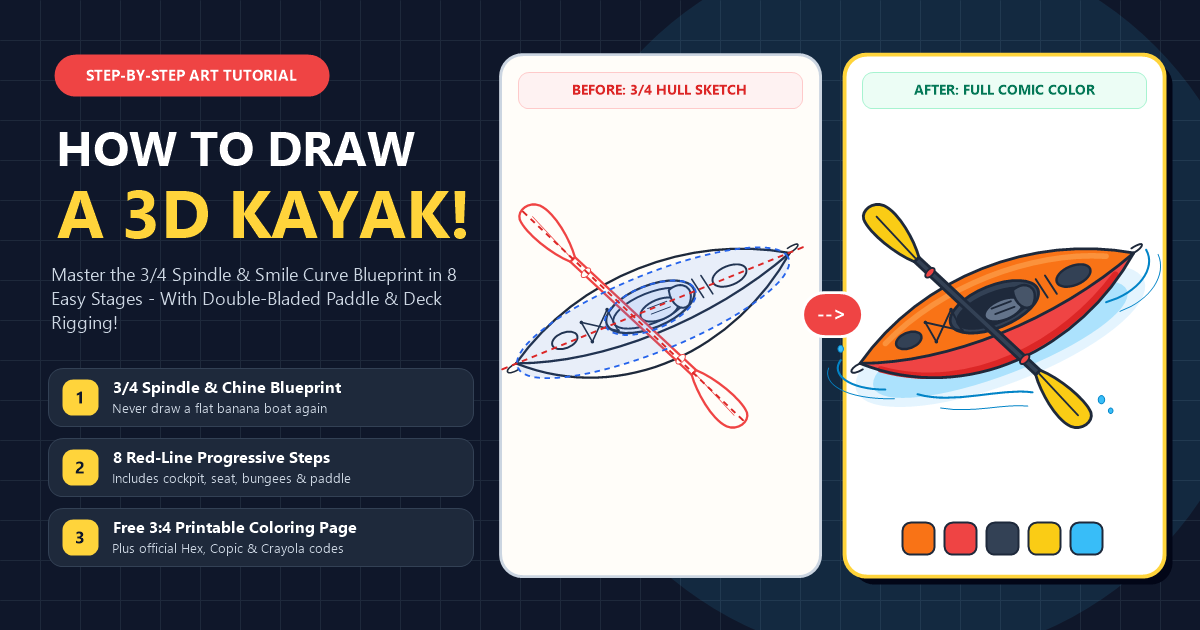
Every convincing three-dimensional kayak drawing relies on three simple geometric guides a tilted spindle oval for the top deck, a smaller center ellipse for the cockpit opening, and a diagonal counter-axis for the double-bladed paddle. Blocking in these three construction shapes at a 22-degree tilt immediately solves foreshortening and stops your boat from looking flat.
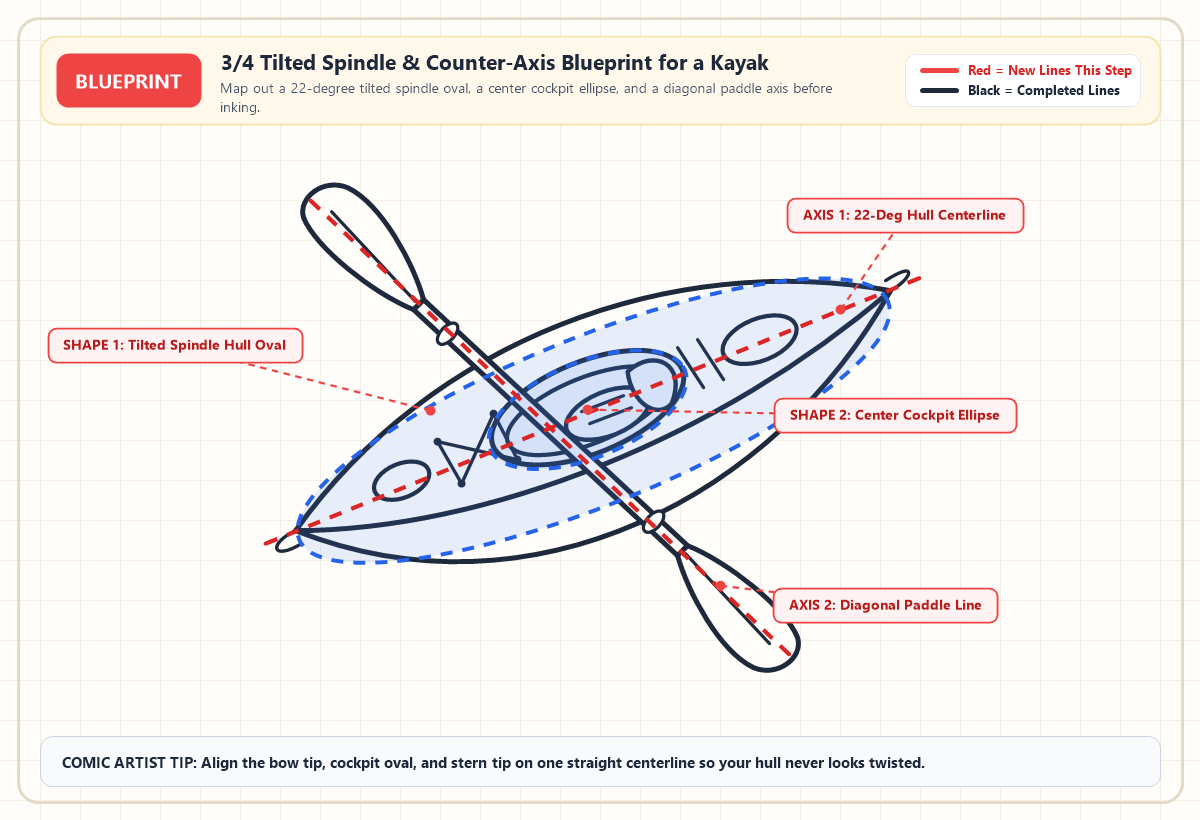
When you practice foundational 3D shape construction for beginners, you quickly discover that viewing an object from a three-quarter angle reveals two surfaces at once the flat top deck and the curved side wall of the hull. Where those two surfaces meet is a long, sweeping seam called the chine line. By angling your primary centerline axis upward from bottom-left to top-right at roughly 22 degrees, the top deck naturally compresses into a sleek, leaf-shaped spindle while the lower hull drops underneath like a deep smile curve. Crossing that upward boat axis with a downward diagonal paddle axis creates an instant X-composition that gives your sketch energetic outdoor motion even while floating in calm water.
Following the Eight Step Visual Blueprint for How to Draw a Kayak
Learning how to draw a kayak step by step is effortless when you build from the outer top deck down to the buoyant lower hull, then work inward to the cockpit, deck rigging, and foreground paddle. In every stage card below, the bright red lines show the exact new strokes to add right now while completed lines from earlier stages turn solid black.
Easy Kayak Drawing Step by Step
The new lines in each picture show what to add next. Simple shapes will come together to make your kayak. Let’s begin!
Step 1: Sketches the Tilted Top Deck Spindle From Bow to Stern
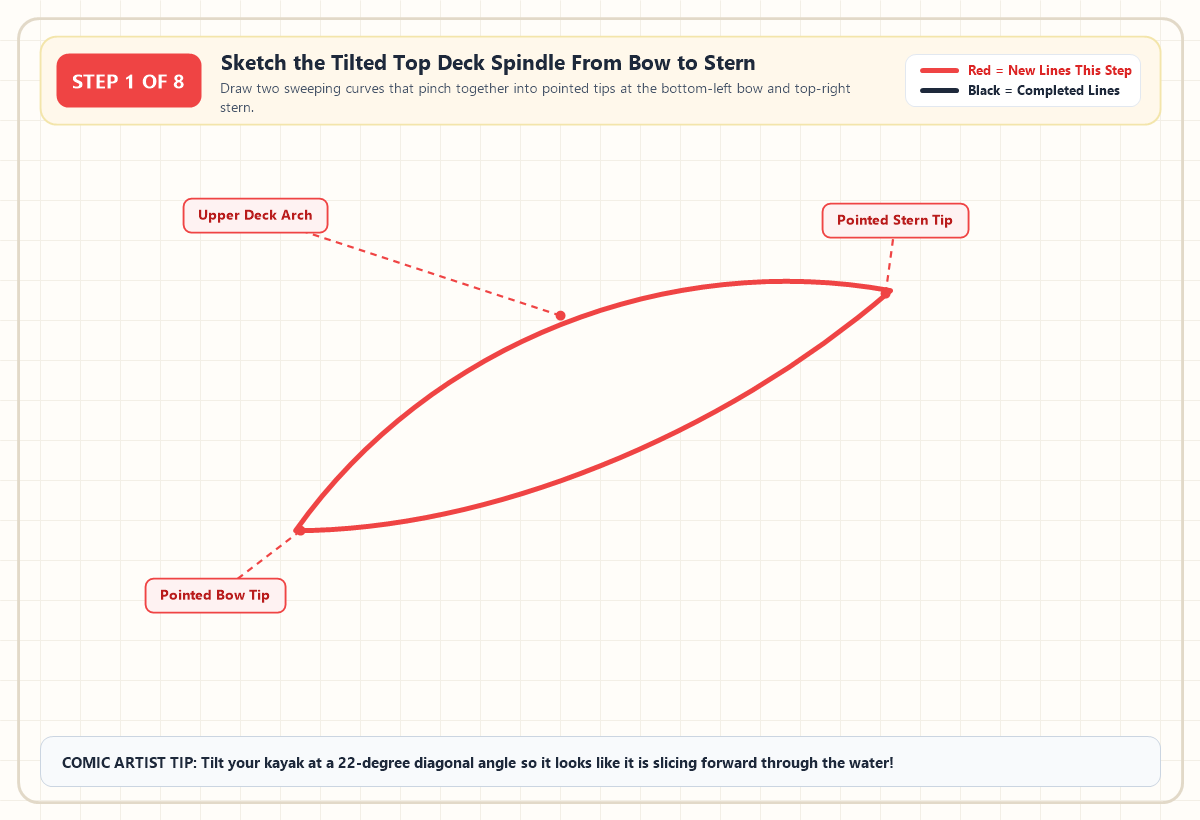
Start by picturing a diagonal line rising from the lower-left side of your paper toward the upper-right corner at a gentle 22-degree angle. Along that invisible path, draw a long, arching upper curve that sweeps upward over the middle of the boat and tapers down to sharp, pinched points at the bottom-left bow and top-right stern. Connect those exact same two pointed tips underneath with a flatter, smoother S-curve to complete a sleek leaf or spindle silhouette. Keep both pointed tips slightly upturned boat builders call this upward curve rocker, and it helps a real kayak ride over waves instead of plowing straight under them.
Step 2: Drops the Buoyant Lower Hull Curve Underneath
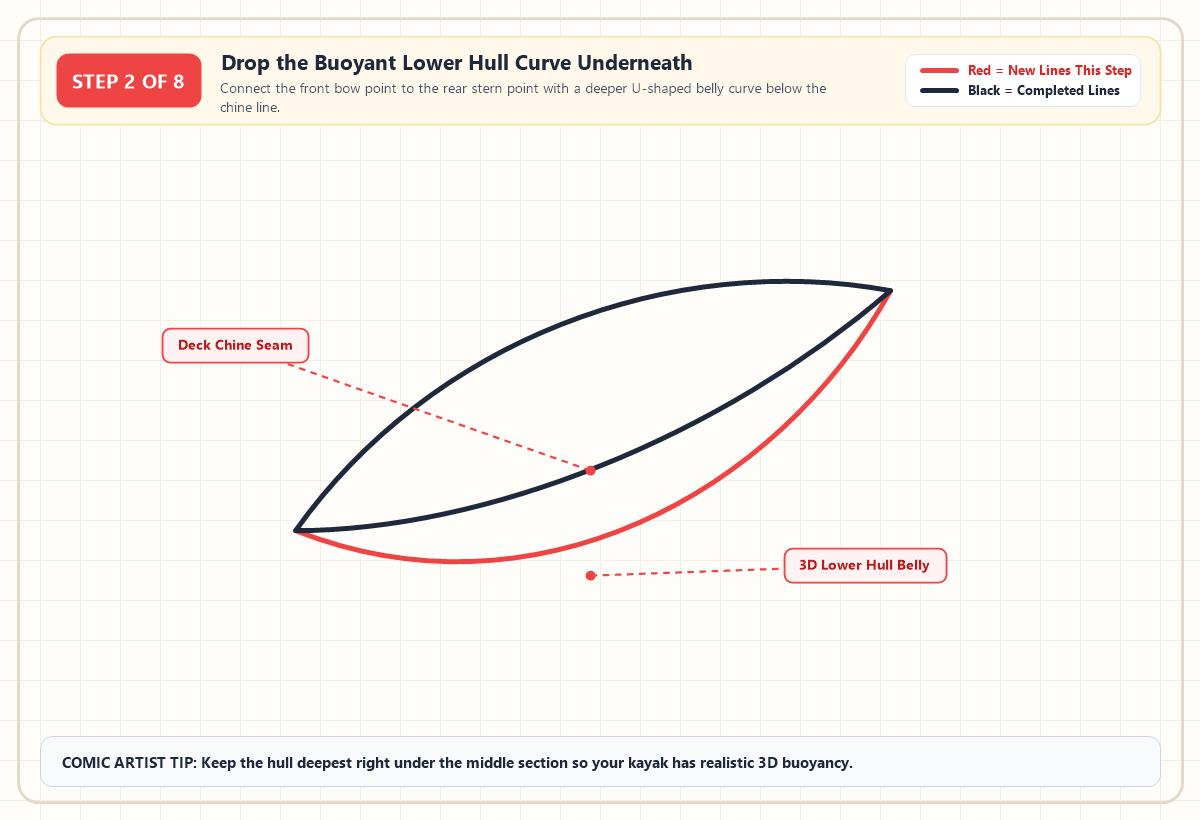
Your Step 1 spindle represents the flat top deck of the boat, and the lower edge of that spindle now acts as the chine seam separating the top deck from the side wall. Place your pencil back on the sharp bottom-left bow point and pull a deeper, fuller U-shaped belly curve underneath the boat that climbs smoothly back up to meet the top-right stern point. Notice how this lower hull line swells widest directly below the center of the kayak and pinches tight into the bow and stern tips. That single sweeping belly line transforms a flat leaf shape into a buoyant, three-dimensional hull that displaces water.
Step 3: Frames the Raised Cockpit Coaming Ring in the Center
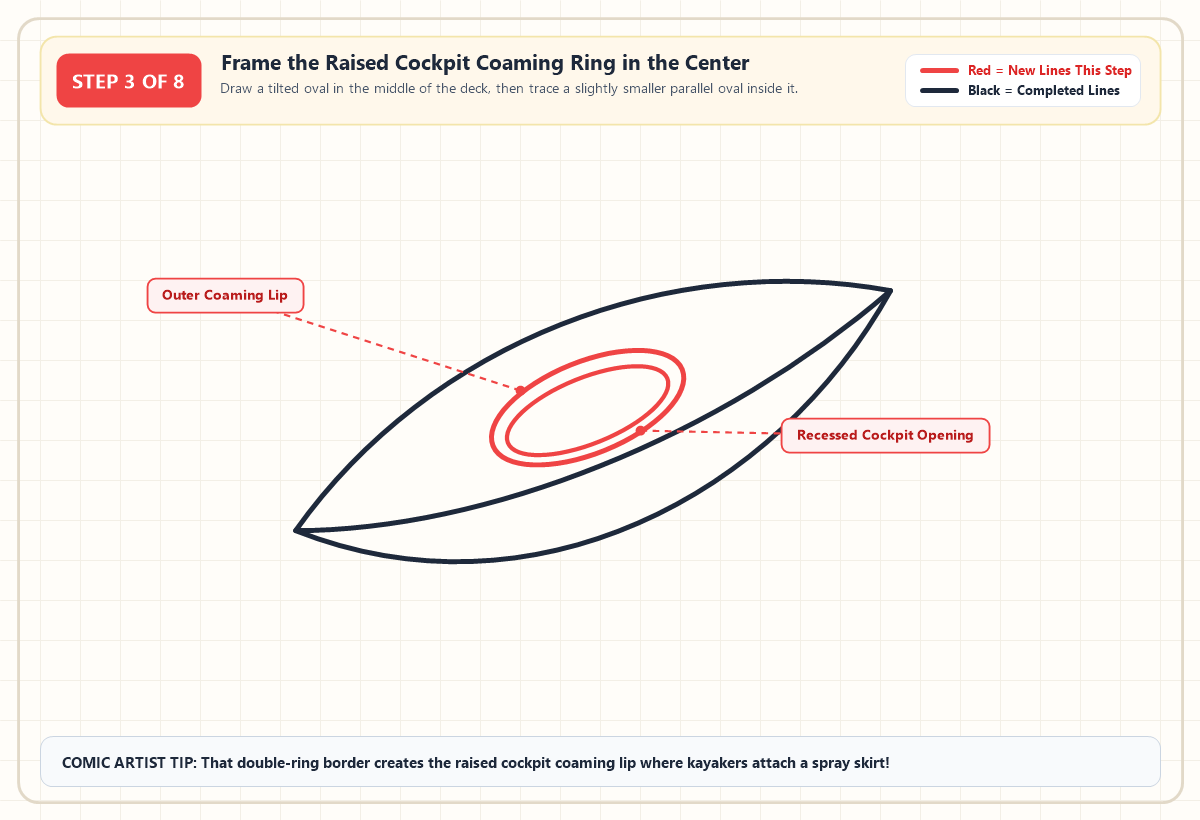
Move right into the middle of your top deck spindle and sketch an elongated, tilted oval that follows the exact same 22-degree angle as the boat hull. Make sure this oval sits centered between the upper and lower deck edges without touching either border. Just inside that first oval, trace a second, slightly smaller parallel oval about an eighth of an inch inward. This double-ring frame creates the raised cockpit coaming the sturdy molded lip around the seating opening that keeps splashing water off the paddler's lap and holds a waterproof spray skirt in place.
Step 4: Tucks the Ergonomic Bucket Seat Inside the Cockpit
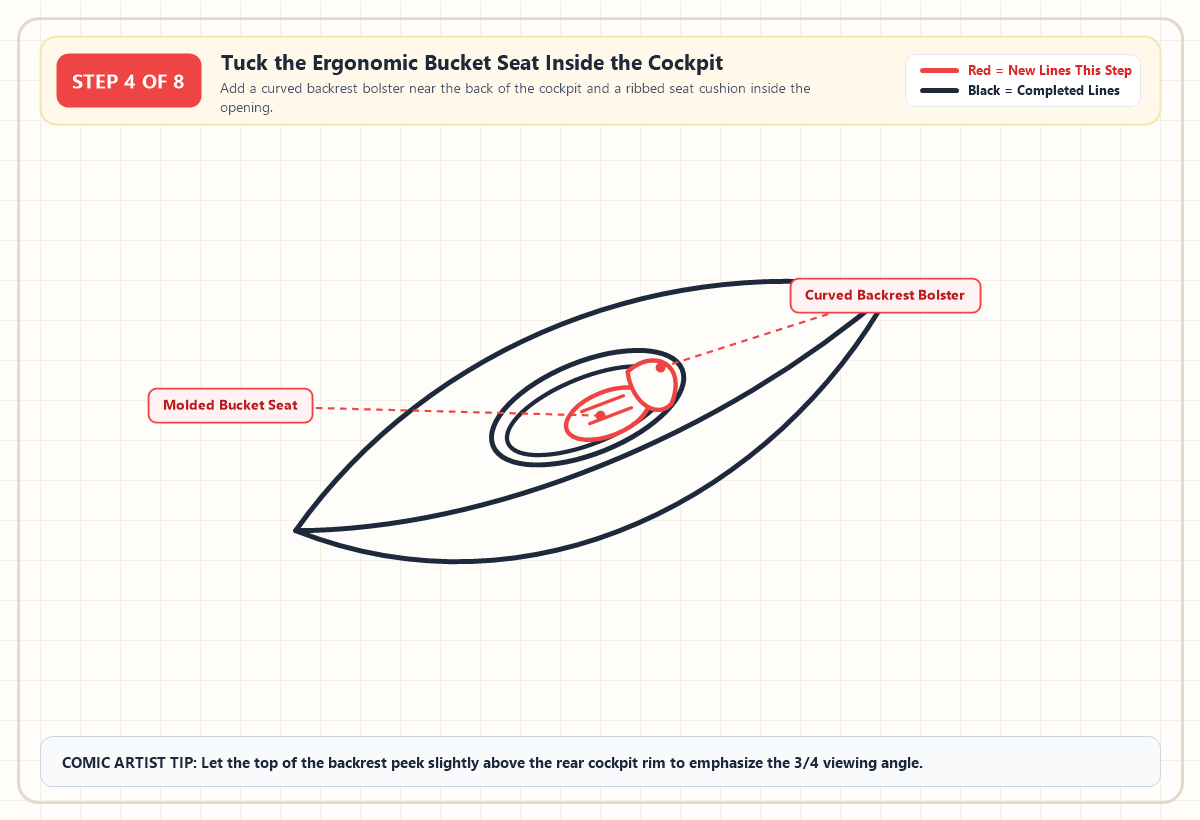
An empty oval hole makes a kayak look unfinished, so let's build the padded interior seat inside the rear half of the cockpit opening. Toward the upper-right back end of the cockpit oval, draw a plump, kidney-shaped backrest bolster that curves upward and overlaps the rear coaming rim slightly. Directly in front of that backrest, tuck a smaller tilted oval on the cockpit floor for the molded bucket seat cushion, and add two short parallel lines down its center for ergonomic drainage grooves. Letting the top of the backrest peek slightly above the back rim reinforces the three-quarter camera angle.
Step 5: Adds Watertight Storage Hatches and Deck Bungee Cords
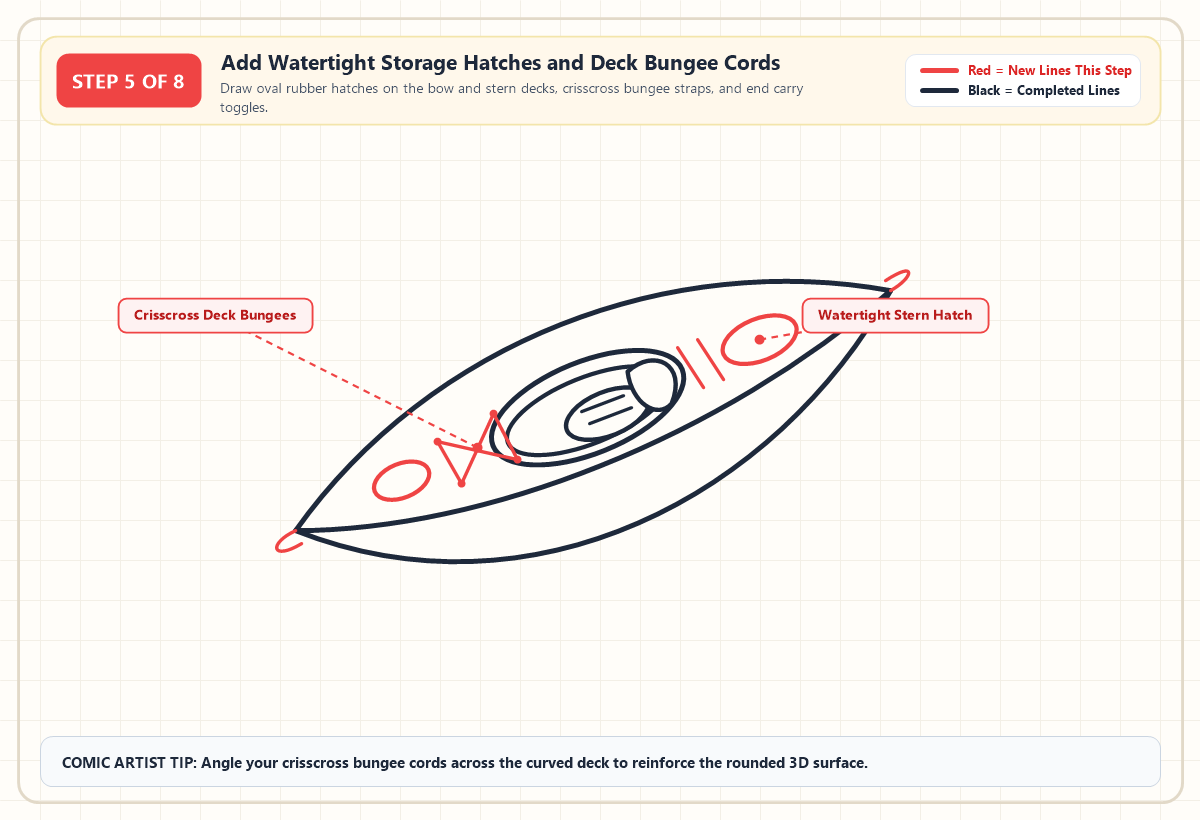
Real touring kayaks carry dry bags and camping gear inside sealed compartments fore and aft of the cockpit, and sketching those deck details makes your drawing look authentic. On the narrow front bow deck toward the bottom-left, draw a small tilted oval for the front rubber day hatch. On the wider rear stern deck toward the top-right, sketch a larger tilted oval for the main stern bulkhead hatch. Between the front hatch and the cockpit rim, draw an X-shaped crisscross pattern of straight elastic bungee cords anchored by four tiny black deck-loop dots, add two parallel bungee straps just behind the cockpit, and loop a small U-shaped toggle carry handle off both pointed tips of the hull.
Step 6: Lays the Double Bladed Paddle Across the Forward Deck
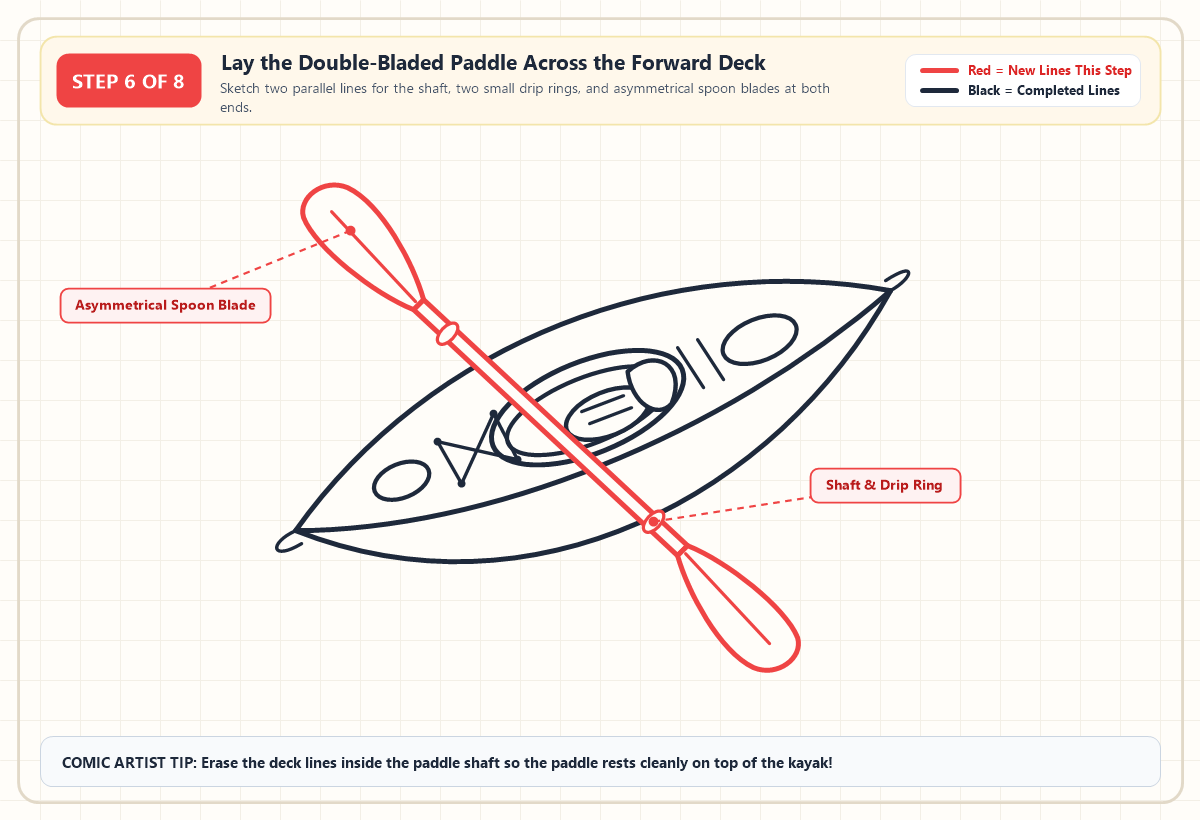
Unlike a canoe oar that only has one blade, a kayak paddle features two blades mounted on opposite ends of a long shaft so the paddler can alternate left and right strokes seamlessly. Across the front edge of the cockpit and bow bungees, draw two long, closely spaced parallel straight lines running diagonally from upper-left to lower-right. Use your kneaded eraser right away to clean out the kayak deck lines trapped inside those two parallel shaft lines so the paddle sits solidly on top of the boat. Near both ends of the shaft, draw a tiny oval collar for the rubber drip rings, then flare the ends outward into two elongated, asymmetrical spoon blades with a straight center spine rib down each blade.
Step 7: Inks Bold Comic Contours and Dynamic Water Ripples
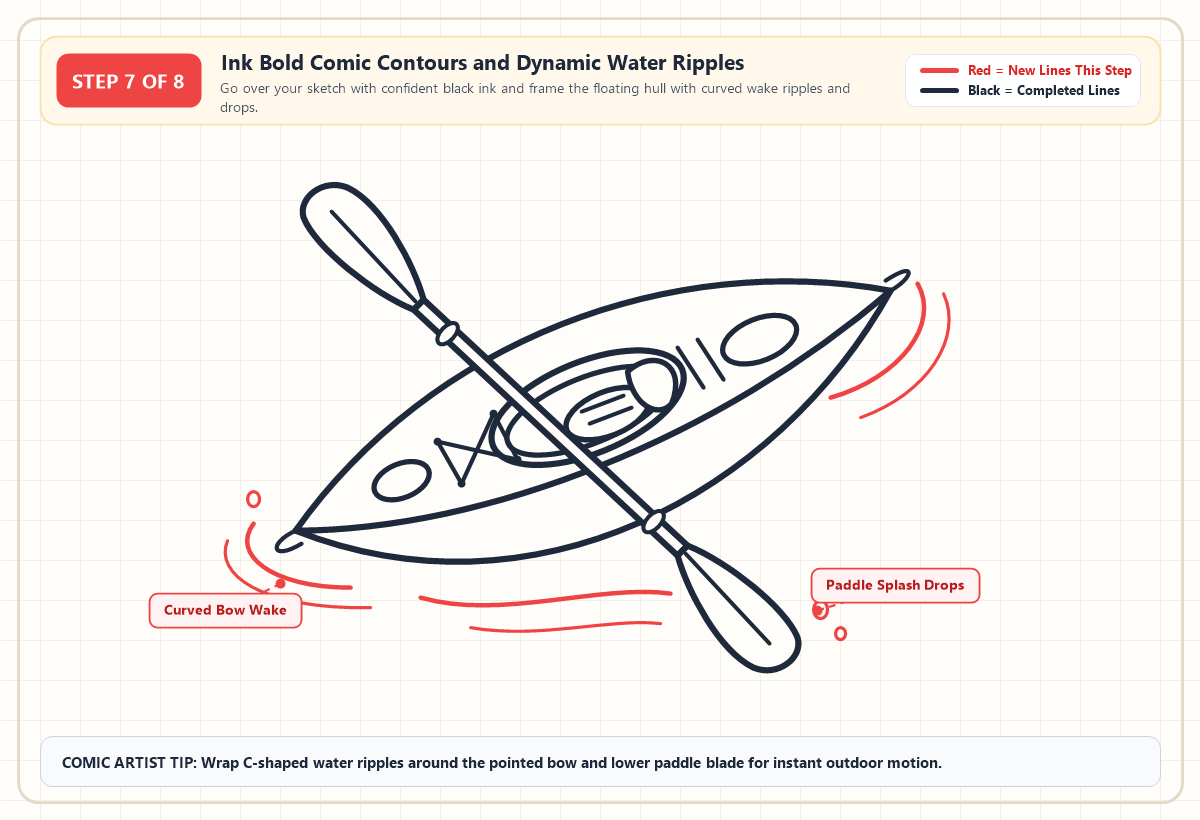
Pick up your 0.8mm waterproof black fineliner and trace cleanly over the outer kayak hull, the cockpit coaming, the rubber hatches, and the foreground paddle. Switch to your finer 0.4mm pen for the interior seat grooves, the crisscross bungee cords, and the blade ribs so those secondary details don't crowd the main outline. Once your ink is bone-dry and all stray pencil guidelines are erased, anchor the boat in water by sketching two curved, C-shaped wake ripples wrapping around the pointed bow and stern, two gentle undulating wave lines underneath the center hull belly, and three small teardrop splash droplets near the bow and lower paddle blade.
Step 8: Layers Sunset Mango Hull Gradients and Glacier Water
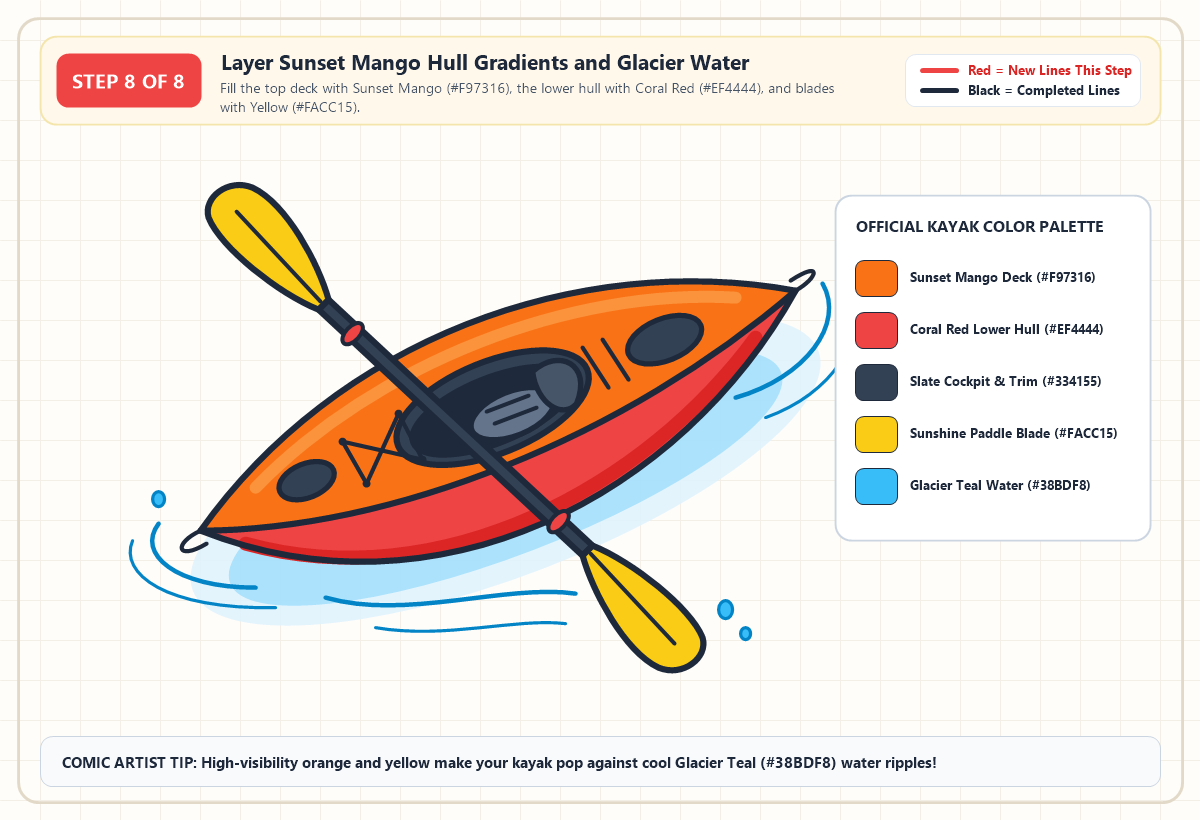
Real sea and river kayaks are molded in high-visibility safety colors so rescue boats and fellow paddlers can spot them easily against dark water. Fill the entire top deck spindle with vibrant Sunset Mango orange (#F97316) and leave a lighter warm orange highlight ribbon (#FB923C) hugging the upper deck arch to suggest bright overhead sunlight. Shade the lower hull belly underneath the chine line with rich Coral Red (#EF4444) and deepen the bottom keel shadow with crimson (#DC2626) to make the side of the boat curve away from the light. Color the cockpit coaming, rubber hatches, and paddle shaft in crisp Charcoal Slate (#334155), pop in bright Sunshine Yellow (#FACC15) on both paddle blades, and wash a cool oval pool of Glacier Teal (#38BDF8 and #E0F2FE) underneath the floating hull.
Printable Kayak Drawing PDF
Download the printable PDF to use now or save for later — it prints on A4 and Letter paper.
Print PDFComparing Touring Kayaks With Open Canoes and Exact Color Swatches
Many beginner artists accidentally blend kayak and canoe features together, ending up with an open wooden boat paddled with a two-bladed stick. While both watercraft come to pointed tips at the bow and stern, a touring kayak features an enclosed top deck that sheds waves, a sunken bucket seat inside a narrow cockpit rim, and a double-bladed paddle. If you ever want to sketch its open-topped cousin for a summer camp lake scene, you can compare the anatomy in our step-by-step open canoe drawing guide and use the reference matrix below to match exact Hex codes, Copic markers, and Crayola crayons for every part of your boat.
| Watercraft Zone & Feature | Touring Kayak Anatomy (This Guide) | Open Canoe Anatomy Comparison | Official Hex Code | Copic Sketch & Crayola Match |
|---|---|---|---|---|
| Top Deck & Gunwales | Enclosed curved deck shedding water with bow/stern hatches and bungee cords | Wide-open top hull with exposed wooden ribs and narrow gunwale rails | Sunset Mango (#F97316) |
Copic YR07 (Cadmium Orange) / Crayola Mango Tango |
| Lower Hull & Chine Profile | Sleek low-profile V-chine belly sitting deep in the water for stability | Tall, high-sided curved walls riding high above the waterline | Coral Red (#EF4444) |
Copic R27 (Cadmium Red) / Crayola Scarlet |
| Cockpit, Hatches & Shaft | Raised oval coaming lip (#334155) with recessed bucket seat (#475569) |
Flat wooden or webbed bench thwarts suspended across the open hull | Charcoal Slate (#334155) |
Copic C7 (Cool Gray No. 7) / Crayola Outer Space |
| Paddle & Propulsion | Long double-bladed shaft with asymmetrical spoon blades and drip rings | Short single-bladed oar with a T-grip handle on one end | Sunshine Yellow (#FACC15) |
Copic Y17 (Golden Yellow) / Crayola Dandelion |
| Water Wake & Splash Drops | Crisp C-shaped bow ripples and oval glacier reflection pool underneath | Gentle broad wake arcs trailing behind a wider flat stern | Glacier Teal (#38BDF8) |
Copic B02 (Robin's Egg Blue) / Crayola Cerulean |
Fixing Three Proportion Mistakes Beginners Make When Sketching Boats
Even when you follow a step-by-step guide, three subtle proportion traps can make a watercraft sketch look lopsided or flat. Checking your pencil lines against these quick fixes before you pick up your black fineliner will keep your kayak looking sleek and seaworthy.
- Forgetting the deep lower hull belly underneath the chine line If your Step 2 bottom curve hugs the Step 1 chine line too closely, your kayak will look like a paper-thin surfboard. Drop the center of the lower hull belly at least a full inch below the chine seam so the boat has realistic three-dimensional depth and buoyancy.
- Tilting the cockpit oval at a different angle than the hull Beginners often draw the kayak hull on a diagonal tilt but sketch the Step 3 cockpit oval completely horizontal. That mismatch makes the cockpit look like it is sliding off the side of the deck. Always align the long axis of your cockpit oval and storage hatches with your 22-degree centerline from bow to stern.
- Drawing tiny round lollipop circles on the ends of the paddle Real kayak paddle blades are long, slightly asymmetrical spoons that measure nearly a third of the total paddle length. Make sure each blade starts narrow at the drip ring, flares into a sturdy elongated oval with a center spine line, and spans roughly the same width as the kayak's cockpit.
Frequently Asked Questions About Sketching Kayaks and Water Scenes
How do you make a kayak drawing look 3D instead of flat?
To make a kayak drawing look three-dimensional, tilt the boat at a 22-degree diagonal angle and separate the top deck spindle from the lower hull belly using a curved chine seam line. Shading the lower hull coral red while keeping the top deck bright orange immediately sells rounded 3D buoyancy.
What is the visual difference between drawing a kayak and a canoe?
A kayak has a closed top deck with a small oval cockpit rim in the center and uses a double-bladed paddle, whereas a canoe has a completely open top hull with bench seats across the gunwales and uses a single-bladed oar. Adding watertight rubber hatches and deck bungee cords makes your drawing unmistakably a kayak.
How do you draw a person sitting inside a kayak?
To draw a kayaker inside the boat, skip the interior seat pan in Step 4 and draw the paddler's waist rising right out of the oval cockpit coaming like a flower in a pot. Because a kayak's closed deck hides the legs completely, you only need to sketch a life vest torso, two arms holding the diagonal paddle shaft, and a helmet or sun hat.
Why do kayak paddles have two blades and small rings on the shaft?
Kayakers sit low near the waterline and alternate strokes on the left and right sides using a double-bladed paddle for speed and tracking stability. The two small rubber rings positioned a few inches inside each blade are drip rings that stop cold water from running down the raised shaft onto your hands.
Launching Your Finished Watercraft Into a Full Outdoor Adventure Scene
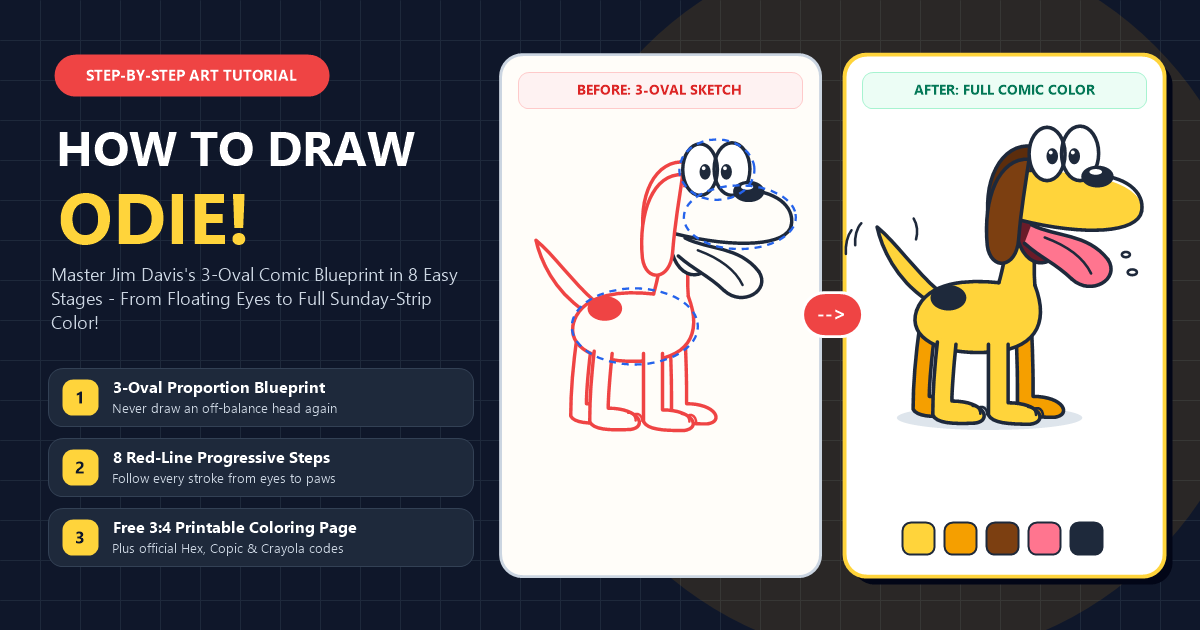
Now that your high-visibility touring kayak is floating cleanly on the page with its double-bladed paddle resting across the bow, you have the centerpiece for an entire wilderness illustration. Frame the top corners of your paper with jagged pine-covered mountain peaks, sketch a wooden dock or rocky shoreline in the lower foreground, or add a second kayak trailing just behind the stern wake. If you want to place an excited cartoon passenger right inside that central cockpit or waiting on the riverbank, jump over to our easy step-by-step guide on how to draw Odie and sketch a cheerful, floppy-eared pup wearing a tiny life jacket at the front of your boat!