
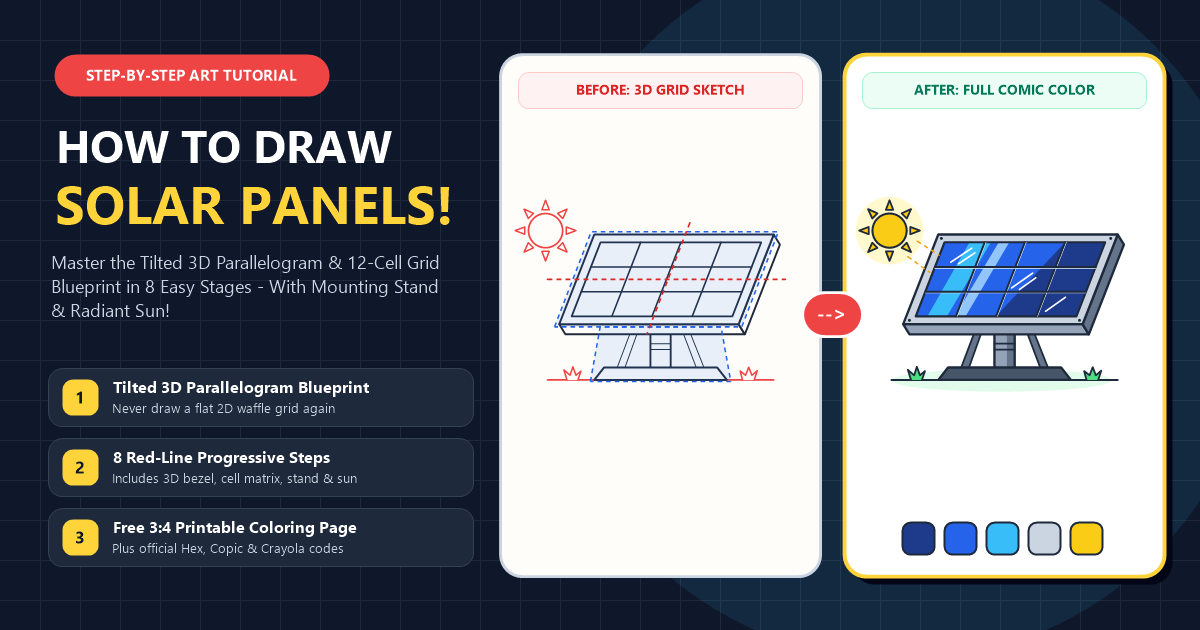
Most beginners who sit down to learn how to draw solar panels make the exact same proportion mistake within the first ten seconds. They draw a flat, upright square and divide it with a tic-tac-toe grid, only to step back and realize their drawing looks like a breakfast waffle or a bathroom floor tile rather than a high-tech renewable energy collector. Ever since engineers at Bell Labs unveiled the first practical silicon photovoltaic cell in 1954, real solar modules have always been mounted at a deliberate tilt so their tempered-glass surfaces can drink in maximum sunlight.
Capturing that unmistakable solar array silhouette on paper doesn't require complex architectural drafting. By swapping a boxy rectangle for a slanted parallelogram (//), framing it with an extruded 3D aluminum bezel, and leaving crisp diagonal highlights across deep sapphire cells, you can turn four simple geometric shapes into a vibrant illustration for science fair boards, creative Earth Day poster illustrations, or comic backgrounds. Grab a pencil and a straightedge ruler to follow all eight progressive stages below.
Gathering Simple Drawing Supplies Before Your First Sketch
Clean geometry is the secret behind a convincing solar panel drawing, because even a slightly wobbly border can make rigid glass and anodized metal look rubbery. You don't need expensive drafting gear to get sharp results, though keeping a small plastic ruler next to your sketchbook will make dividing the twelve silicon cells ten times faster and neater.
- HB Graphite Pencil and Vinyl Eraser for sketching light construction angles and cleaning up overlapping guide strokes where the panel overhangs the mounting post.
- 6-Inch Clear Plastic Ruler for keeping the slanted left, right, and internal column lines strictly parallel across the entire module face.
- Waterproof Black Fineliners (0.8mm and 0.4mm) so you can ink a bold, confident outer aluminum frame with the thicker nib while keeping the internal photovoltaic grid seams razor-thin.
- Sapphire Blue, Cobalt Blue, Sky Blue, Cool Gray, and Yellow Markers to build the signature glossy contrast between dark silicon wafers, bright sky reflections, and a warm brushed-metal rim.
Understanding How Three Simple Geometric Shapes Build a Realistic Solar Array
Before drawing a single photovoltaic square, look at how a freestanding solar collector breaks down into three interlocking geometric blocks. If you lock in these foundational angles first, your internal cell grid will fall into place automatically without warping or crowding toward one corner.
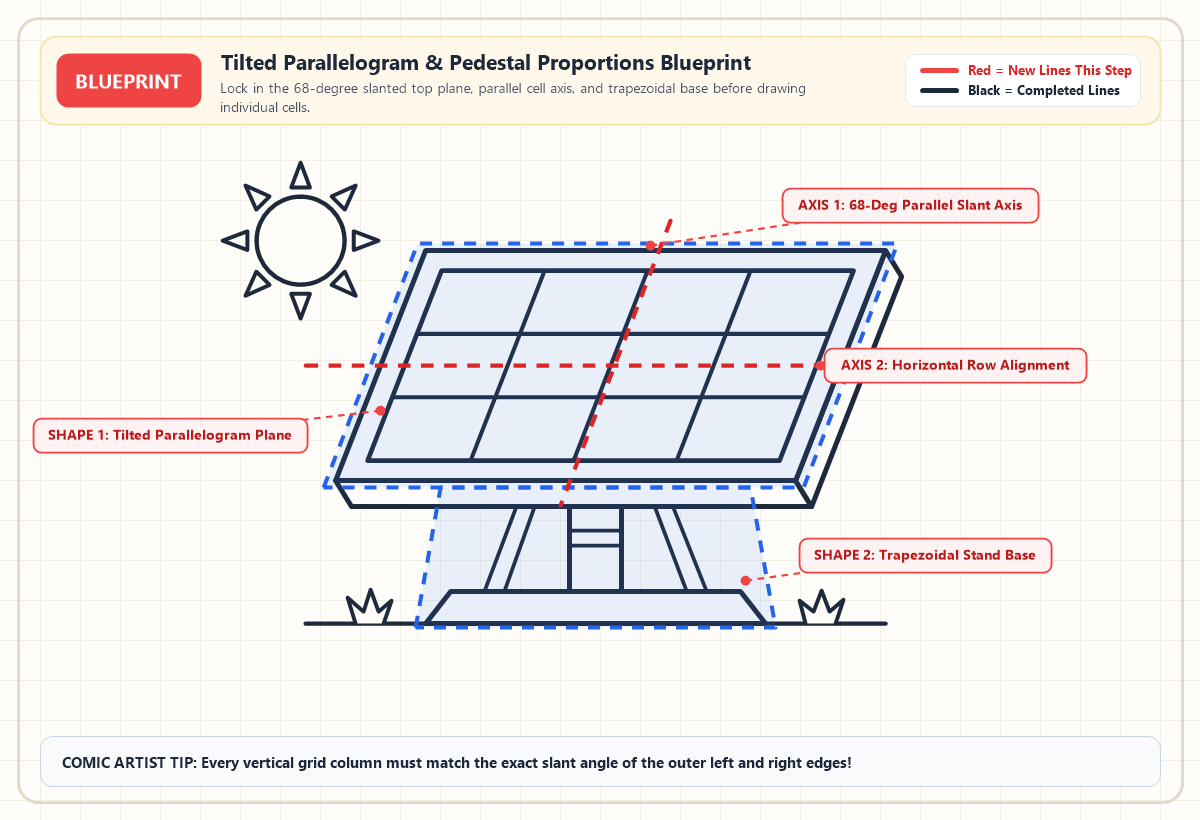
- Shape 1 (The 68-Degree Tilted Parallelogram Plane) forms the main top face of the solar module. Keeping the top and bottom edges completely horizontal while slanting both the left and right edges at the exact same 68-degree angle creates immediate foreshortening, making the top edge appear farther away and tilted toward the sky.
- Axis 1 and Axis 2 (The Parallel Grid Guides) govern every cell divider inside the frame. Every vertical column line must copy the 68-degree slant of the outer side borders, while every horizontal row line stays flat and parallel to the top and bottom edges.
- Shape 2 (The Trapezoidal Pedestal Envelope) anchors the heavy glass panel to the ground. A central cylindrical post flanked by two angled diagonal struts distributes the visual weight down into a wide trapezoidal base plate so your panel never looks like it's tipping over.
Following the Eight Step Visual Blueprint for How to Draw Solar Panels
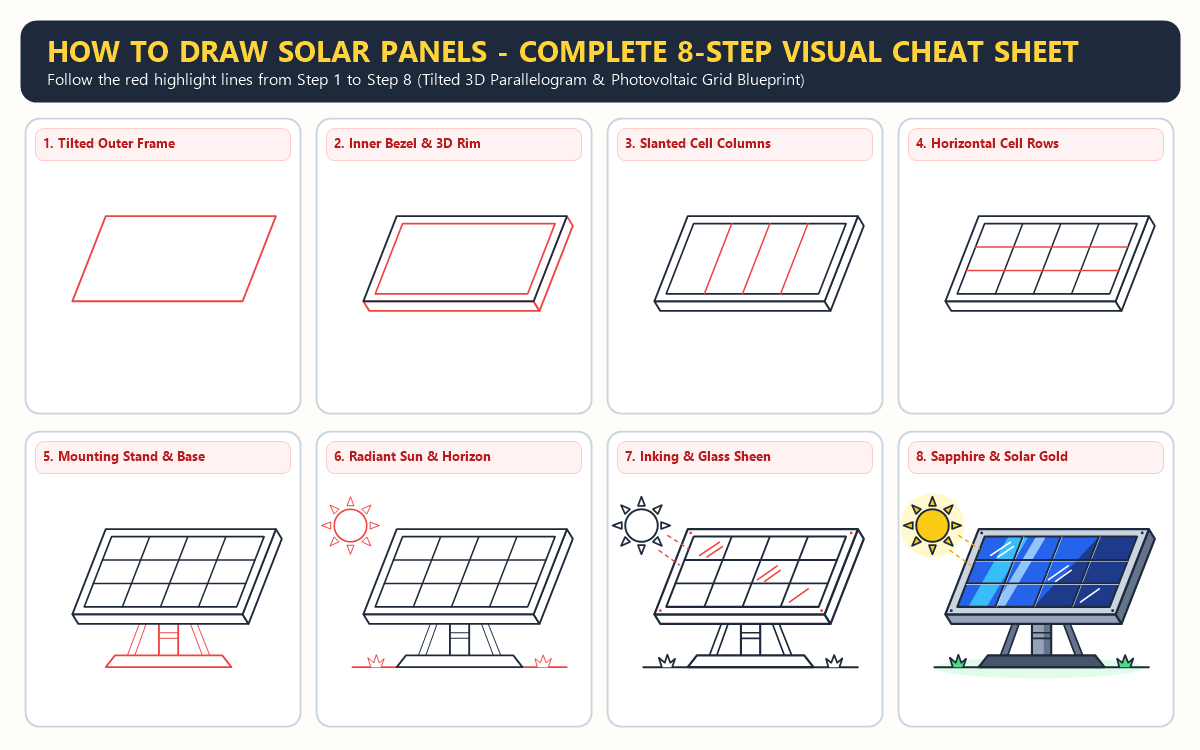
This eight-stage tutorial uses our progressive red-line method so you never lose your place on the page. In each illustration card below, bright red lines highlight the exact new strokes to draw in that stage, while dark black lines show completed strokes carried over from earlier steps. Sketch lightly with your pencil through Step 6 before switching to ink in Step 7.
Easy Solar Panels Drawing Step by Step
The new lines in each picture show what to add next. Simple shapes will come together to make your solar panels. Let’s begin!
Step 1: Sketching the Tilted Parallelogram Outer Frame
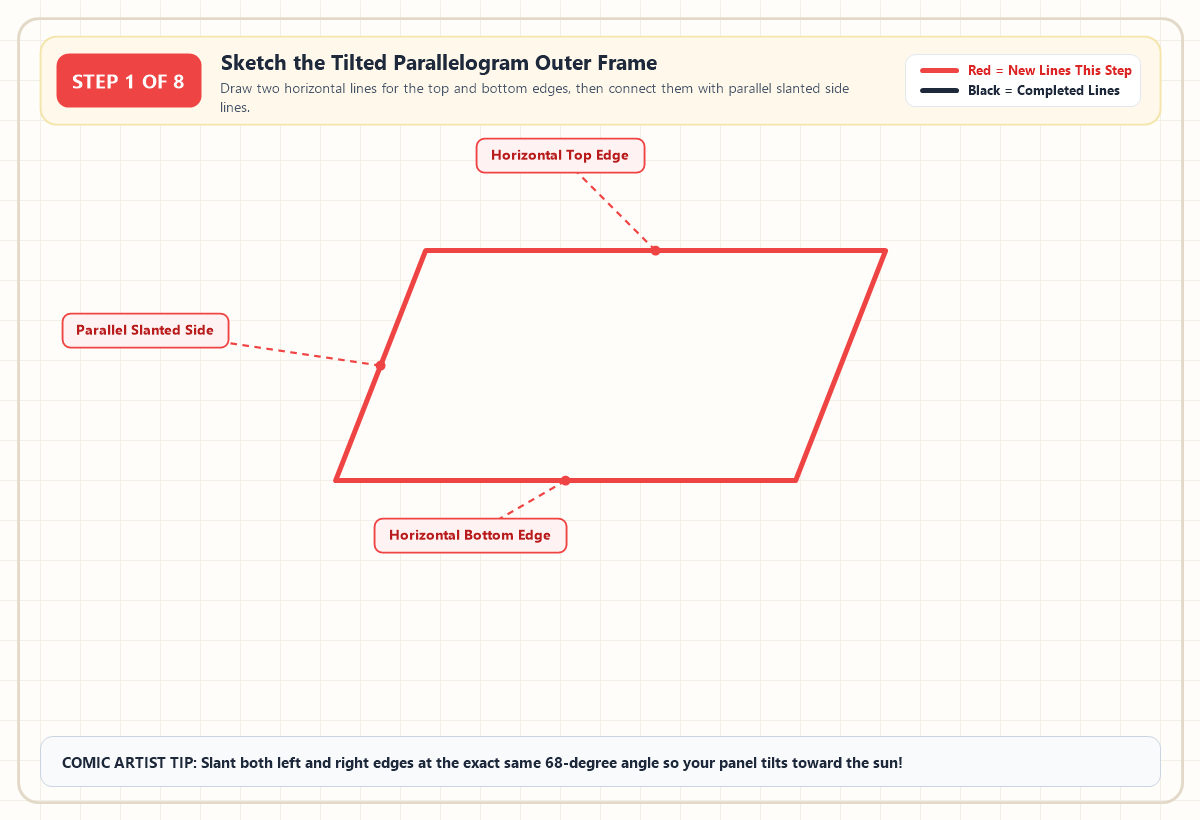
Start in the upper-center area of your paper by drawing two straight, parallel horizontal lines one near the top for the upper edge of the panel, and a second one lower down and shifted slightly to the left for the bottom edge. Connect their left ends and right ends with two slanted straight lines tilted at roughly a 68-degree angle. Double-check that your left and right borders lean at the exact same slant so the entire frame reads as a flat rectangle viewed at a three-quarter tilt.
Step 2: Adding the Inner Aluminum Bezel and 3D Rim Depth
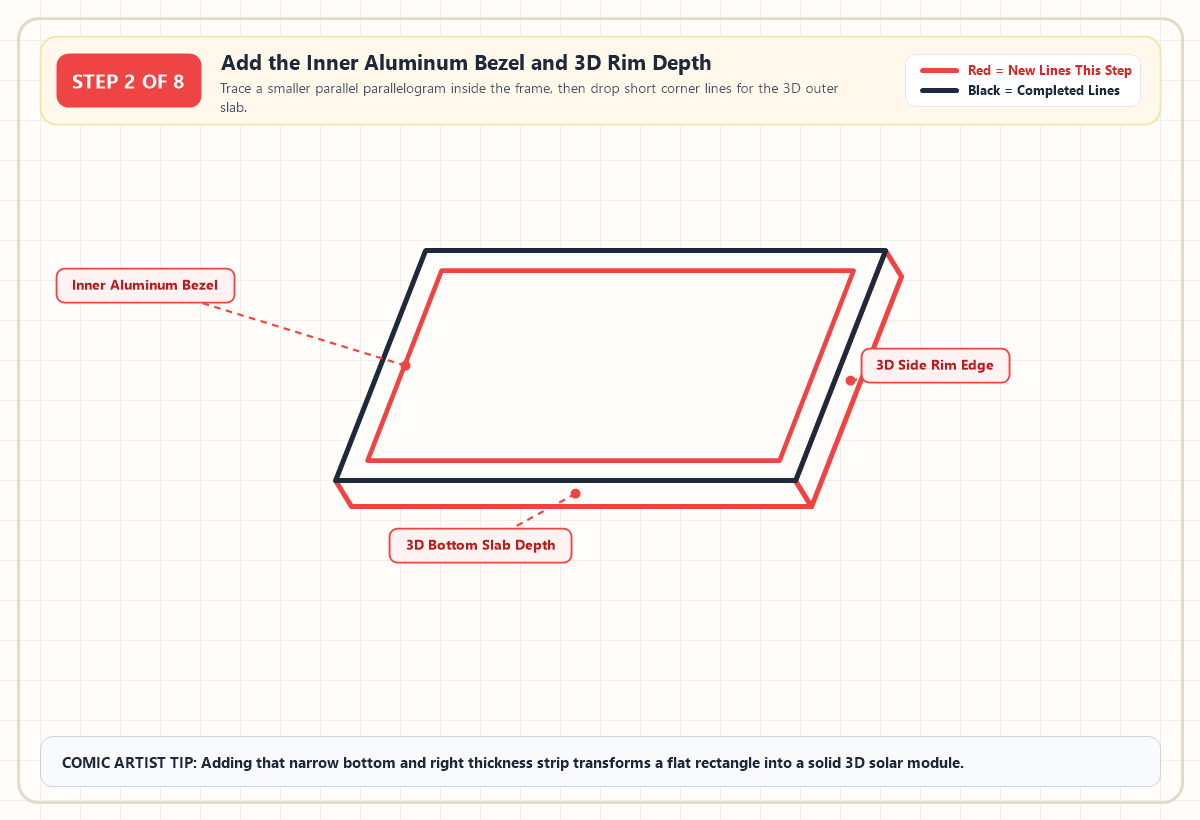
Real solar panels are encased in a protective anodized aluminum frame that keeps moisture out and locks the tempered glass in place. Trace a slightly smaller parallel parallelogram inset evenly inside your Step 1 outline to create this flat metallic bezel. Next, give your module solid three-dimensional thickness by dropping short diagonal ticks down and to the right from the bottom-left, bottom-right, and top-right outer corners, then connecting them with two straight lines that run parallel to the bottom and right borders.
Step 3: Dividing the Surface With Slanted Vertical Cell Columns
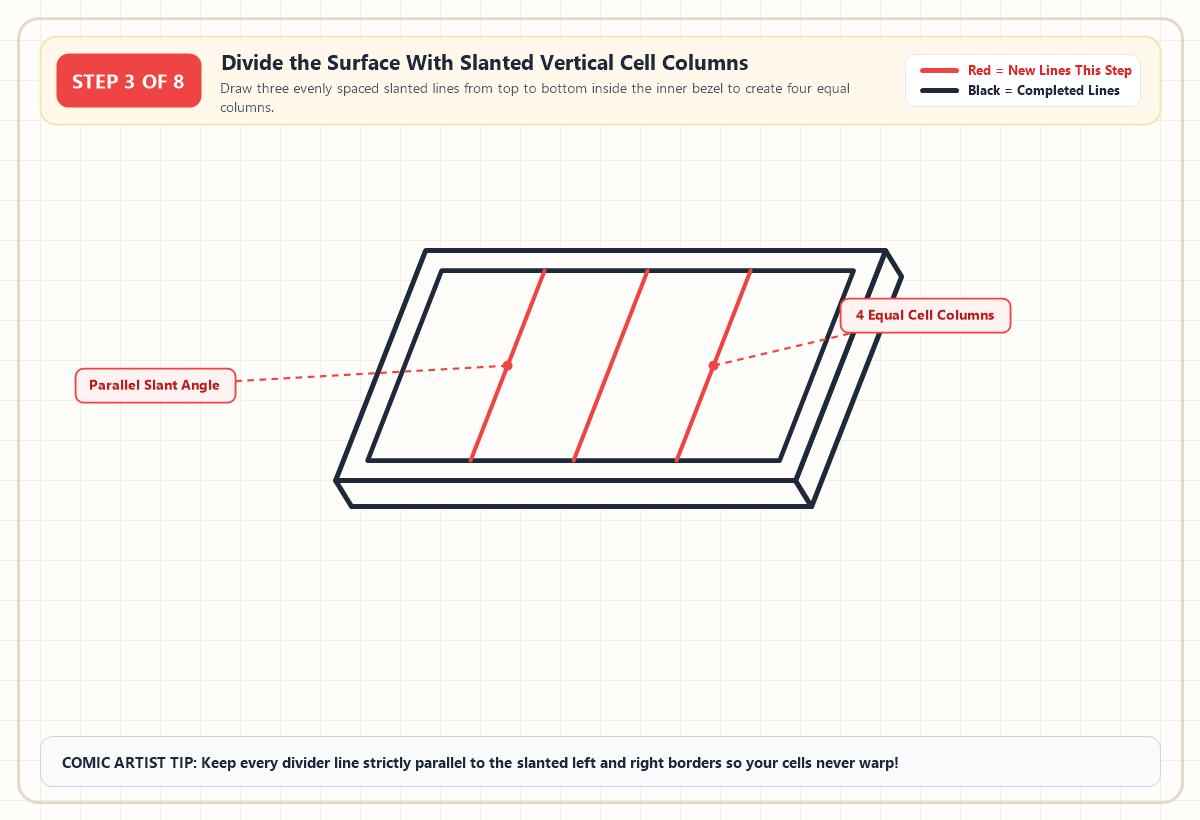
Now you're ready to subdivide the recessed glass area into columns of silicon wafers. Place your ruler along the slanted left inner bezel edge, slide it a quarter of the way across the panel while keeping that exact 68-degree tilt, and draw your first slanted divider line from the top inner border to the bottom inner border. Repeat this two more times at equal intervals across the face so three slanted lines divide the interior into four uniform columns.
Step 4: Crossing the Grid With Horizontal Silicon Cell Rows
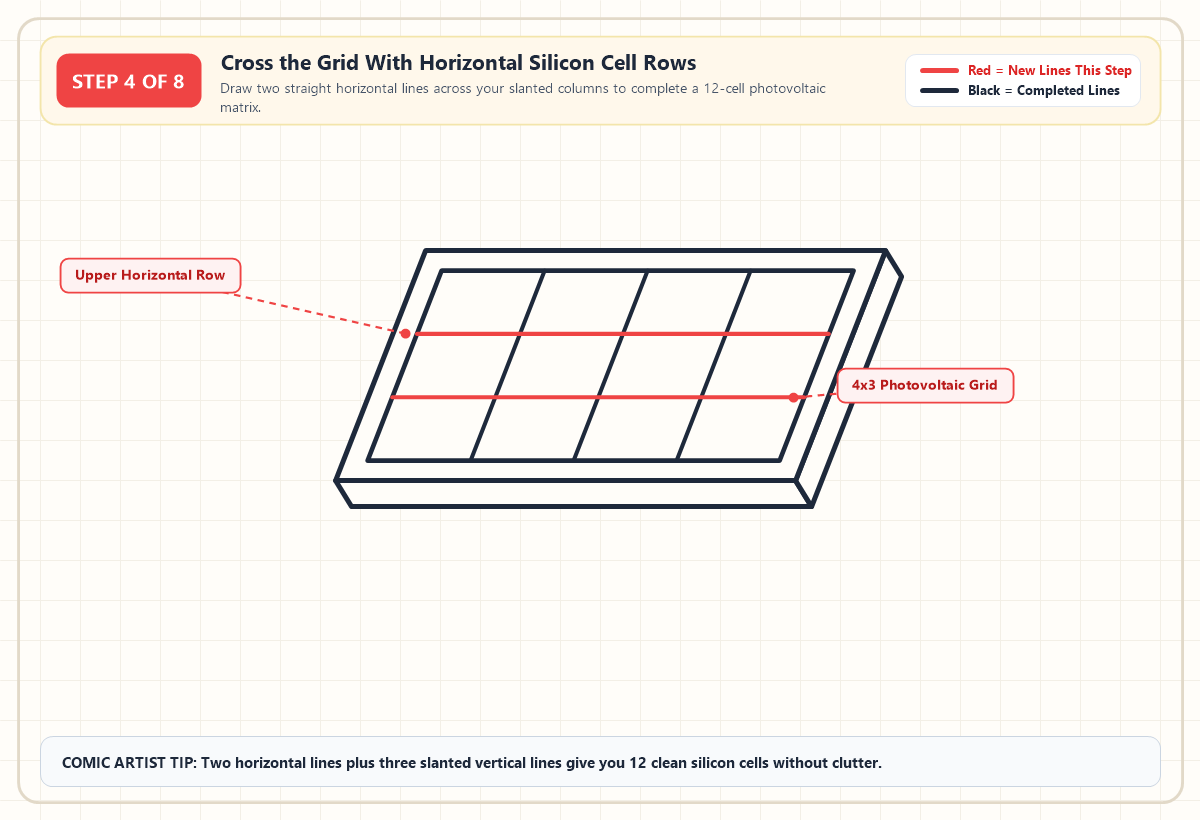
To turn those four slanted strips into individual photovoltaic cells, lay your ruler horizontally across the middle of the panel so it matches the flat angle of the top and bottom borders. Draw two evenly spaced horizontal lines straight across from the left inner bezel to the right inner bezel. Those two horizontal strokes intersect your three slanted columns to form a balanced 4x3 checkerboard of twelve crisp solar cells.
Step 5: Drawing the Sturdy Support Pillar and Ground Mounting Base
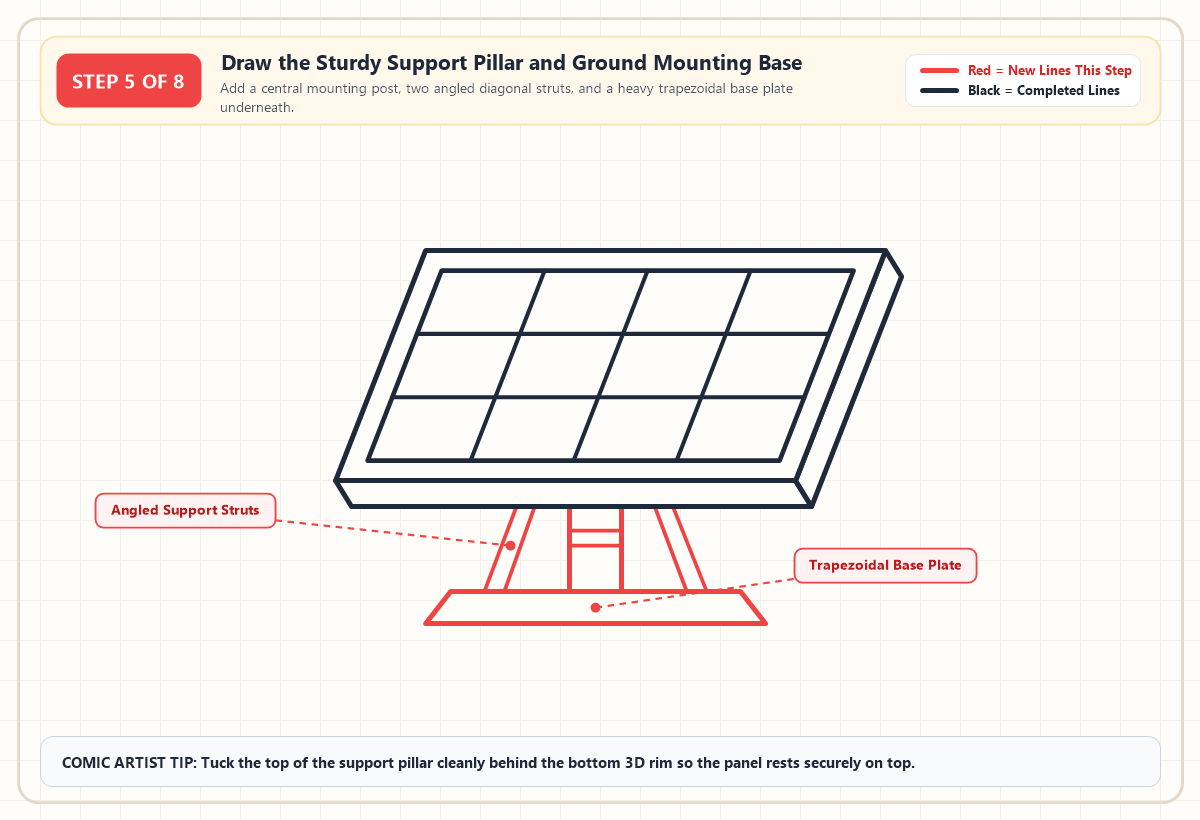
Anchor your tilted solar module by sketching its heavy-duty ground mounting rack directly beneath the lower 3D rim. Start with two vertical lines dropping down from the center of the bottom edge to form the main steel pillar, adding two horizontal collar lines across its middle. Frame the central post with two thinner diagonal support struts angling outward on the left and right, and plant all three supports onto a wide trapezoidal base plate that flares outward toward the bottom.
Step 6: Sketching the Radiant Sun and Ground Horizon Details
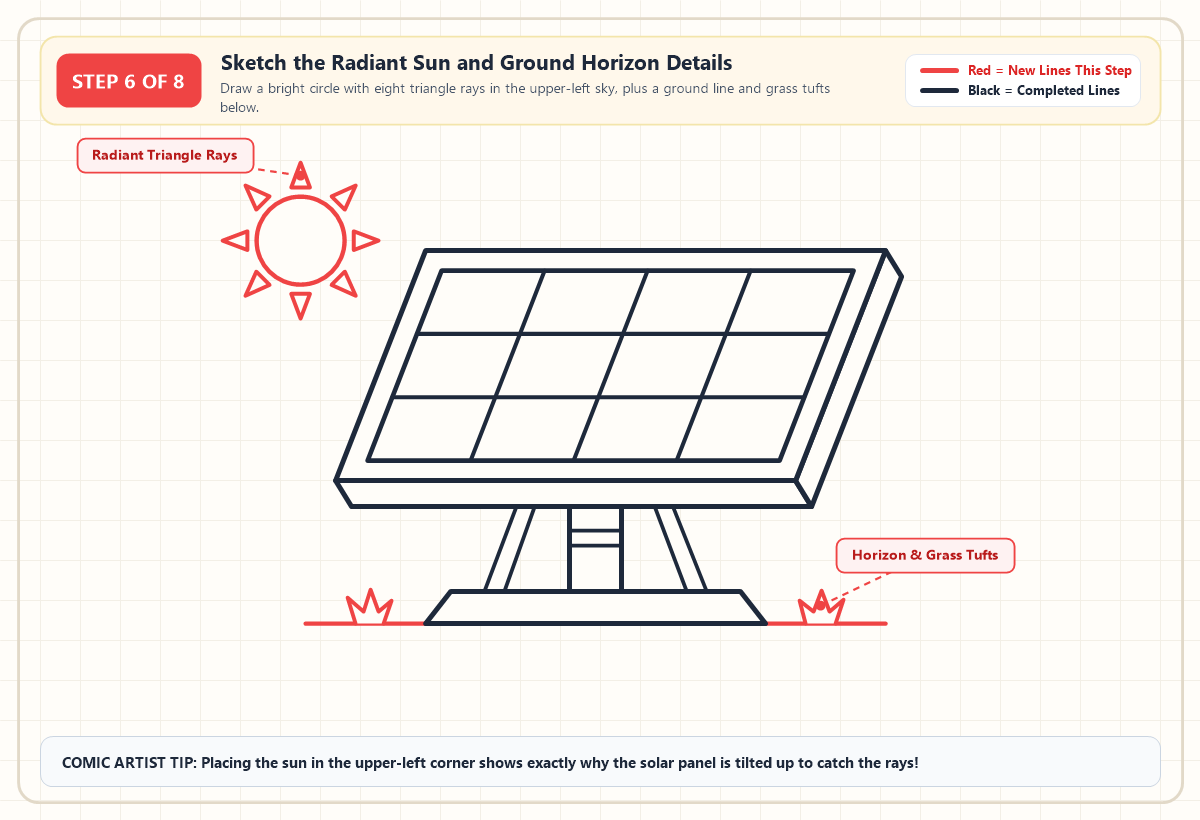
A solar panel illustration tells a much clearer visual story when you show the energy source it's facing. In the open sky space above the upper-left corner of your panel, draw a smooth circle surrounded by a ring of eight pointed triangle rays a classic approach borrowed from expressive cartoon sun sketching techniques. Finish the environment by extending a straight horizontal ground line out from both sides of the pedestal base and sketching a spiky three-blade tuft of grass on the left and right.
Step 7: Inking Bold Outlines and Adding Diagonal Glass Reflections
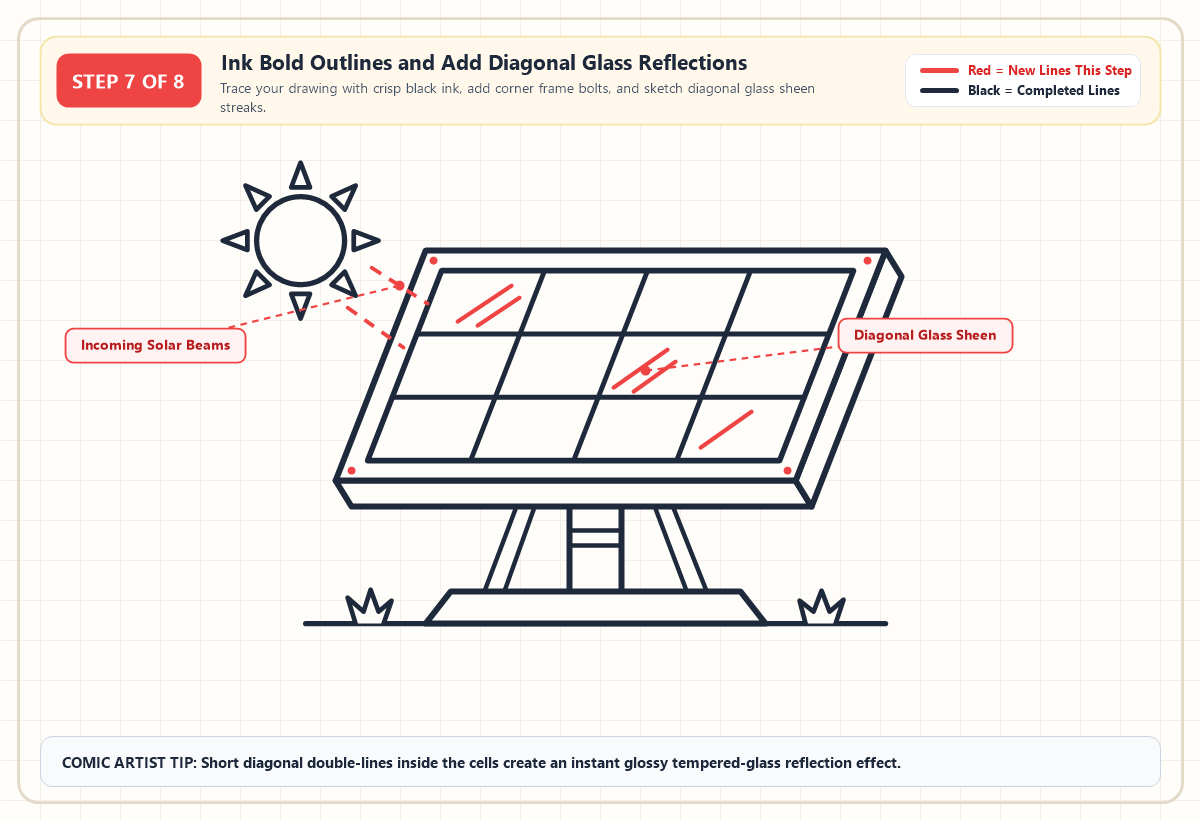
Switch to your black fineliner pens to make the drawing pop off the page. Use your thicker 0.8mm pen to trace the outer aluminum frame, the 3D bottom and side rims, the support stand, and the sun, then use a finer 0.4mm pen for the internal cell grid lines so they don't overpower the silicon squares. Add four tiny black bolt dots inside the corners of the metal bezel, draw two dashed energy lines streaming from the sun toward the upper cells, and sketch short pairs of diagonal reflection streaks inside three or four cells.
Step 8: Coloring the Photovoltaic Cells and Metallic Frame Highlights
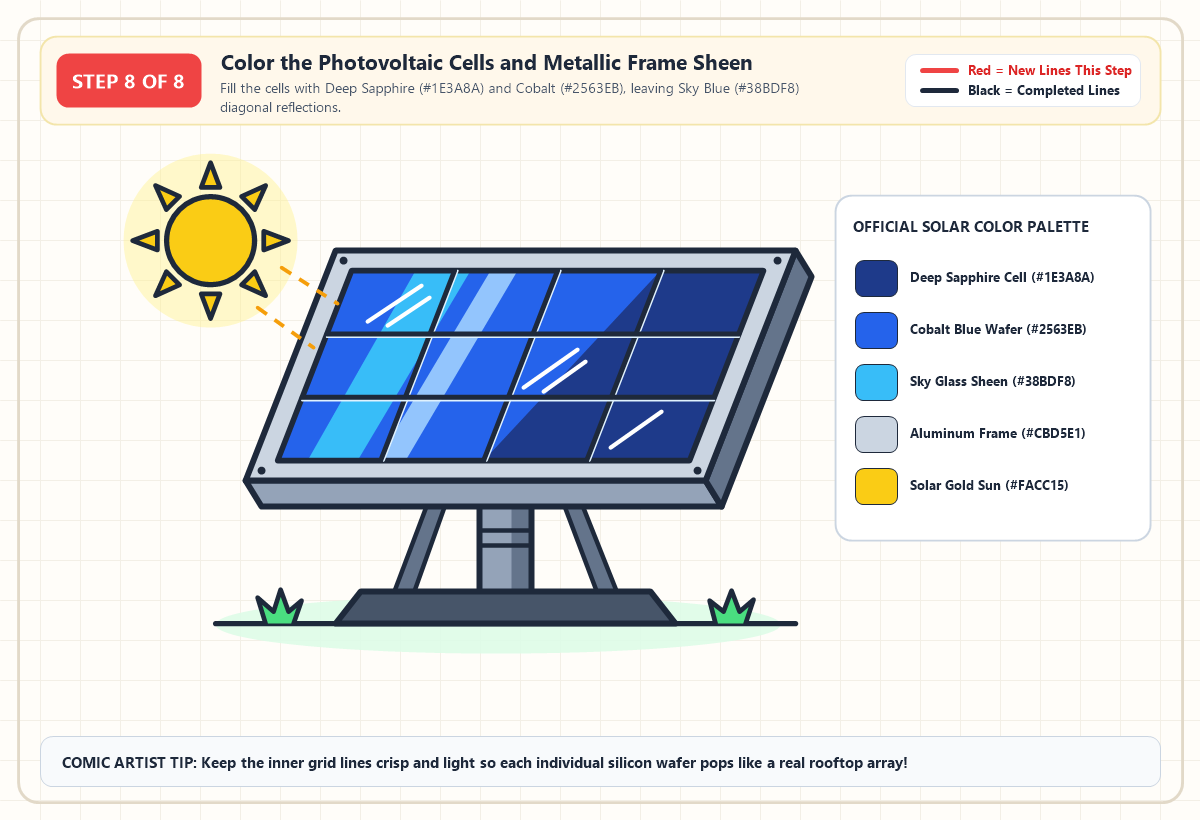
Once your black ink is completely dry and you've erased any leftover pencil marks, bring your solar array to life with high-contrast color. Color the shaded right-hand cells with rich Deep Sapphire (#1E3A8A), blend the middle and upper-left cells into vibrant Cobalt Blue (#2563EB), and paint a sweeping diagonal band of Sky Glass Sheen (#38BDF8) across the left columns while leaving your crisp white reflection streaks untouched. Shade the top aluminum bezel with Cool Silver (#CBD5E1), use a darker Slate Gray (#64748B) on the 3D bottom and right rims to emphasize the shadow underneath the panel, and fill the sun with bright Solar Gold (#FACC15).
Printable Solar Panels Drawing PDF
Download the printable PDF to use now or save for later — it prints on A4 and Letter paper.
Print PDFComparing Classic Blue Polycrystalline Panels With Modern Black Rooftop Arrays
If you've ever looked up at neighborhood rooftops and wondered why some solar panels glow bright royal blue while others look like sleek tinted obsidian, you're seeing the difference between polycrystalline and monocrystalline silicon technology. Polycrystalline panels are poured from melted silicon fragments that reflect light in multi-toned sapphire and cobalt hues, making them the undisputed favorite for cartoon artists, school posters, and comic strips because their vibrant blue grid immediately reads as "solar energy" from across a room.
Modern monocrystalline panels, on the other hand, are sliced from a single pure silicon crystal that absorbs nearly all visible light, giving them a deep slate-black finish often paired with black anodized frames on contemporary houses. If you are combining this tutorial with our 3D house roof perspective tutorial, use the comparison matrix below to pick the exact Hex codes, Copic Sketch markers, or Crayola crayons for either style.
| Solar Panel Component | Classic Polycrystalline Cartoon Style | Modern Monocrystalline Rooftop Style | Official Hex Code | Copic Marker Match | Crayola Crayon Match |
|---|---|---|---|---|---|
| Primary Shaded Silicon Cells | Rich indigo-blue wafer base in lower-right cells | Deep charcoal-black silicon surface | #1E3A8A (Blue) / #0F172A (Black) |
B39 (Prussian Blue) / 100 (Black) |
Navy Blue / Black |
| Sunlit Mid-Tone Cells | Bright royal cobalt blue across upper-left cells | Cool dark slate-gray mid-tone blend | #2563EB (Cobalt) / #334155 (Slate) |
B29 (Ultramarine) / C8 (Cool Gray 8) |
Blue / Outer Space |
| Diagonal Glass Reflection Band | High-contrast sky-blue and white diagonal sheen | Crisp ice-blue and silver-gray glass streak | #38BDF8 (Sky Sheen) |
B02 (Robin's Egg Blue) |
Sky Blue |
| Outer Frame & 3D Rim | Brushed silver-gray top bezel with slate 3D edge | Matte charcoal anodized aluminum bezel | #CBD5E1 (Top) / #64748B (3D Side) |
C2 (Cool Gray 2) / C6 (Cool Gray 6) |
Silver / Cadet Blue |
| Sun & Incoming Energy Beams | Warm golden-yellow core with amber rays | Warm golden-yellow sun accent | #FACC15 (Solar Gold) |
Y17 (Golden Yellow) |
Dandelion / Yellow |
Fixing Three Proportion Mistakes Beginners Make When Sketching Solar Panels
Even a small geometry slip can flatten out your drawing or make the grid look chaotic. Watch out for these three common pitfalls when penciling Steps 1 through 4.
- Fanning Out the Vertical Grid Columns happens when you angle the left column to match the left border but accidentally tilt the right column the opposite way, turning your panel into a flared trapezoid. Keep every single vertical column line strictly parallel to the 68-degree left and right outer edges.
- Running Cell Grid Lines Straight Into the Outer Edge skips the inner aluminum bezel from Step 2, which strips away the metallic frame and makes the panel look like a floating piece of graph paper. Always leave a clean, uniform gap between your inner cell matrix and the outer rim.
- Coloring Over Your Diagonal Glass Highlights fills all twelve squares with flat, heavy dark blue ink so the surface looks like matte cardboard instead of reflective tempered glass. Map out your sky-blue diagonal band and white streak lines before touching your dark blue marker to the paper.
Frequently Asked Questions About Sketching Solar Energy Diagrams
How do you make a solar panel drawing look 3D and tilted?
Replace a flat upright rectangle with a slanted parallelogram tilted at roughly 68 degrees, then extrude a narrow L-shaped thickness strip along the bottom and right edges. Keeping the top and bottom borders horizontal while slanting all vertical lines at the exact same angle creates instant three-dimensional depth.
How many grid squares should I draw inside a cartoon solar panel?
A 4x3 grid of twelve photovoltaic cells is the sweet spot for cartoon and school poster illustrations. Drawing three slanted vertical lines and two horizontal lines communicates the silicon wafer checkerboard clearly without crowding your paper or making the lines smudge together during coloring.
What colors make a solar panel look like shiny glass on paper?
Pair a dark base of Deep Sapphire Blue (#1E3A8A) and Cobalt Blue (#2563EB) with two diagonal streaks of bright Sky Blue (#38BDF8) and crisp white paper highlights. That high-contrast jump between dark indigo cells and bright diagonal reflection bands tricks the eye into seeing polished tempered glass.
How do I draw solar panels mounted on a slanted house roof instead of a stand?
Match the slant angle of your solar panel's left and right edges to the exact slope of the house roof rafters, and replace the tall ground pedestal with four short rectangular mounting brackets tucked just underneath the panel's lower 3D rim so it hovers slightly above the shingles.
Bringing Your Clean Energy Illustration to Life on Full Landscape Posters
Now that you've mastered a single tilted 3D solar module, scaling up to a full clean-energy solar farm or eco-friendly home is as simple as repeating your Step 1 parallelogram right next to the first one along the same horizontal guideline. Leave a tiny gap between adjacent frames so each module reads clearly, keep your diagonal glass reflections angled in the same direction toward the sun, and pair your array with our step-by-step wind turbine drawing guide to build a complete renewable energy landscape.