Most beginners who sit down to learn how to draw a kiwi bird accidentally draw a smooth brown circle with a short triangle beak and wonder why their sketch looks like a fuzzy grocery-store kiwifruit on toothpicks. Unlike almost every songbird on Earth, New Zealand's iconic nocturnal Apteryx evolved without functional wings, without tail feathers, and with nostrils placed at the very tip of a long, downward-arching bill. Once you understand that quirky pear-shaped silhouette, sketching one becomes effortless.
You don't need advanced anatomy training to capture that unmistakable woodland charm. By combining two tilted ovals with simple C, U, and V strokes, you can build a round, shaggy cartoon kiwi in less than fifteen minutes. Follow the eight red-line stages below to master the proportions, print the free vertical coloring sheet, and bring your bird to life with warm chestnut and ivory shading.
Gathering Simple Drawing Supplies Before Your First Sketch
You only need a soft graphite pencil, a clean eraser, a waterproof black fine-liner pen, and four earth-tone markers to draw a crisp cartoon kiwi bird. Starting with light pencil guidelines lets you adjust the forward-leaning posture and sweeping curved beak before committing to bold ink feather tufts.
- 2B Graphite Pencil:eal for laying down faint, pressure-free construction ovals and testing the curve of the long ivory bill without indenting your paper.
- 0.5mm Waterproof Black Fine-Liner: Delivers clean, confident comic outlines and sharp saw-tooth feather notches that won't smudge under alcohol or water-based markers.
- Kneaded or Soft Vinyl Eraser: Lifts away your underlying geometric guidelines cleanly once the black ink has dried for sixty seconds.
- Warm Earth-Tone Markers or Pencils: Grab a rich chestnut brown (
#8B5A2B), a deep walnut shadow tone (#5C3A1E), a creamy ivory tint (#F3E5AB) for the bill and claws, and a fresh forest green (#4ADE80) for the ground fern.
Understanding Why New Zealand Kiwi Proportions Rely on Two Simple Ovals
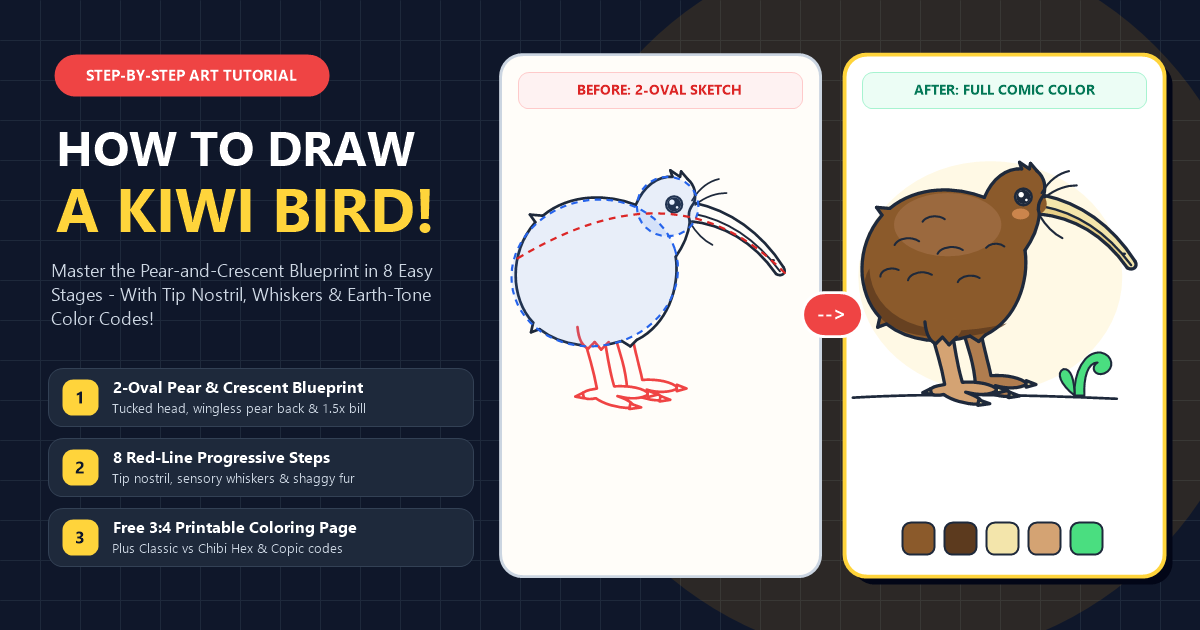
A convincing kiwi bird silhouette relies on a two-to-one pear ratio where the heavy lower rump oval is twice as wide as the tucked head oval. Because kiwis evolved on the predator-free forest floors of Aotearoa without flight muscles or a breastbone keel, their spine slopes forward at a gentle 35-degree angle rather than standing upright.
If you have ever practiced how to draw a cute cartoon penguin, you already know how flightless birds carry their weight low toward their feet. The key difference here is horizontal balance. A kiwi's bill measures roughly 1.5 times the width of its head oval, curving downward like a crescent blade. To keep the bird from looking like it is tipping onto its nose, you must tuck the head oval high into the front shoulder of the pear torso and plant the muscular drumstick legs under the rear third of the body.
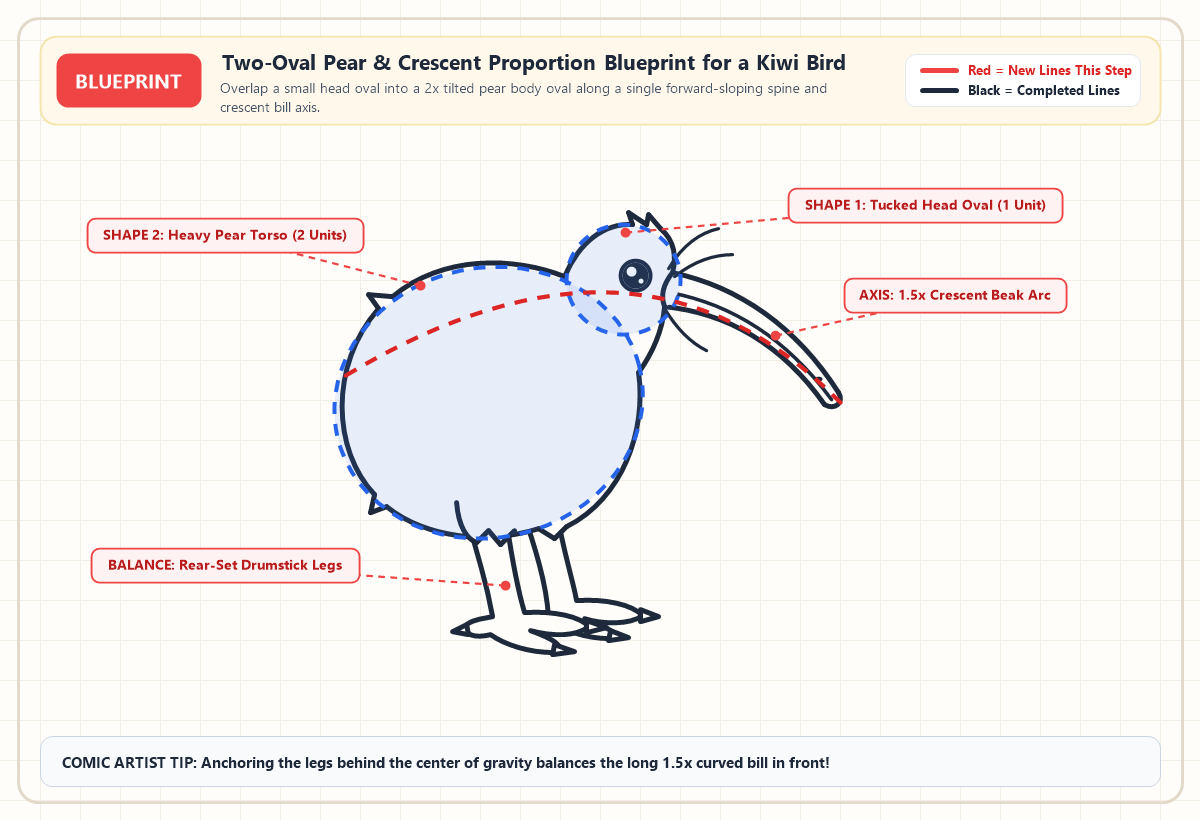
Following the Eight Step Visual Blueprint for How to Draw a Kiwi Bird
Follow these eight progressive stages by anchoring the glossy eye and upper bill bridge first, wrapping the wingless pear torso around your construction ovals, and grounding the bird on sturdy three-toed feet. In every illustration below, bright red lines highlight the exact new strokes to add while black lines represent completed contours.
Easy Kiwi Bird Drawing Step by Step
The new lines in each picture show what to add next. Simple shapes will come together to make your kiwi bird. Let’s begin!
Step 1: Anchoring the Beady Eye and Upper Beak Bridge
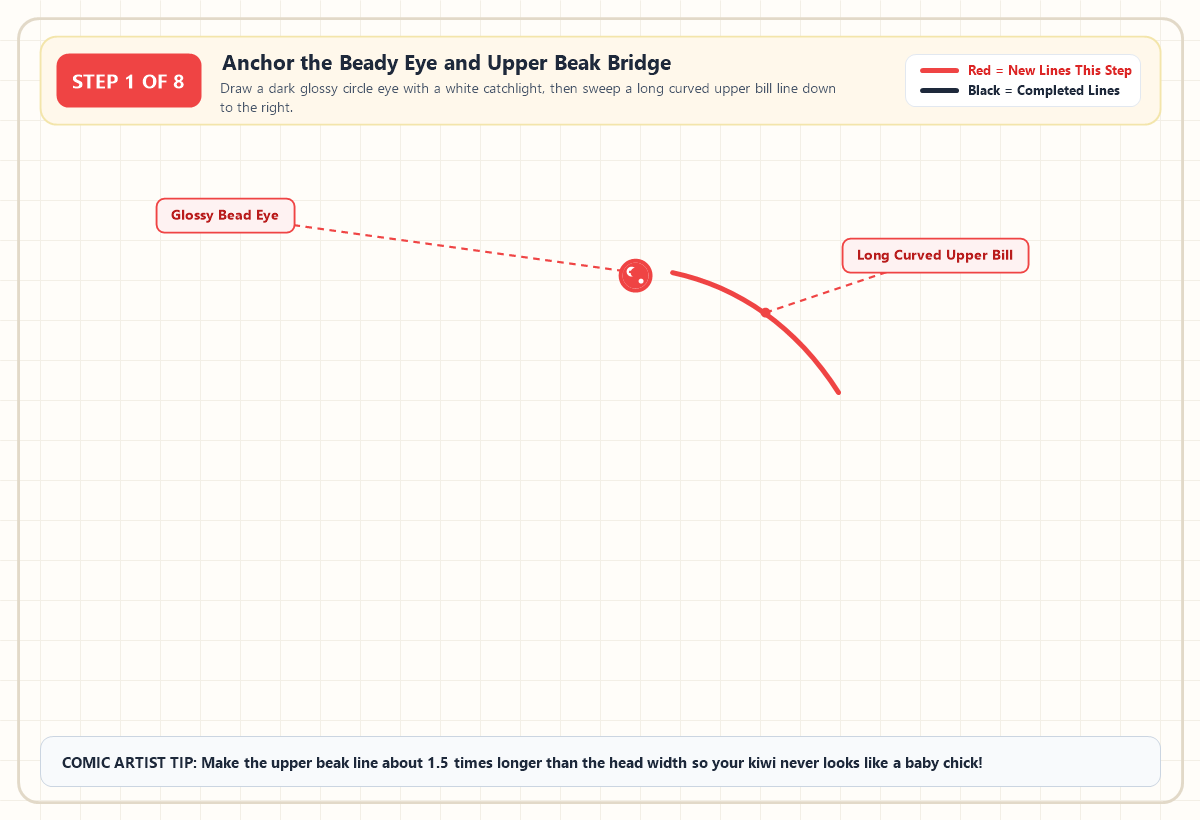
Start in the upper-right quadrant of your sketching area by drawing a small, dark circle for the eye, leaving two tiny white circles unshaded inside so the gaze sparkles with nocturnal life. Just to the right of the eye, sweep a smooth, downward-curving line that stretches roughly 1.5 times the width of the head. Because kiwis rely on scent and touch rather than big daytime eyes, keeping the eye compact makes the sweeping bill look instantly authentic.
Step 2: Completing the Long Curved Bill and Tip Nostril
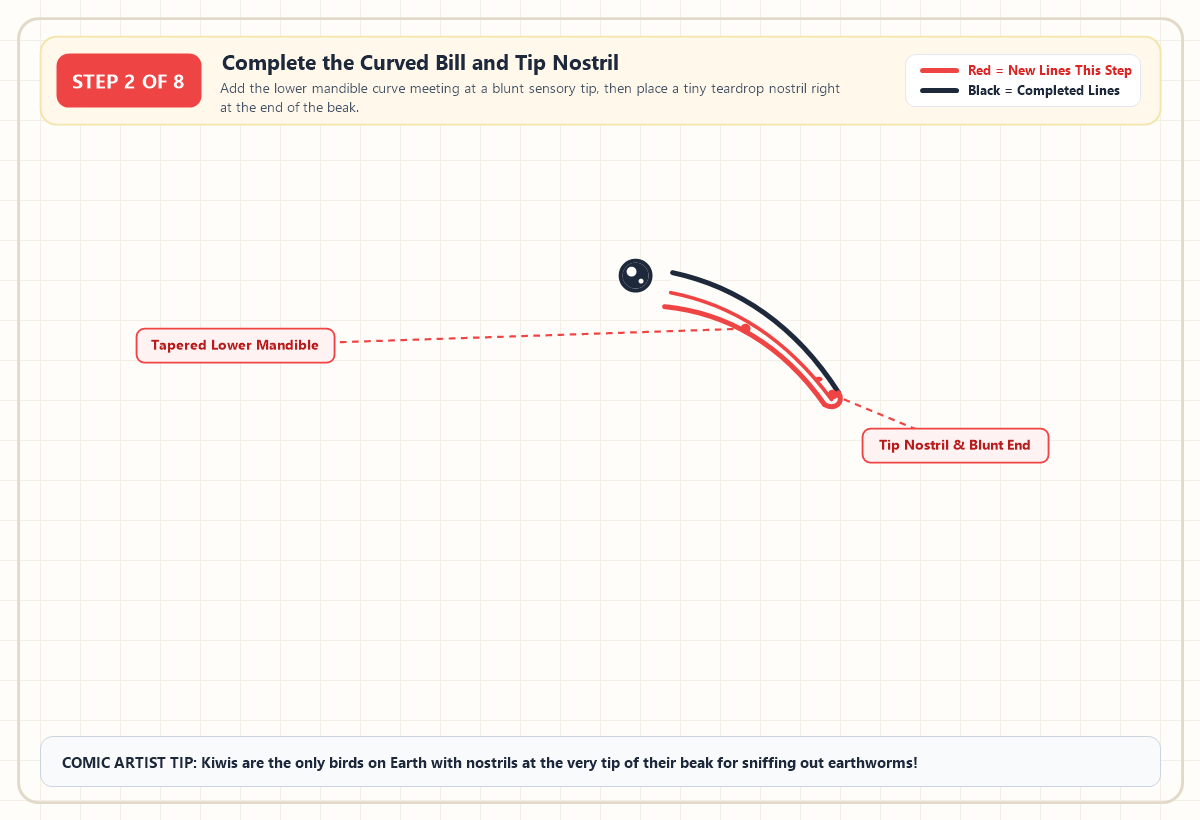
Round off the far right end of the upper bill with a blunt, U-shaped sensory tip rather than a sharp needle point, then draw a second parallel curve sweeping back toward the face to form the tapered lower mandible. Add a thin mouth split line down the middle and place a tiny dark teardrop right near the blunt tip of the upper bill. Unlike every other bird on the planet, the kiwi carries its nostrils at the very end of its beak so it can sniff out earthworms deep beneath damp forest soil.
Step 3: Adding the Cheek Ruff and Sensory Whisker Bristles
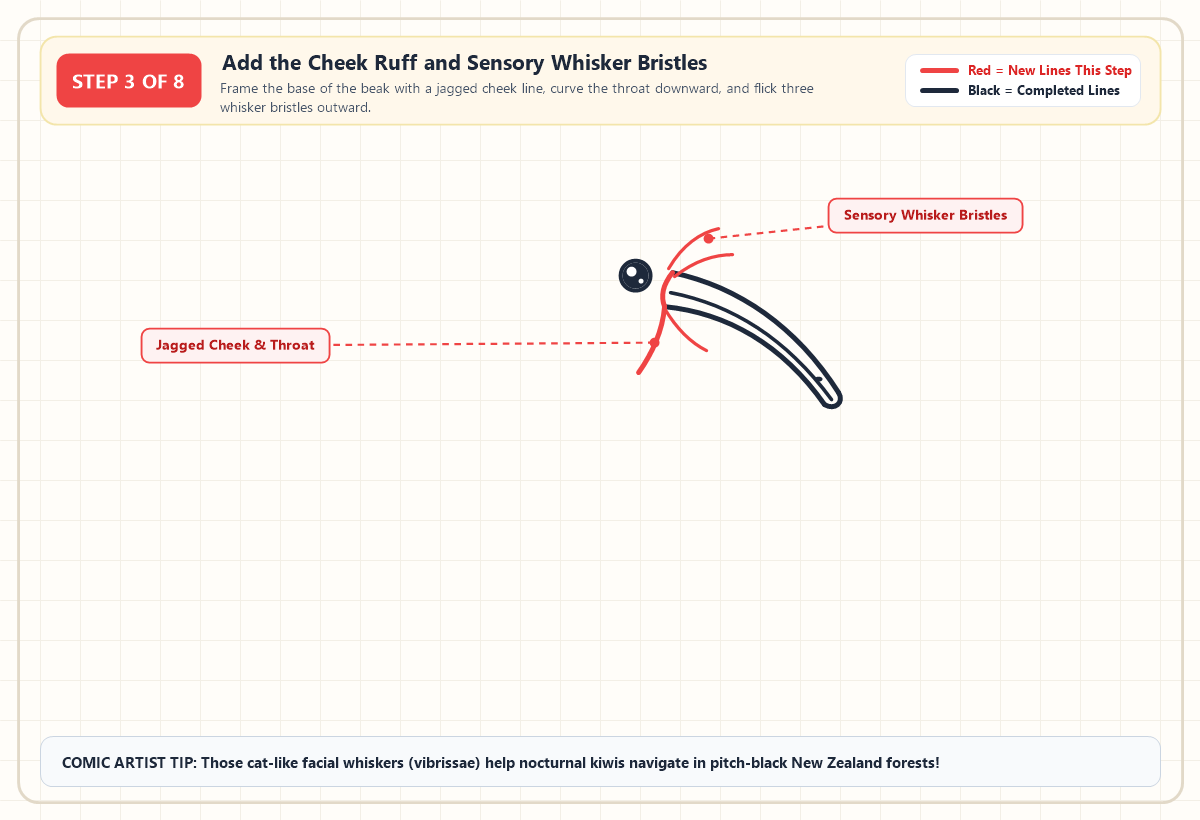
Close the base of the beak with a short, slightly wavy cheek curve where the facial feathers overlap the horn bill, then extend a smooth throat line curving downward and slightly left toward the chest. Next, flick three delicate, hair-thin whisker bristles known to biologists as vibrissae outward from the top and bottom of the beak base. Those cat-like tactile whiskers act like nighttime radar antennas in dense New Zealand bush and immediately separate a real kiwi sketch from a generic cartoon bird.
Step 4: Arching the Fuzzy Crown and Sloping Neck
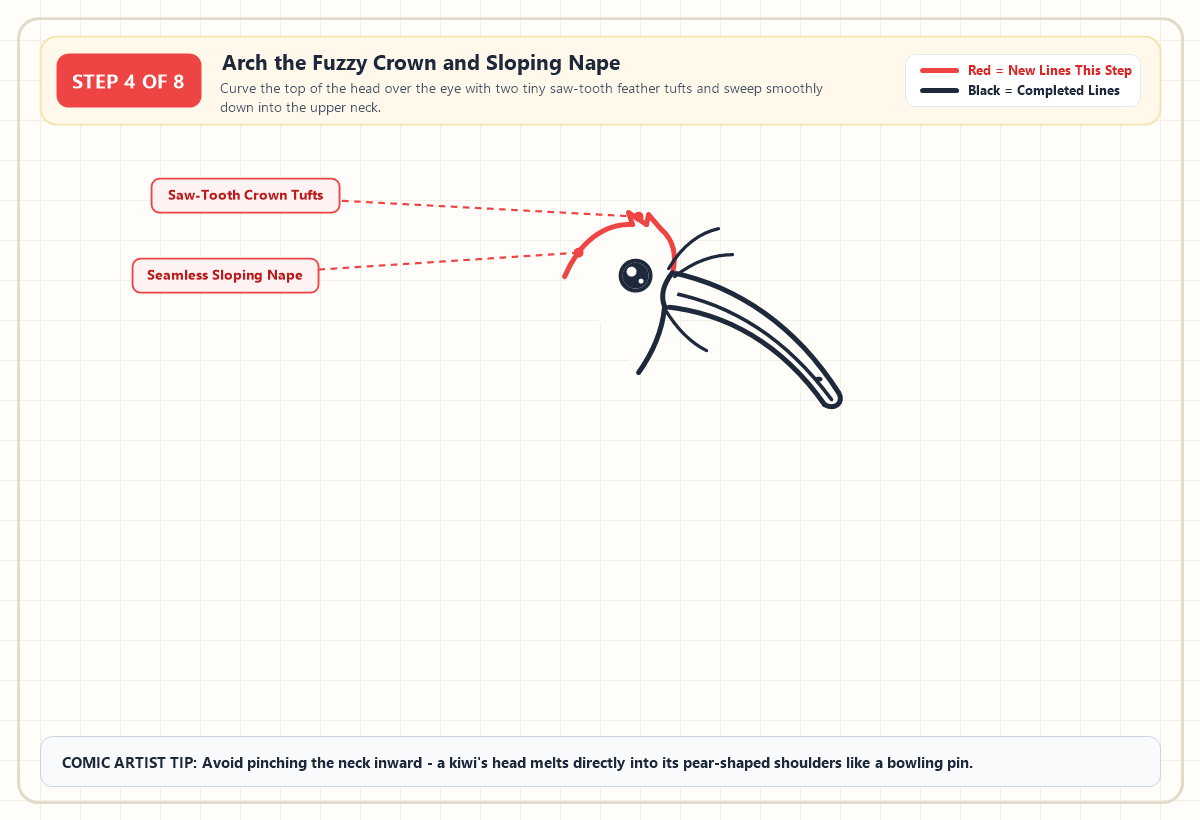
Starting just above the upper beak bridge, arch a rounded dome over the eye to form the crown of the head, breaking the top curve with two small saw-tooth V notches so the plumage looks scruffy from the very beginning. Let the back of the head glide smoothly downward into a short, sloping nape without pinching inward. A kiwi's neck melts directly into its shoulders like a tilted bowling pin, so avoiding a skinny neck indentation keeps the silhouette cozy and compact.
Step 5: Shaping the Plump Pear Torso and Wingless Back
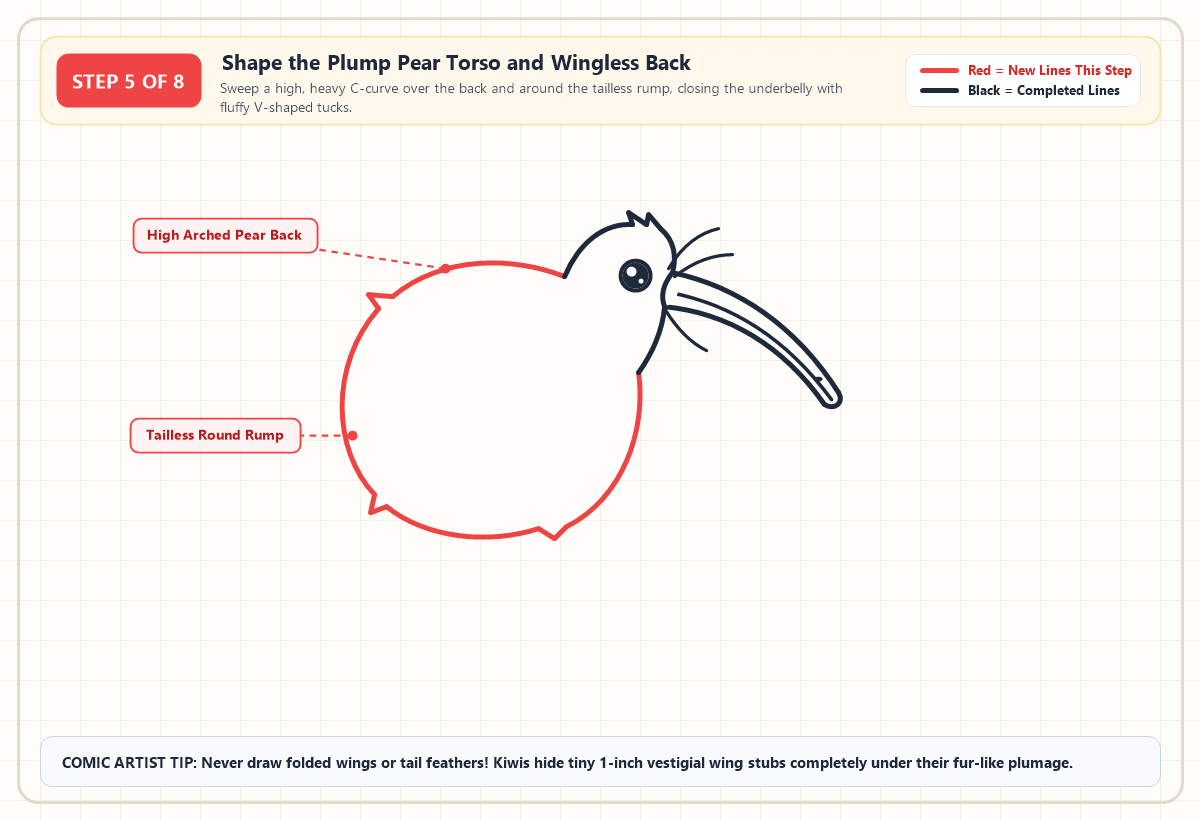
From the base of the nape, sweep a high, generous C-curve up over the back and all the way around a wide, rounded rump on the left, then connect the underbelly back to the throat line. Break the smooth outer contour with two small jagged feather tucks along the back rump and lower belly. Resist the urge to draw a folded wing shield or tail feathers here real kiwis hide tiny one-inch vestigial wing stubs completely beneath their thick, hair-like coat and have zero external tail plumage.
Step 6: Grounding the Muscular Thighs and Three Toed Claws
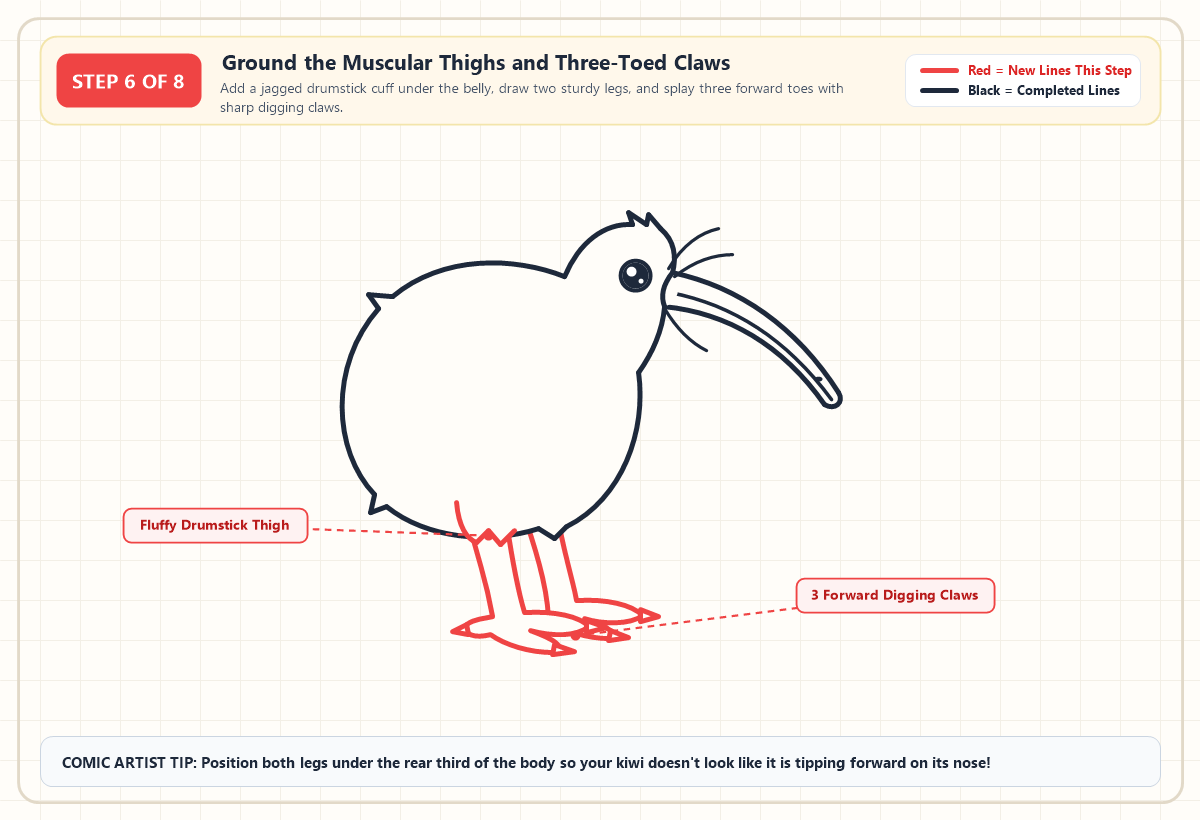
Underneath the rear third of the pear belly, sketch a jagged, W-shaped fur cuff to represent the muscular drumstick thigh before extending two stout, parallel leg shafts down to the ground. At the bottom of each foot, splay three thick forward toes tipped with sharp, triangular digging claws, plus a tiny rear hallux toe on the near leg. Kiwi legs make up nearly a third of the bird's total body weight, so drawing them thick and sturdy gives your character believable forest-floor power.
Step 7: Layering Shaggy Feather Texture and Bold Comic Ink
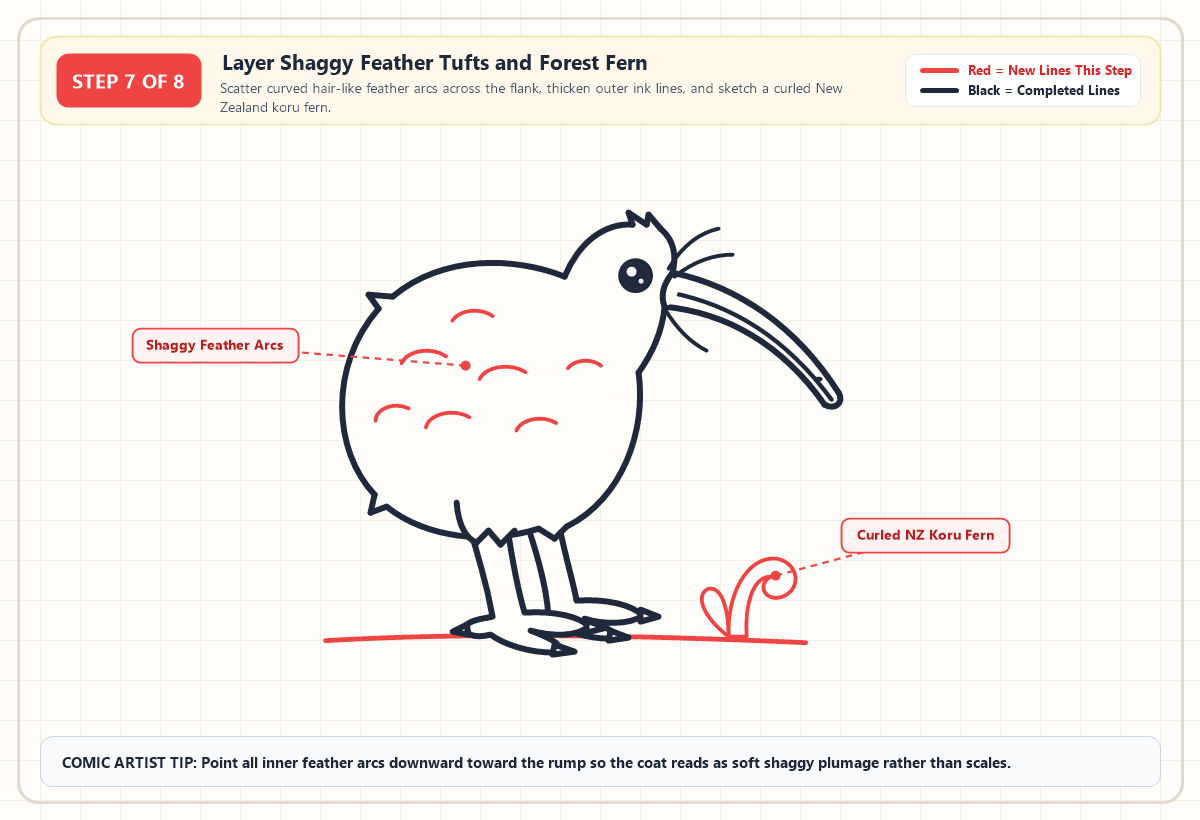
Bring the coat to life by scattering seven short, downward-curving feather arcs across the middle of the pear flank, pointing every curve toward the lower rump so they follow gravity like coarse brown fur. If you enjoy layering soft nocturnal bird feather textures, you will notice that spacing these arcs unevenly looks far more natural than drawing neat rows like fish scales. Finish your ink stage by drawing a gentle forest ground line beneath the claws and sprouting a curled New Zealand koru silver fern beside the front foot.
Step 8: Applying Warm Earth Tones and Underbelly Shading
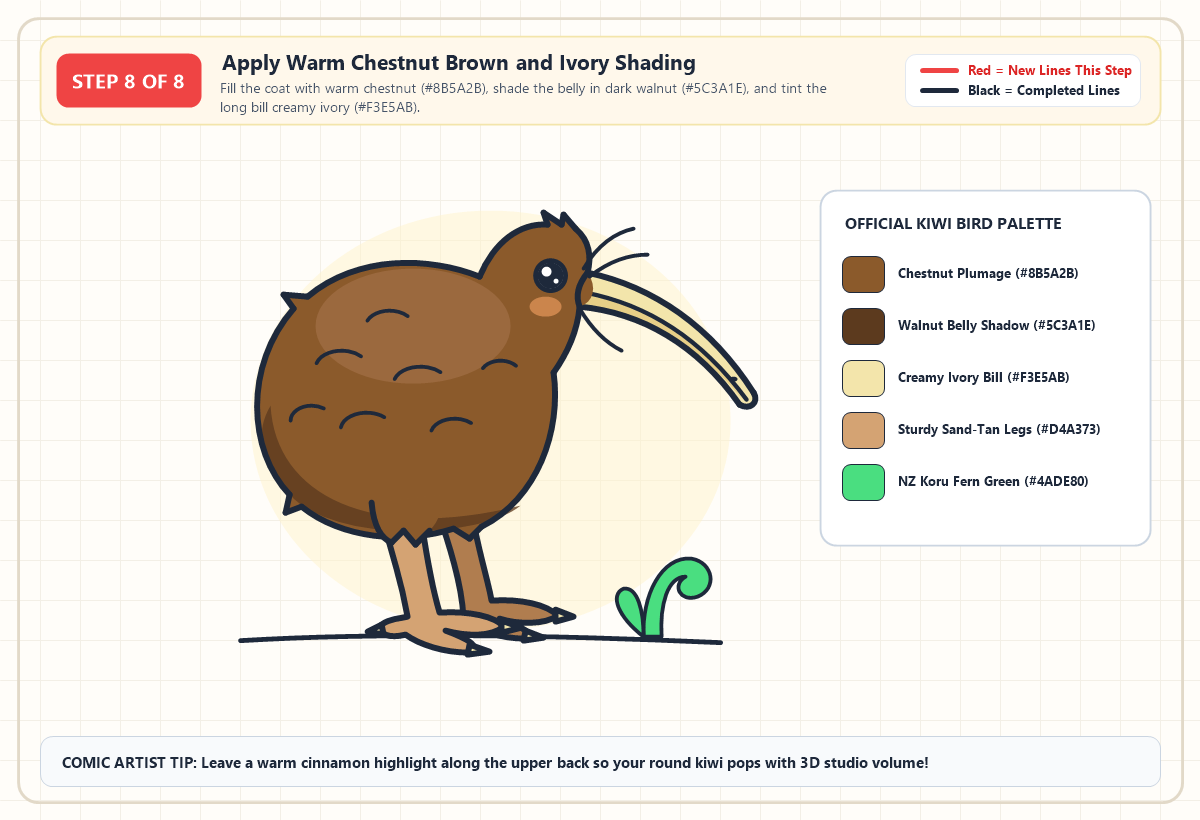
Fill the main pear body and head with a warm chestnut brown (#8B5A2B), then layer a curved crescent of deep walnut umber (#5C3A1E) along the lower rump and underbelly to create instant three-dimensional roundness. Drop a lighter cinnamon oval highlight (#A47148) across the upper back arch and dab a soft peach-rose blush (#F4A261) right below the glossy black eye. Finish by coloring the long curved bill and claws in creamy ivory (#F3E5AB), the sturdy legs in sandy tan (#D4A373), and the curled koru sprout in vibrant fern green (#4ADE80).
Printable Kiwi Bird Drawing PDF
Download the printable PDF to use now or save for later — it prints on A4 and Letter paper.
Print PDFComparing Classic Naturalist Illustration With Cute Chibi Kiwi Style
Choosing between a classic storybook nature illustration and a modern kawaii chibi sticker comes down to eye scale, bill curvature, and warm color saturation. While field-guide cartoons emphasize a compact beady eye and muted umber earth tones, chibi character designs double the eye diameter, shorten the bill slightly to 1.2x head width, and add a rosy cheek oval underneath the eye.
Use the color and style comparison matrix below to match your digital brush Hex codes directly to physical Copic Sketch markers or Crayola colored pencils:
| Anatomical Zone | Classic Storybook Kiwi | Cute Chibi / Kawaii Kiwi | Official Hex Code | Copic Sketch & Crayola Match |
|---|---|---|---|---|
| Main Shaggy Plumage | Textured medium umber with fine hair strokes | Warm toasted chestnut with smooth cel-shading | #8B5A2B |
Copic E37 Sepia / Crayola Raw Umber |
| Underbelly & Rump Shadow | Deep bark brown cross-hatching along lower curve | Crisp crescent shadow hugging the belly and thigh | #5C3A1E |
Copic E49 Dark Bark / Crayola Sepia |
| Long Curved Bill & Claws | Pale horn ivory with subtle lower mandible shade | Creamy vanilla yellow with rounded blunt tip | #F3E5AB |
Copic YR30 Macadamia Nut / Crayola Peach Cream |
| Stout Legs & Foot Pads | Weathered sandy clay with faint toe creases | Smooth warm biscuit tan with thick cartoon outline | #D4A373 |
Copic E33 Sand / Crayola Tan |
| Koru Fern & Cheek Accent | Muted olive moss leaf with zero facial blush | Bright emerald fern sprout + #F4A261 coral cheek |
#4ADE80 |
Copic G14 Apple Green / Crayola Jungle Green |
Fixing Three Proportion Mistakes Beginners Make When Sketching a Kiwi
Most proportion problems happen when artists subconsciously borrow songbird habits and apply them to a flightless nocturnal ground dweller. Checking your pencil sketch against these three quick fixes before inking will save your drawing every time:
- Adding a Folded Wing or Tail Spike: Because we are used to drawing robins and sparrows, our hand automatically sketches a teardrop wing on the side. Erase any internal wing shield and replace it with five to seven open, curved fur tufts so the torso reads as a seamless shaggy coat.
- Drawing a Short, Straight Triangle Beak: A short conical bill turns a kiwi into a brown baby chicken. Just as when you are balancing oversized bird beaks in cartoon drawing, let the kiwi's slender ivory bill sweep outward at least 1.5 times the width of the head with a gentle downward curve.
- Planting the Legs Under the Front Chest: If you attach the legs too far forward under the throat, the round rump hangs unsupported in the air. Shift both drumstick thighs back under the rear third of the pear oval so the bird stands solidly over its feet.
Frequently Asked Questions About Sketching Kiwi Birds
Do you draw wings or a tail on a kiwi bird?
No, you should never draw visible folded wings or tail feathers on a kiwi bird. Real New Zealand kiwis are flightless birds whose vestigial one-inch wing stubs are completely hidden underneath a dense coat of shaggy, hair-like plumage, and they have no external tail feathers at all.
How do you make a kiwi bird drawing look fluffy instead of like a potato?
Break up the smooth outer oval with two or three small V-shaped saw-tooth notches along the crown, rump, and underbelly, then scatter five to seven downward-curving feather arcs across the flank. Combining a 2-to-1 pear silhouette with directional tufts creates instant shaggy feather texture.
Where should the nostrils go when drawing a kiwi bird beak?
Place a tiny teardrop nostril right at the blunt tip of the upper beak rather than near the face. The kiwi is the only bird on Earth with external nostrils at the very end of its bill, allowing it to sniff out earthworms deep underground.
What colors work best for shading a cartoon kiwi bird?
Use warm chestnut brown (#8B5A2B) for the main coat, deep walnut umber (#5C3A1E) for the lower belly and rump shadow, and cinnamon tan (#A47148) for the upper back highlight. Pair those earth tones with creamy ivory (#F3E5AB) on the long bill and sand tan (#D4A373) on the legs.
Bringing Your Own Flightless Bird Sketchbook Scene to Life
Now that your first kiwi bird is standing proudly beside its curled koru fern sprout, try sketching a second smaller chick right behind it probing its long bill into the mossy soil, or expand your page by sketching fuzzy Australasian wildlife step by step to build a complete Southern Hemisphere nature spread. Grab your fine-liner pen, print an extra copy of the vertical coloring sheet for a friend, and test how changing the eye size shifts your kiwi from woodland naturalist art to a playful cartoon mascot.