
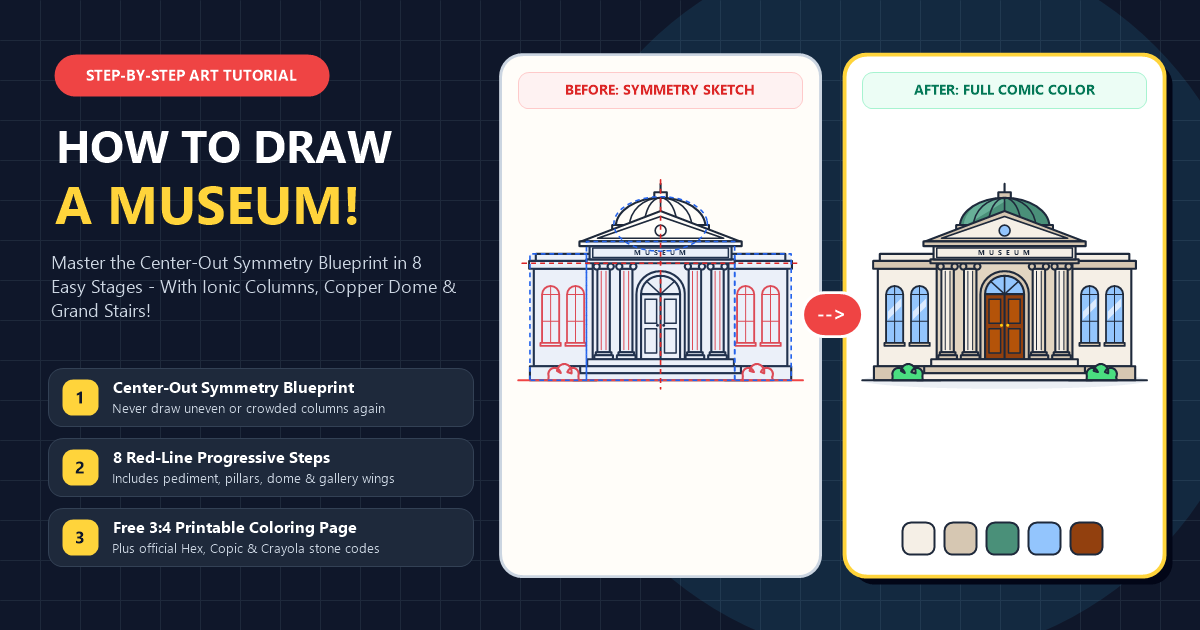
Learning how to draw a museum is much easier when you stop sketching pillars from left to right. Nine out of ten beginners start with the far-left column, work across the page, and suddenly run out of room for the front doors. Real architects never guess their spacing like that. When Sir Robert Smirke designed The British Museum in 1823 and Richard Morris Hunt drafted the grand Fifth Avenue facade of The Metropolitan Museum of Art, they anchored the center line first. You can use that exact same trick today. By locking in a wide triangular pediment, a horizontal signboard, and a three-tier staircase before placing a single pillar, your columns will line up with mathematical precision every time. Grab a pencil and ruler. In eight clear stages, you will build a landmark worthy of dinosaurs, marble statues, and priceless paintings.
Gathering Simple Drawing Supplies Before Your First Architectural Sketch
You do not need an expensive drafting table or architectural compass to sketch a crisp, balanced museum facade. A standard pencil, a straight edge, and smooth paper give you complete control over every column, stair riser, and roof angle.
Before you place your first mark on the page, set these four everyday tools within reach so you can sketch lightly and ink with confidence.
- 2B Graphite Pencil: Soft enough to glide across the page without indenting the paper, yet crisp enough for ruler-straight construction lines that erase cleanly.
- Clear 12-Inch Plastic Ruler: Seeing through the transparent plastic lets you check your underlying column spacing and horizontal roof bars before committing to a stroke.
- 0.5mm Waterproof Black Fineliner Pen: Delivers bold, uniform comic outlines that will not smudge or bleed when you layer alcohol markers or watercolors over the stonework.
- Kneaded Rubber Eraser: Lifts away temporary symmetry axes and pencil guidelines without roughing up the paper fibers before coloring.
Understanding Why Grand Museums Rely on Five Simple Geometric Shapes
Every world-famous neoclassical museum looks complex from the street, yet its silhouette is built from five elementary geometric shapes locked onto a central vertical axis. Once you see those underlying blocks, the intimidation of drawing classical architecture disappears completely.
Think of your drawing paper as a front-elevation blueprint divided straight down the middle by an imaginary plumb line. The central temple portico is a tall rectangle capped by a wide, low isosceles triangle called the pediment. Behind that triangle rises a semicircular skylight dome similar to the rotunda of the National Gallery of Art in Washington while twoentical rectangular gallery wings step outward on the left and right. To keep the building feeling grounded rather than top-heavy, each side wing should measure roughly 40 percent of the width of your central four-column portico.
Following the Eight Step Visual Blueprint for How to Draw a Museum
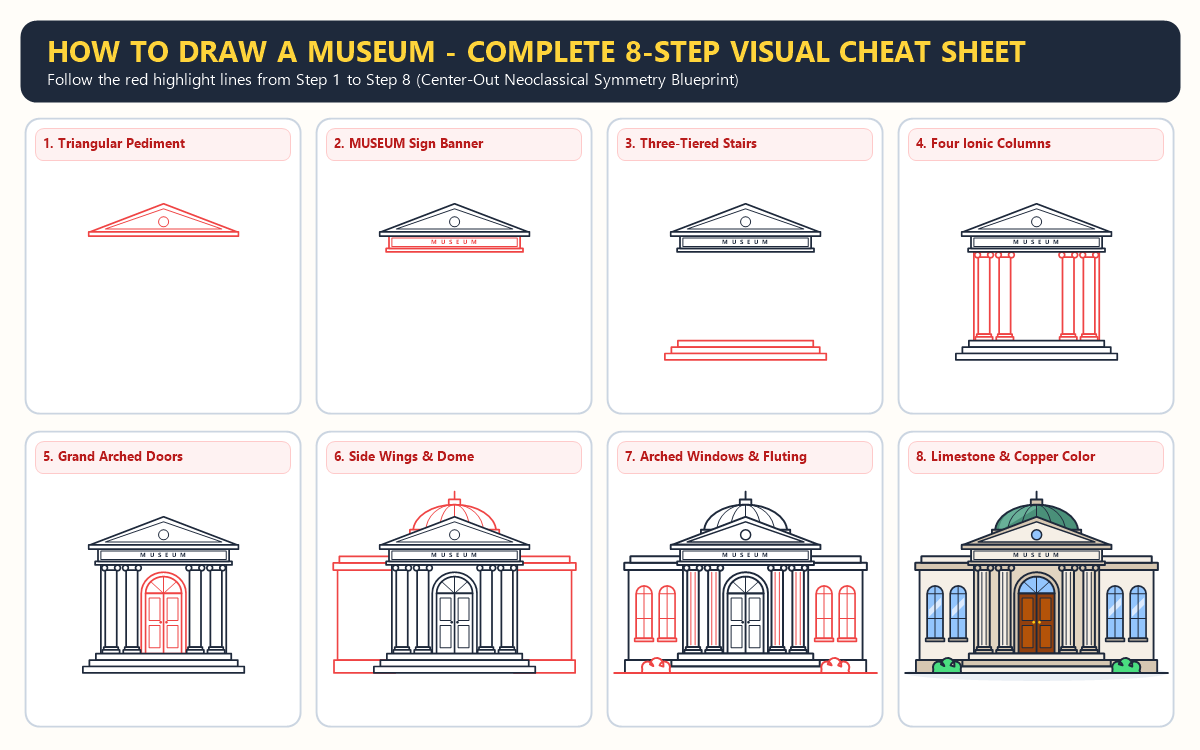
To make this tutorial effortless to follow, every stage below highlights new strokes in bright red while completed strokes switch to solid black ink. Keep your pencil pressure feather-light during the first six stages so you can fine-tune your proportions before inking.
Easy Museum Drawing Step by Step
The new lines in each picture show what to add next. Simple shapes will come together to make your museum. Let’s begin!
Step 1: Sketching the Central Triangular Pediment and Roof Cornice
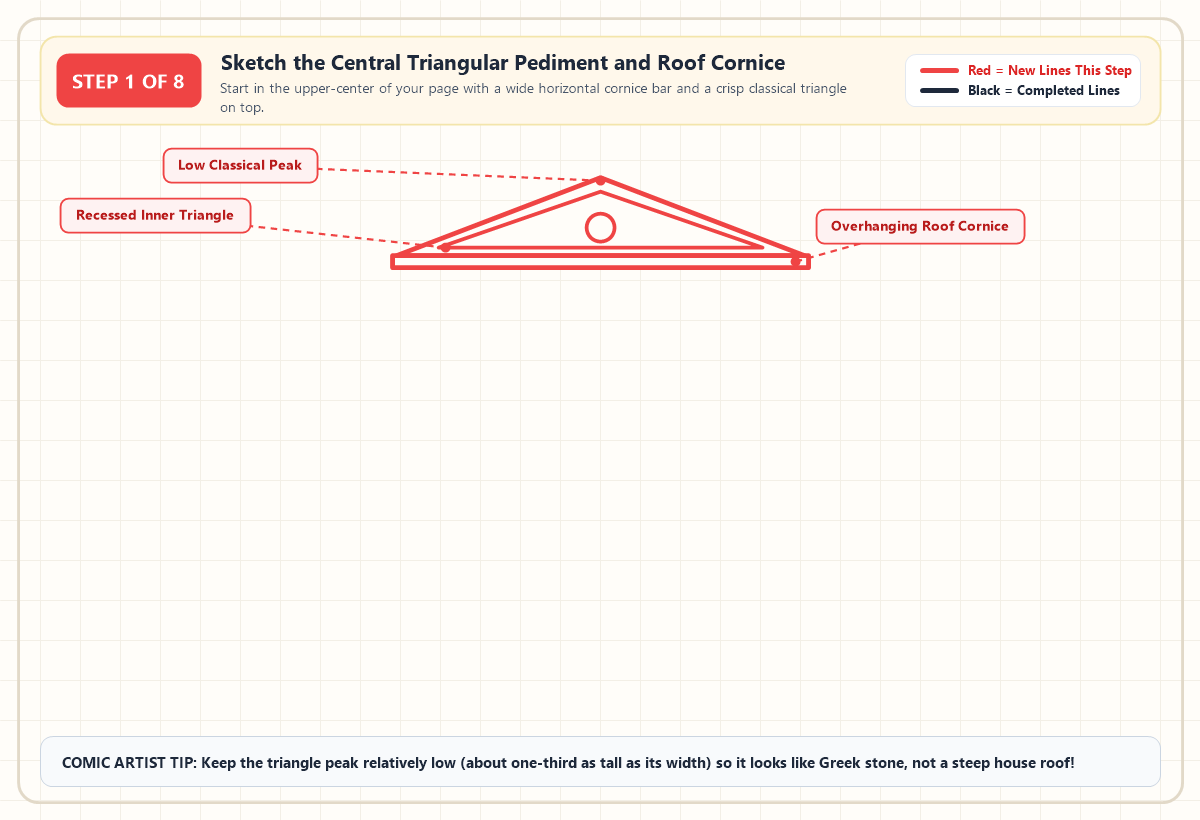
Start in the upper-middle section of your paper by drawing a wide, flat horizontal rectangle for the overhanging roof cornice. Directly on top of that bar, sketch a wide isosceles triangle whose peak sits dead-center on your page, then trace a smaller parallel triangle inside it to create recessed stone molding. Finish this upper gable by placing a small circle called an oculus medallion right in the middle of the inner triangle. Keep the triangle peak relatively low, about one-third as tall as its base width, so your roof looks like classical Greek marble rather than a steep chalet cabin.
Step 2: Adding the Horizontal Entablature Banner and Museum Sign
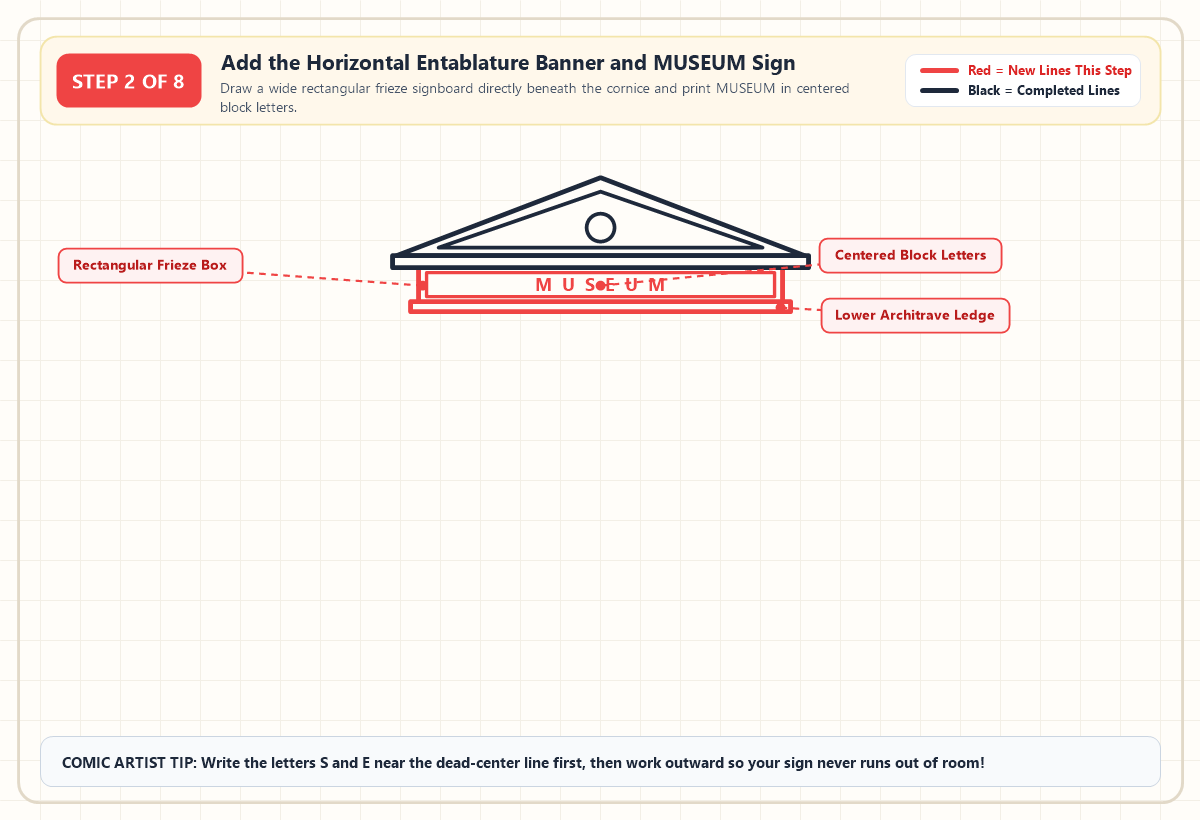
Drop two vertical lines down from the underside of your cornice bar inset slightly from the outer tips of the roof and connect them with a long horizontal line to form the rectangular frieze signboard. Underneath that rectangle, add a narrower horizontal strip called the architrave ledge, which will act as the ceiling beam resting on your columns. Frame the inside of the main banner with a thin border rectangle and print M U S E U M in crisp capital block letters. Pro tip: write the middle letters S and E on either side of the center line first, then work outward so your lettering stays perfectly centered.
Step 3: Building the Three Tiered Stone Steps at the Foundation
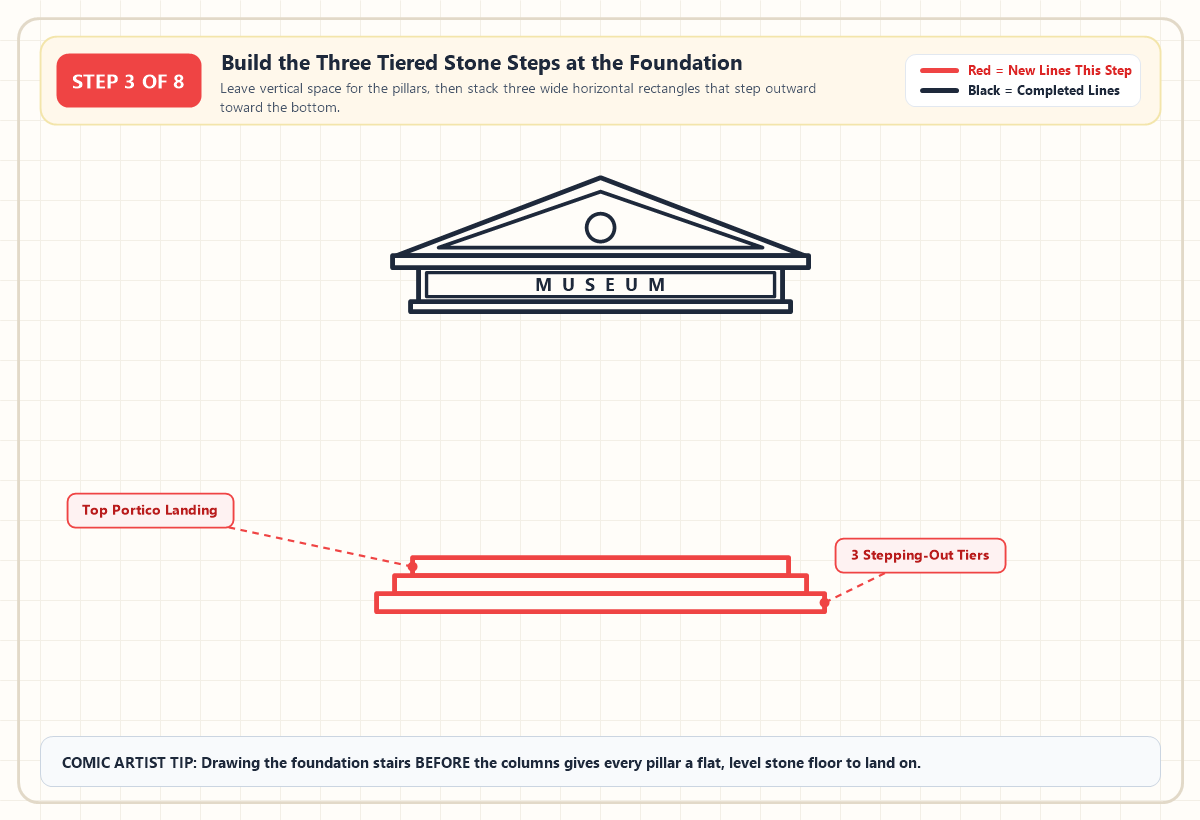
Skip down toward the bottom third of your canvas, leaving generous vertical breathing room for the tall pillars you will add next. Draw three long, flat horizontal rectangles stacked like a wedding cake so each lower tier steps outward slightly wider than the one above it. In classical architecture, this stepped stone platform is known as the stylobate. Drawing your stairs in Step 3 before sketching the columns guarantees that every single pillar lands on a flat, level stone floor rather than dangling unevenly in midair.
Step 4: Placing Four Symmetrical Ionic Columns Across the Front Portico
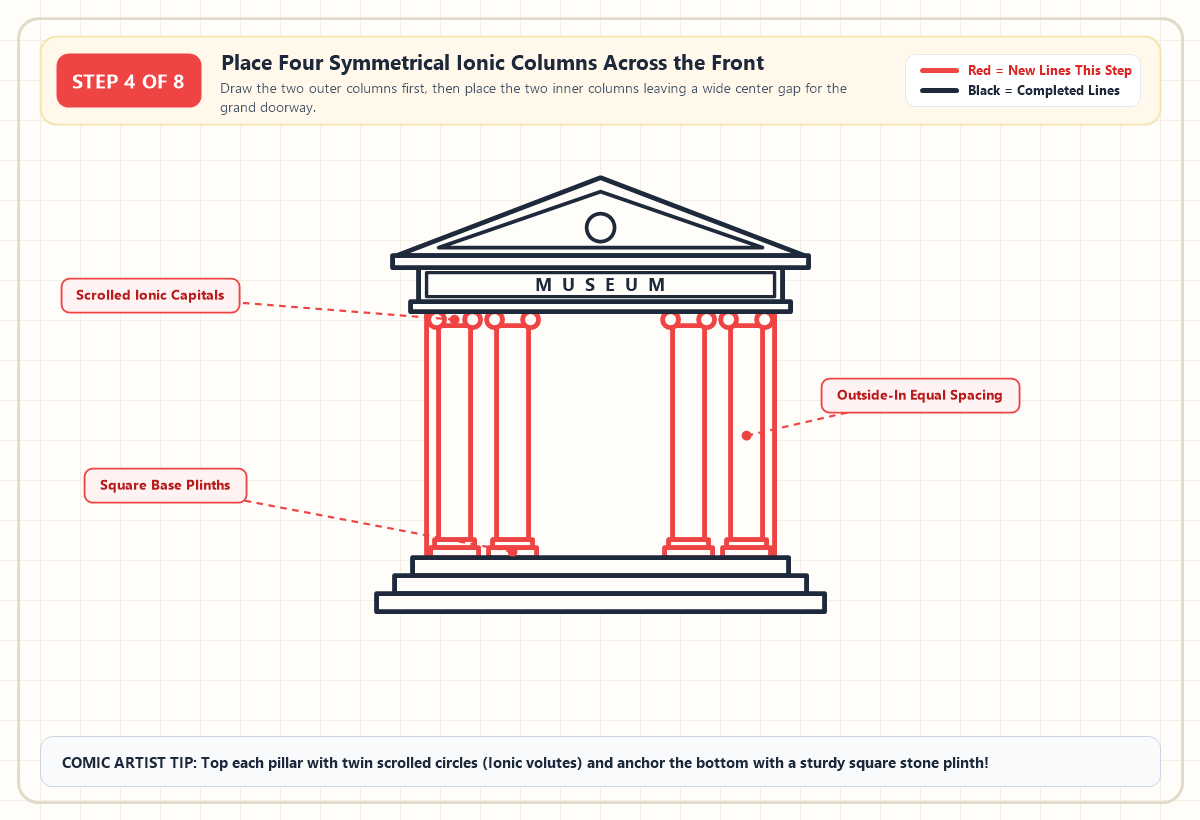
Now connect your upper entablature beam to the top stair landing using four tall, vertical column shafts and use the Outside-In Spacing Rule so they never crowd together. Draw the far-left column and far-right column first, lining them up right inside the outer edges of the MUSEUM signboard. Next, place the two inner columns slightly closer to the outer pillars, leaving a wide, inviting central bay in the middle for the grand entrance doors. Crown the top of each shaft with a rectangular cushion flanked by two small circles for the scrolled Ionic volutes, and ground the bottom of each pillar with a stepped square plinth.
Step 5: Framing the Grand Arched Entrance Doors Between the Center Pillars
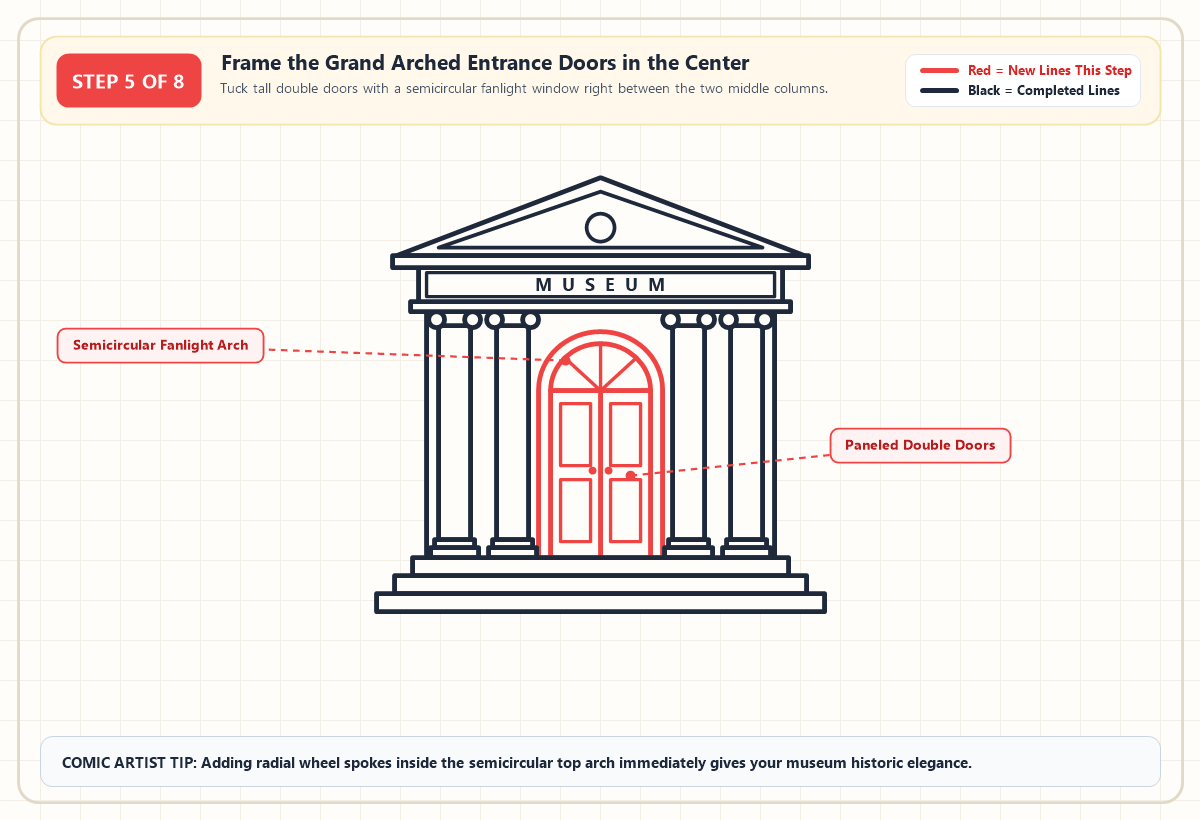
Inside the wide central space between your two middle columns, draw a tall archway that rises from the top step and curves smoothly into a semicircle near the upper third of the portico. Trace a second parallel arch just inside the outer stone frame to create a thick carved doorway surround. Divide the upper semicircular window called a fanlight transom from the lower doorway with a horizontal crossbar, and sketch three radiating wheel spokes inside the glass arch. Below the crossbar, split the doorway down the middle into double doors and add four vertical rectangular panels plus two small round brass handles.
Step 6: Extending the Left and Right Gallery Wings With Crowned Roofs
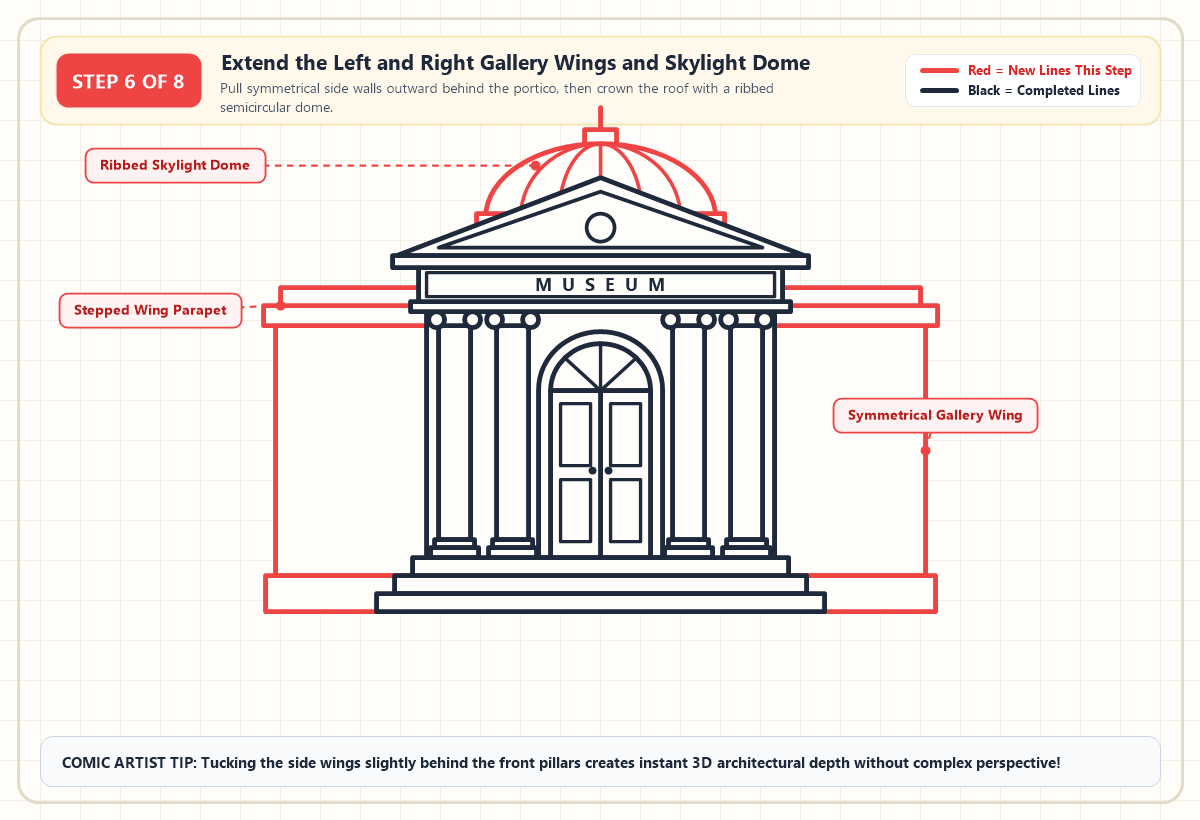
Give your museum monumental scale by pulling two symmetrical exhibition wings outward from behind the left and right edges of the central portico. For each wing, draw a vertical outer wall, a thick base plinth aligned with the bottom two stairs, and a two-stepped horizontal roof cornice at the top. Because these wing lines stop cleanly wherever they touch the outer columns, the central four-pillar temple naturally jumps forward in three dimensions. Finally, crown the skyline above your central triangle with a wide rectangular drum, a semicircular ribbed dome, and a small cupola lantern with a pointed finial spire.
Step 7: Inking Fluted Column Grooves Arched Windows and Foreground Shrubs
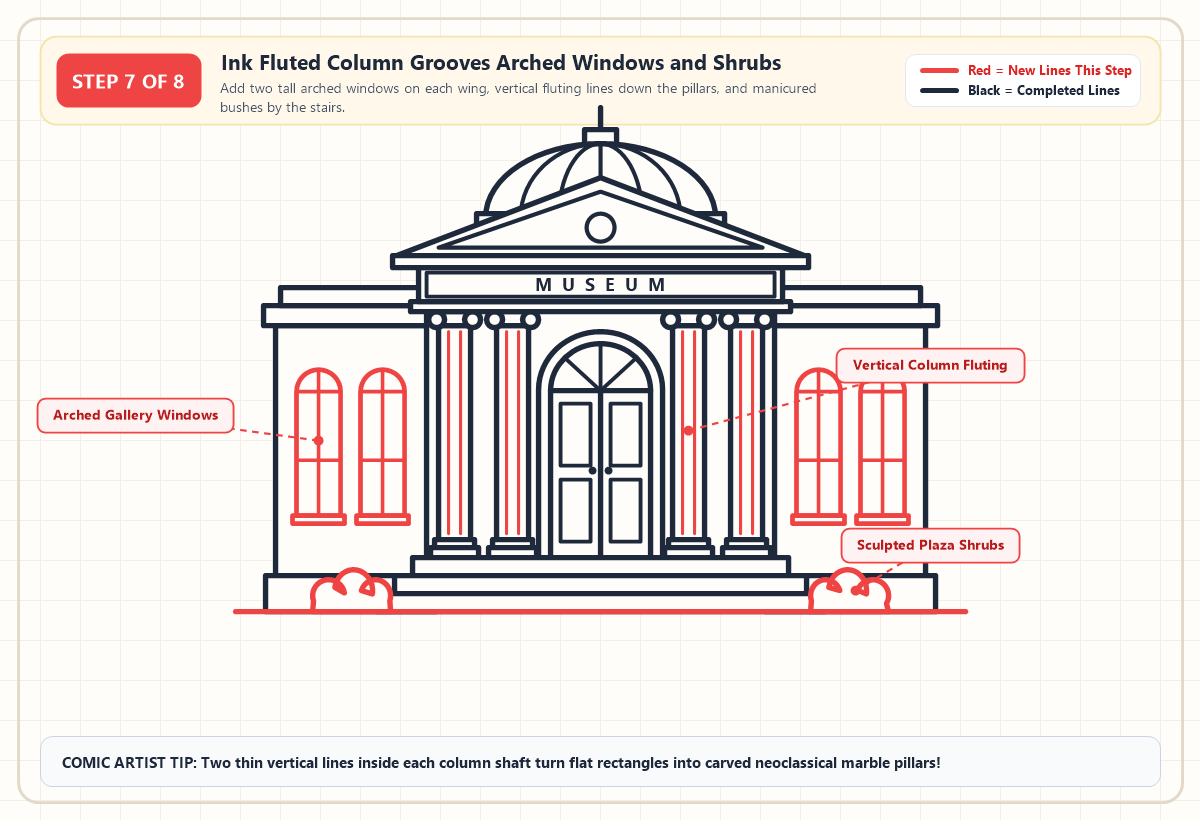
Bring your architectural facade to life with crisp structural details before reaching for your markers. On the left gallery wing, draw two tall arched windows with flat stone sills and cross-shaped muntin bars, then mirror those exact two windows on the right wing. Next, use your ruler to draw two thin vertical lines down the inside of each column shaft instantly transforming flat white strips into carved, fluted marble cylinders. Finish the ink stage by sketching a wavy, cloud-like boxwood shrub on each side of the front staircase and pulling a clean horizontal plaza ground line across the bottom.
Step 8: Coloring Warm Limestone Walls Sky Glass and Cast Shadows
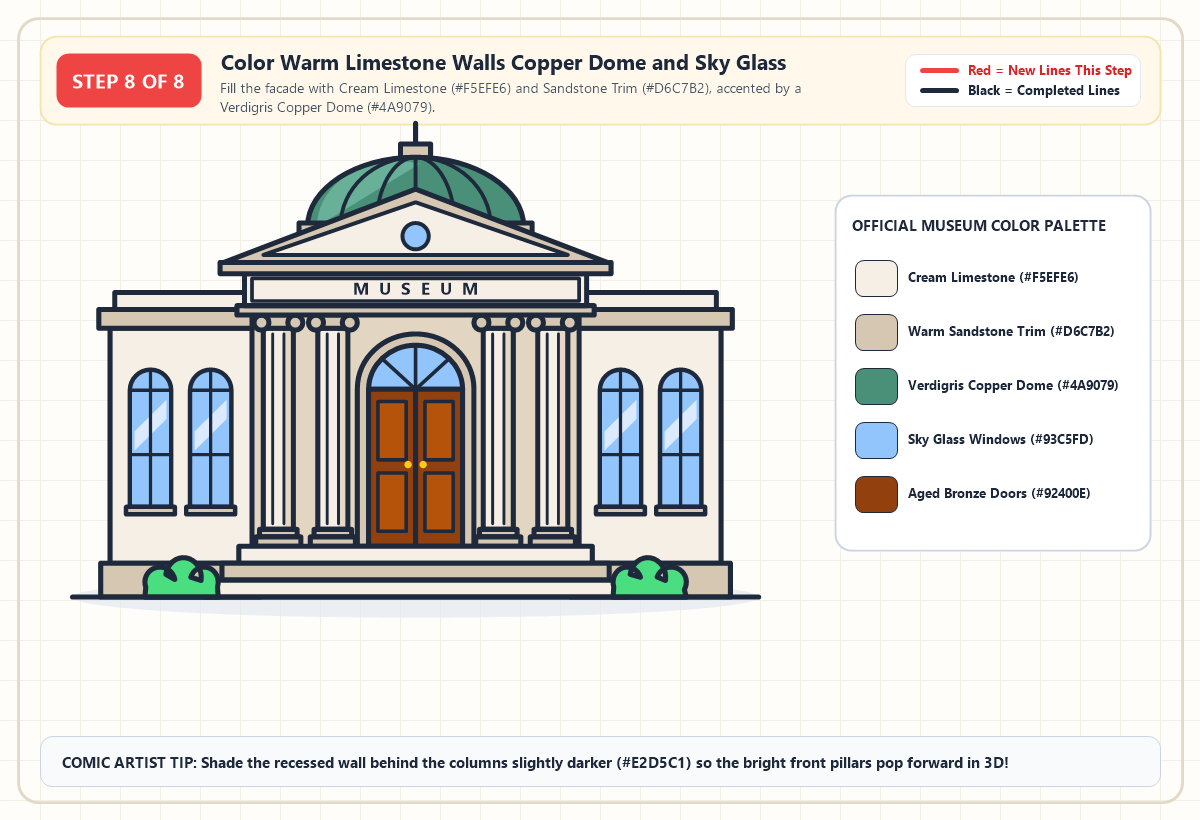
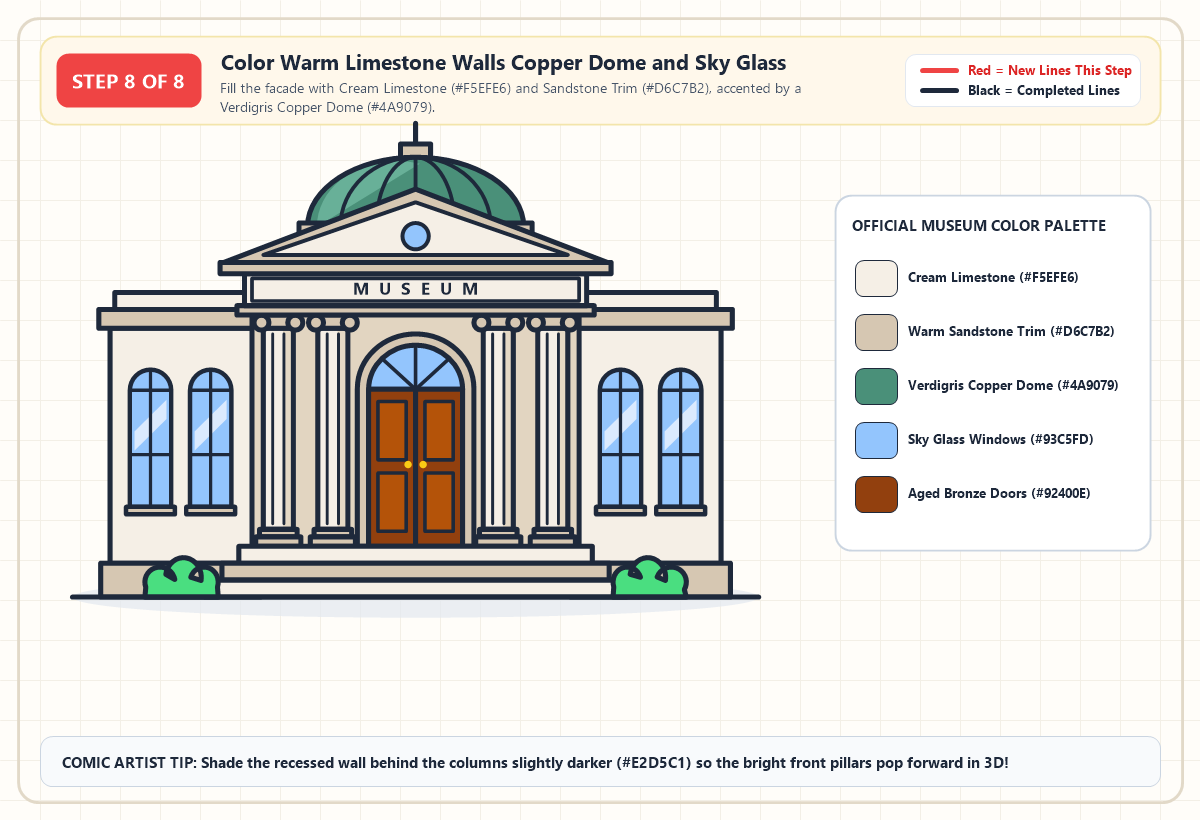
Great architectural coloring relies on subtle warm-and-cool contrast rather than painting the entire building dull battleship gray. Fill the main gallery walls, column shafts, and frieze banner with a pale Cream Limestone (#F5EFE6), then layer a slightly darker Warm Sandstone (#D6C7B2) across the recessed wall behind the columns, the roof cornices, and the middle stair riser. That darker tone behind the pillars pushes the bright front columns forward like a real 3D pop-up book. Color the skylight dome in oxidized Verdigris Copper (#4A9079), fill the arched windows and fanlight with Sky Glass (#93C5FD) leaving diagonal pale-blue reflection streaks, and finish the double doors in rich Aged Bronze (#92400E).
Printable Museum Drawing PDF
Download the printable PDF to use now or save for later — it prints on A4 and Letter paper.
Print PDFComparing Classic Neoclassical Landmarks With Modern Glass Museums
While our eight-step blueprint models a traditional Beaux-Arts and Greek Revival landmark like The British Museum or The Met, many artists love customizing their sketch toward modern architecture like I. M. Pei's glass Louvre Pyramid or Frank Lloyd Wright's spiraled Guggenheim. If you enjoy drawing grand civic buildings with columns and symmetrical facades, you can also explore our step by step guide on sketching a classic public library to expand your cityscape.
Use the color and material reference matrix below to match our exact digital Hex codes with real-world Copic Sketch markers and Crayola crayons on your desk.
| Architectural Surface Element | Official Hex Code | Copic Sketch Equivalent | Crayola Crayon Match | Pro Architectural Shading Tip |
|---|---|---|---|---|
| Main Walls & Fluted Columns | #F5EFE6 (Cream Limestone) |
YR30 (Macadamia Nut) |
Almond / Antique Brass (Light) | Leave a thin uncolored vertical strip along the left edge of each pillar for sunlight |
| Cornice Trim & Portico Shadow | #D6C7B2 (Warm Sandstone) |
E42 (Sand White) |
Tan / Desert Sand | Darken the recessed wall behind the pillars so the four columns pop forward in 3D |
| Ribbed Skylight Dome | #4A9079 (Verdigris Copper) |
BG96 (Bush / Patina) |
Tropical Rain Forest / Sea Green | Blend a lighter mint highlight (#68B098) along the upper-left curve of the dome |
| Gallery Windows & Fanlight | #93C5FD (Sky Glass Blue) |
B21 (Baby Blue) |
Cornflower / Sky Blue | Slice two diagonal pale streaks (#DBEAFE) across the panes to mimic tempered glass |
| Grand Double Entrance Doors | #92400E (Aged Bronze Wood) |
E37 (Sepia / Bronze) |
Chestnut / Raw Umber | Dot the two center handles with bright gold (#FACC15) to draw the viewer's eye |
Fixing Three Proportion Mistakes Beginners Make When Sketching Buildings
Even experienced urban sketchers can accidentally make a grand civic building look like a squished suburban house if one or two structural ratios slip out of alignment. If your first draft feels slightly off-balance, check your lines against these three classic architectural pitfalls and quick fixes.
- Crowding the Pillars to One Side: When you draw columns sequentially from left to right, the gaps almost always shrink toward the right edge. Erase and place the two outer columns directly beneath the ends of the
MUSEUMbanner first, then frame the center doors with the two inner pillars. - Pitching the Pediment Roof Too Steep: A tall, pointy 60-degree triangle makes the building look like an alpine cabin or church steeple rather than a Greek temple. Keep the vertical height of your triangle peak at roughly one-third of its horizontal base width.
- Letting the Side Wings Overpower the Center: If the left and right wings stretch wider than the central portico, the main entrance loses its visual authority. Keep each side wing around 40 to 50 percent of the central portico's width, and check out our tutorial on mastering simple one-point perspective for beginners when you are ready to tilt buildings at dramatic street-corner angles.
Frequently Asked Questions About Sketching Classic Architecture
How do you space museum columns evenly without measuring every millimeter?
Use the outside-in architectural placement method instead of drawing pillars sequentially from left to right. Anchor the far-left and far-right columns directly under the outer corners of your MUSEUM signboard first, then place the two inner columns equidistant from the center line to leave a wide middle bay for the front doors.
What basic geometric shapes do you need to draw a classic museum?
Every neoclassical museum facade breaks down into five basic geometric shapes: a wide low isosceles triangle for the pediment roof, stacked horizontal rectangles for the frieze banner and three-tier stairs, tall vertical cylinders for the Ionic pillars, smaller side rectangles for the gallery wings, and a semicircle for the central dome.
How can I turn an exterior museum drawing into an inside exhibit scene?
Reuse the exact same center-out symmetry grid from the exterior facade, but turn the outer columns into interior marble hallway pillars and replace the front steps with a polished checkerboard floor. Place a low velvet-rope pedestal along the center line for drawing a towering T-Rex fossil exhibit or a classical marble bust.
What are the best colors for shading a marble or limestone museum building?
Avoid leaving stone walls pure white or coloring them flat battleship gray, which makes classical architecture look cold and lifeless. Layer a pale Cream Limestone base (#F5EFE6) across sunlit surfaces, then use Warm Sandstone (#D6C7B2) inside the recessed portico wall and along the right side of each column shaft for 3D depth.
Bringing Your Own Architecture Sketchbook to Life With City Landmarks
Now that your grand neoclassical museum stands complete with fluted Ionic columns, a verdigris copper dome, and sunlit glass galleries, you can customize the plaza to tell your own story. Hang vertical red exhibition banners between the outer columns announcing an Ancient Egypt or Dinosaur Fossil show, or sketch a bubbling stone fountain and school bus out front. Once you feel comfortable stacking symmetrical stone blocks and arches, challenge your pen control by sketching medieval stone castles and towers next to build an entire historic skyline in your sketchbook.