

Most beginners who sit down to learn how to draw a trail make the exact same frustrating mistake on their very first stroke. They draw two wide, parallel lines running straight up the middle of the paper like a vertical railroad track. Instead of lying flat on the earth, the path immediately stands straight up like a brick chimney against a wall. Over a century ago, National Park Service landscape architects and classic storybook illustrators solved that visual trap by pairing a high eye-level horizon with a pinched S-curve ribbon. When a footpath starts wide at the tips of your boots and pinches down to a tiny needle point at the base of distant mountains, your brain instantly reads miles of three-dimensional depth. You don't need a technical ruler or complex architectural grids to pull off that illusion. If you can sketch simple S, V, U, and O curves, you can build a winding woodland and alpine hiking trail in under twelve minutes. Grab a pencil, relax your wrist, and let's carve your path into the hills stroke by stroke.
Gathering Simple Drawing Supplies Before Your First Sketch
You only need a standard 2B graphite pencil, a soft kneaded eraser, two waterproof black fineliner pens, and five vibrant outdoor markers or crayons to draw a cartoon nature trail cleanly. Keeping your desk setup simple stops you from over-shading early construction lines and ensures crisp comic contours that pop off the page.
Landscape drawings rely heavily on overlapping layers your foreground wooden signpost, evergreen pine trees, and distant mountain peaks all cross over the early horizon line. If you gouge the paper with a hard H-grade pencil in Step 1, erasing those hidden horizon lines inside the signpost and tree trunks later will leave muddy grey creases across your drawing. Sketching lightly with soft graphite and locking in your final shapes with waterproof ink lets you wash warm golden ochre, pine green, and sky blue markers right over the page without a single smudge.
- 2B Graphite Pencil Glides across the paper with whisper-light pressure so you can map out your horizon hills and converging S-curve path before committing to ink.
- Kneaded or Vinyl Eraser Lifts away the hidden horizon guidelines trapped behind your foreground wooden trailhead signpost and layered pine trees without roughing up the paper fibers.
- Waterproof Black Fineliners (0.8mm and 0.4mm) Use the bold
0.8mmtip for foreground stepping stones, the timber signpost, and outer pine trees, then switch to the fine0.4mmnib for distant mountain peaks, wood grain, and trail pebbles. - Heavyweight Smooth Paper (120 gsm or Marker Pad) Prevents rich golden ochre, forest green, and alpine sky blue markers or gel pens from feathering outside your inked borders.
Understanding Why Landscape Artists Build Trails From Three Simple Shapes
Every believable three-dimensional trail drawing relies on three simple geometric guides a horizontal eye-level line across the upper third of the page, a pinched perspective triangle that converges to a single vanishing point, and a wide foreground oval zone at the bottom. Blocking in this triangle-and-ribbon framework before you add trees or rocks forces every detail on the ground plane to recede naturally into the distance.
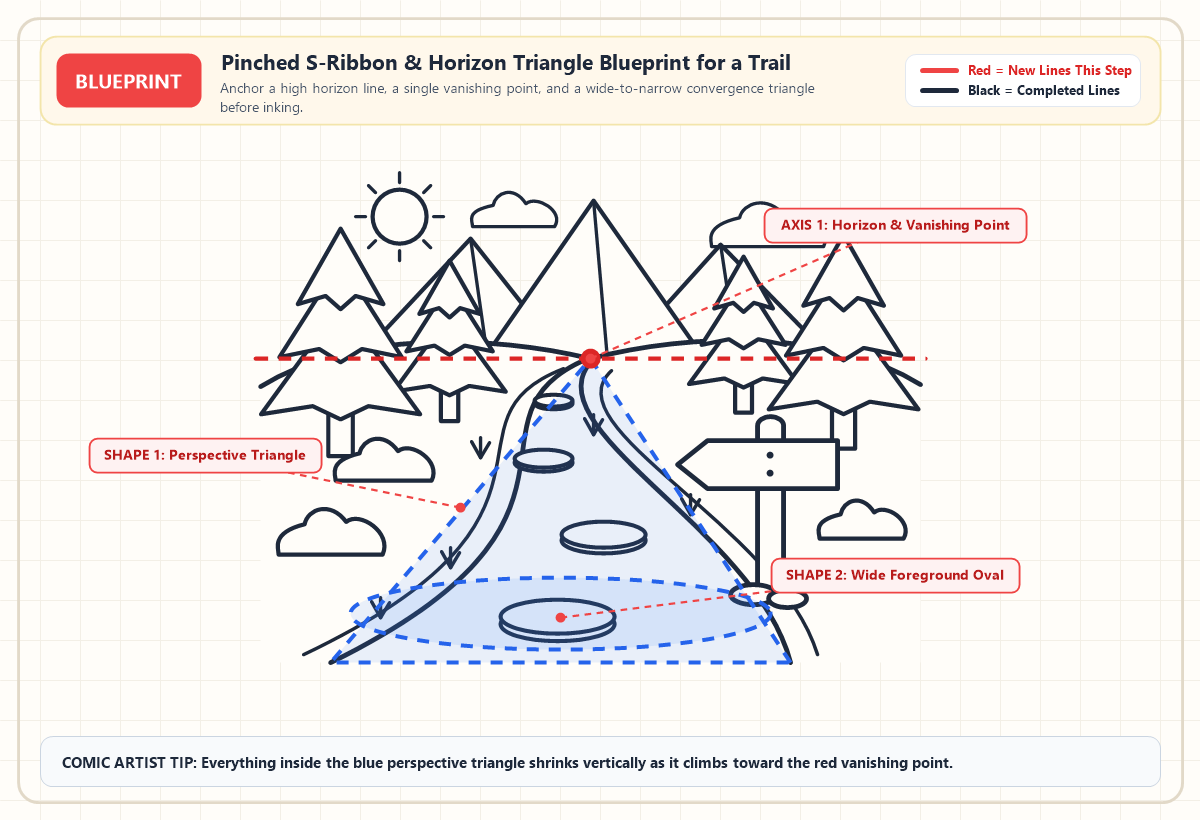
When you practice foundational 3D shape construction for beginners, you quickly notice how linear perspective compresses flat surfaces vertically. Imagine laying a giant triangle flat on the ground with its wide base touching your shoes and its sharp top tip resting on the distant horizon. Even when your hiking trail weaves left and right in a playful S-curve, its left and right dirt edges must stay trapped inside that narrowing blue triangle. Because of foreshortening, every stepping stone, dirt rut, and pine tree inside or alongside that triangle shrinks in both height and width as it climbs toward the red vanishing point dot.
Following the Eight Step Visual Blueprint for How to Draw a Trail
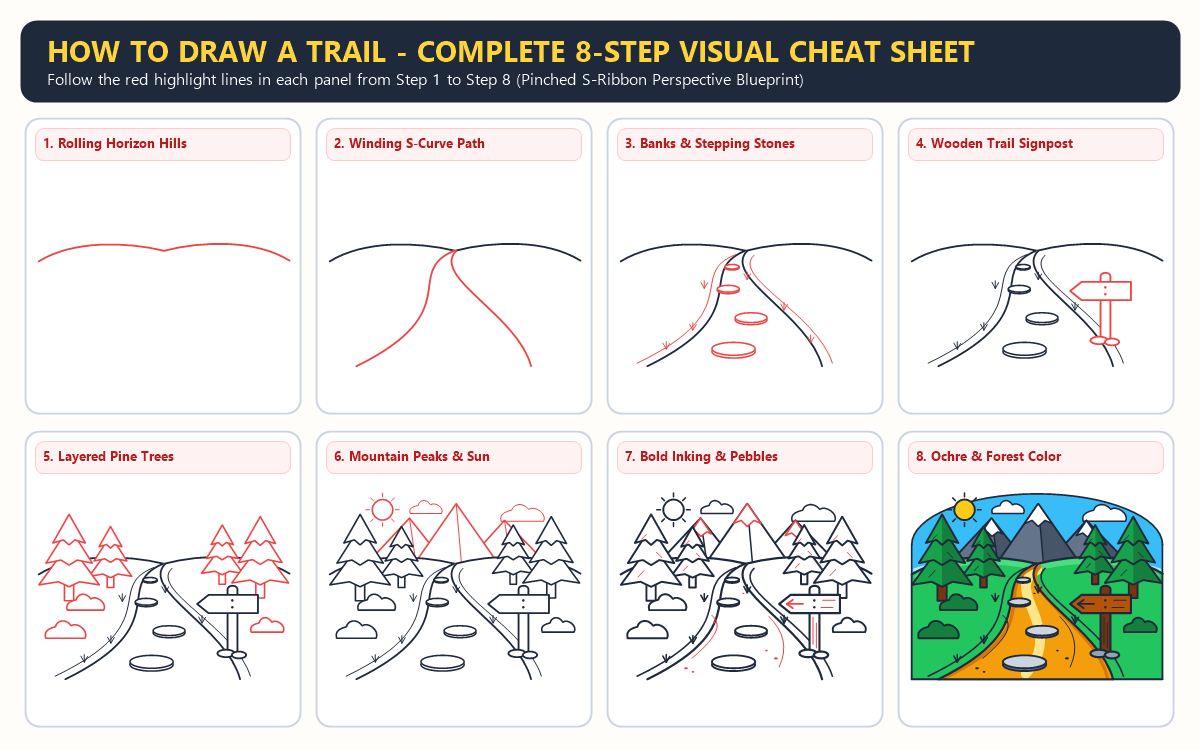
Learning how to draw a trail step by step becomes effortless when you build from the rolling horizon hills down to the winding S-curve ribbon, then layer in foreground landmarks, evergreen trees, and distant alpine peaks. In every stage card below, the bright red lines highlight the exact new strokes to draw right now while completed lines from earlier stages turn solid black.
Easy Trail Drawing Step by Step
The new lines in each picture show what to add next. Simple shapes will come together to make your trail. Let’s begin!
Step 1: Establishes the Rolling Horizon Line and Vanishing Point

Start about one-third of the way down from the top of your paper so you leave generous room underneath for the ground plane. Instead of ruling a stiff, dead-flat line across the page, sketch two gentle, arching hill curves that rise softly on the left and right sides and dip together near the center. That slight V-shaped dip where the left and right hills meet is your vanishing point notch the exact spot where your hiking trail will disappear over the ridge.
Step 2: Sweeps the Winding S Curve Trail From Wide Foreground to Narrow Point
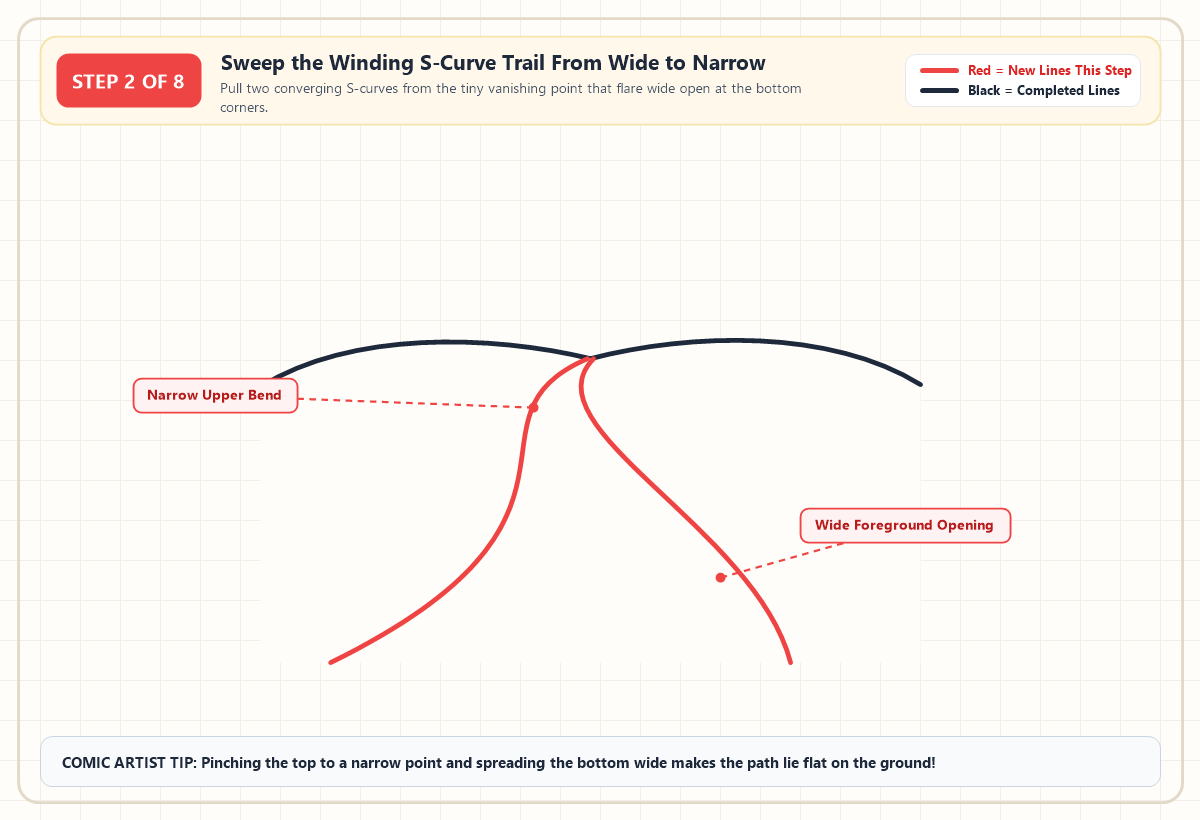
Place the tip of your pencil right inside that central vanishing point notch on the horizon. Pull a smooth, sweeping S-curve downward that bends first toward the left middle of the page, swings back toward the center, and flares wide open to the bottom-left corner of your drawing. Return to the exact same horizon notch leaving only a tiny sixteenth-inch gap and draw a matching second S-curve that widens steadily as it flows down to the bottom-right corner. Notice how the trail starts narrower than a pencil tip at the top and spreads nearly five inches wide at the bottom edge.
Step 3: Shapes the Grassy Bank Edges and Foreshortened Stepping Stones
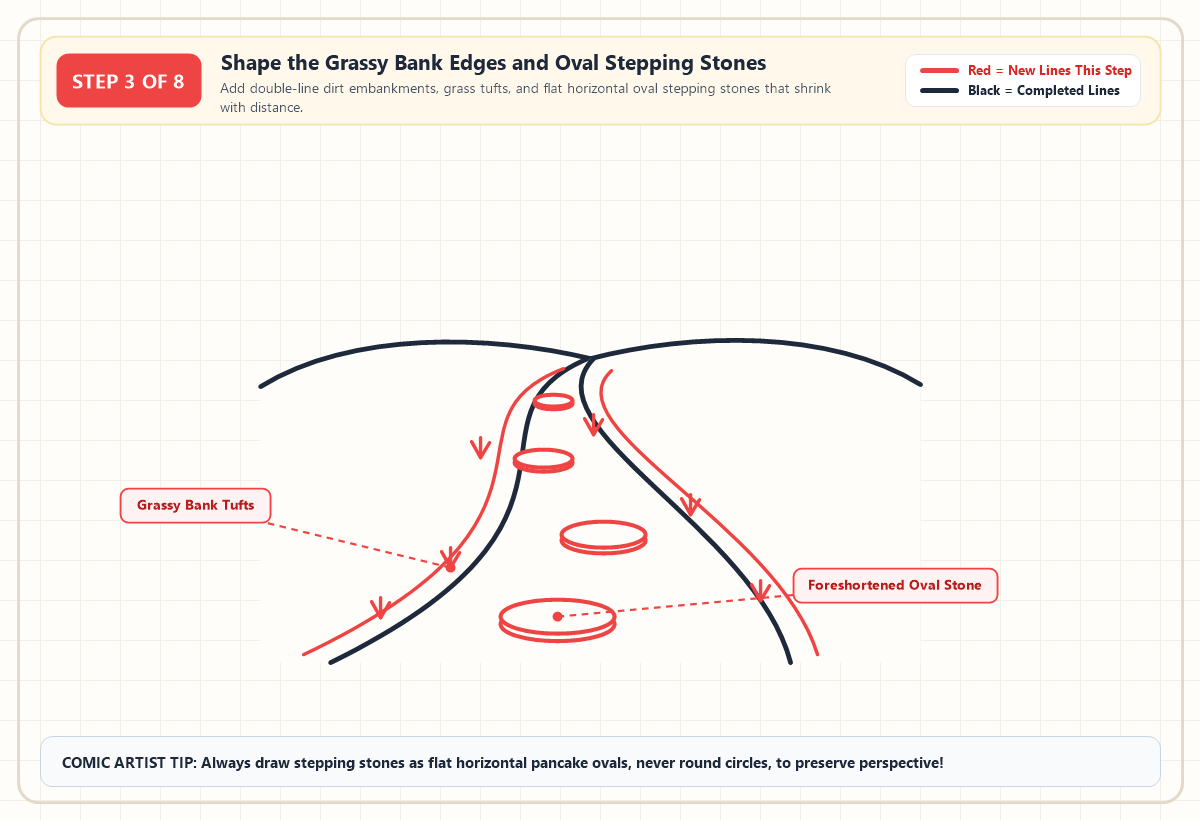
Real dirt trails aren't painted onto flat glass; centuries of hiking boots and rain carve a slightly sunken channel bordered by raised grassy banks. Just outside both S-curve trail lines, trace a thinner parallel curve along the outer bends to form a raised dirt embankment lip, and sprout six small V-shaped grass tufts along the border. Next, sketch four flat horizontal oval stepping stones climbing up the center of the path. Make the bottom foreground stone wide and plump, add a thin curved bottom rim under each oval for three-dimensional slab thickness, and shrink each stone progressively as it nears the horizon.
Step 4: Plants the Rustic Wooden Trailhead Signpost on the Right Bank
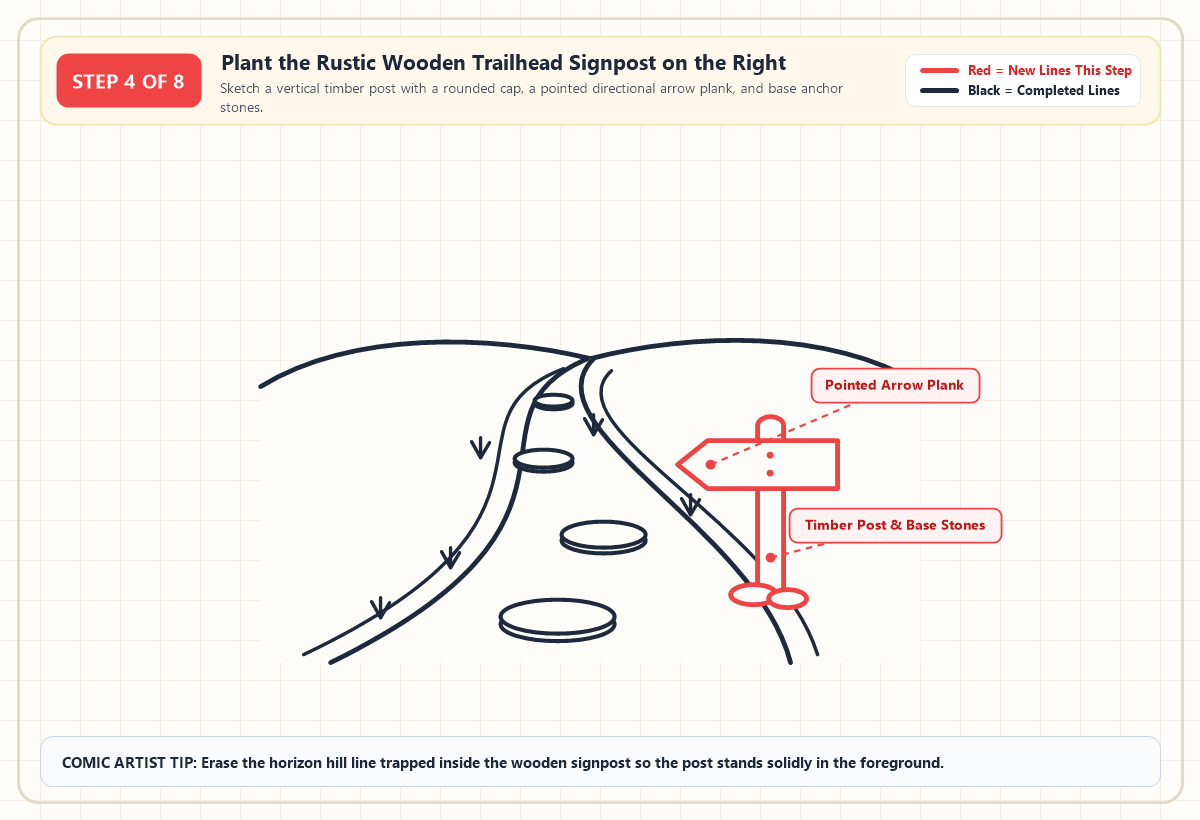
Adding a classic National Park wooden trailhead signpost on the right grassy bank immediately gives your foreground scale and storytelling charm. On the lower-right side of the path, draw two vertical parallel lines capped with a small rounded dome for a sturdy cedar timber post. Across the upper half of that post, sketch a horizontal rectangular plank whose left end tapers into a sharp directional arrow pointing straight toward your trail. Erase the post lines trapped inside the arrow plank, dot two round nail heads in the center, and nestle two small oval rocks against the bottom of the post to anchor it into the soil.
Step 5: Frames the Winding Path With Layered Pine Trees and Trailside Bushes
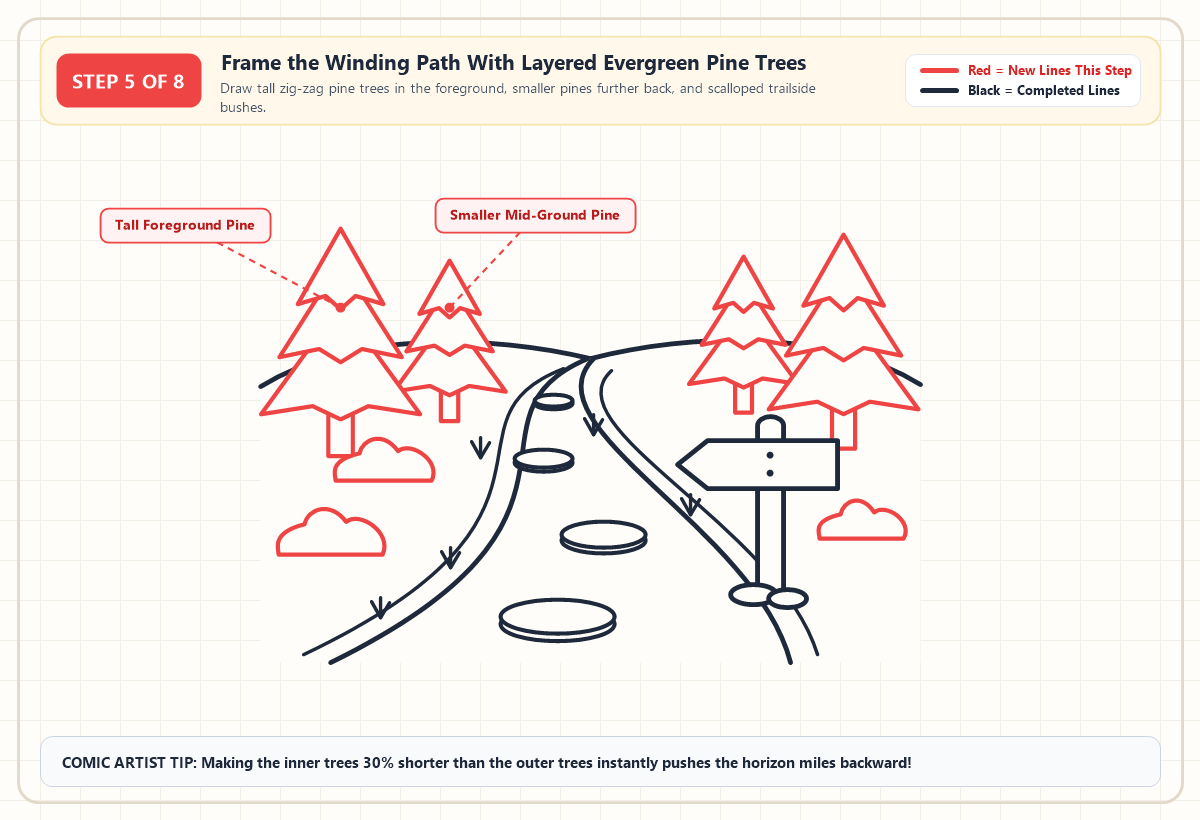
Now let's use tree scale to double the illusion of distance across your hillsides. On the far left and far right outer edges, sketch two tall evergreen pine trees built from three stacked, zig-zag triangular tiers resting on short rectangular trunks. Slightly closer to the center vanishing point, draw two noticeably smaller pine trees about thirty percent shorter than the outer pair perched right along the upper hill crests. Use your kneaded eraser to lift away the horizon hill lines hidden inside the tree canopies, then tuck three scalloped, cloud-like fern bushes around the lower hillside trunks.
Step 6: Crowns the Horizon With Jagged Mountain Peaks and a Sunny Sky
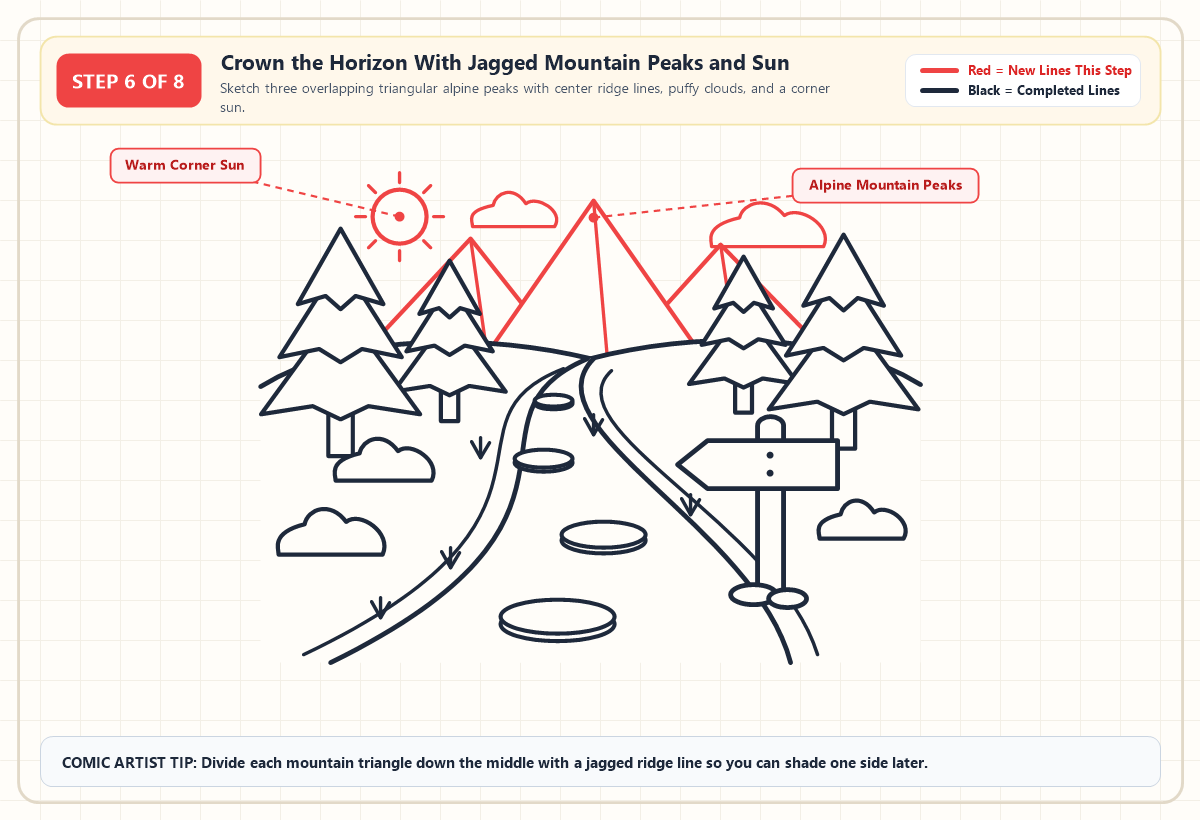
To turn your woodland walk into an epic high-country vista, sketch three overlapping triangular mountain peaks rising behind the rolling horizon hills. Make the center peak the tallest and frame it with two slightly lower peaks on the left and right. Down the center of each mountain triangle, draw a slightly angled ridge line running from the sharp summit peak down to the hillside this divides each mountain into a sunlit left face and a shadowed right face. Finish the sky by drawing a bright circular sun with eight short radiating dashes above the left pine trees and two puffy, flat-bottomed clouds drifting across the peaks.
Step 7: Inks Bold Comic Contours and Adds Wood Grain and Trail Pebbles
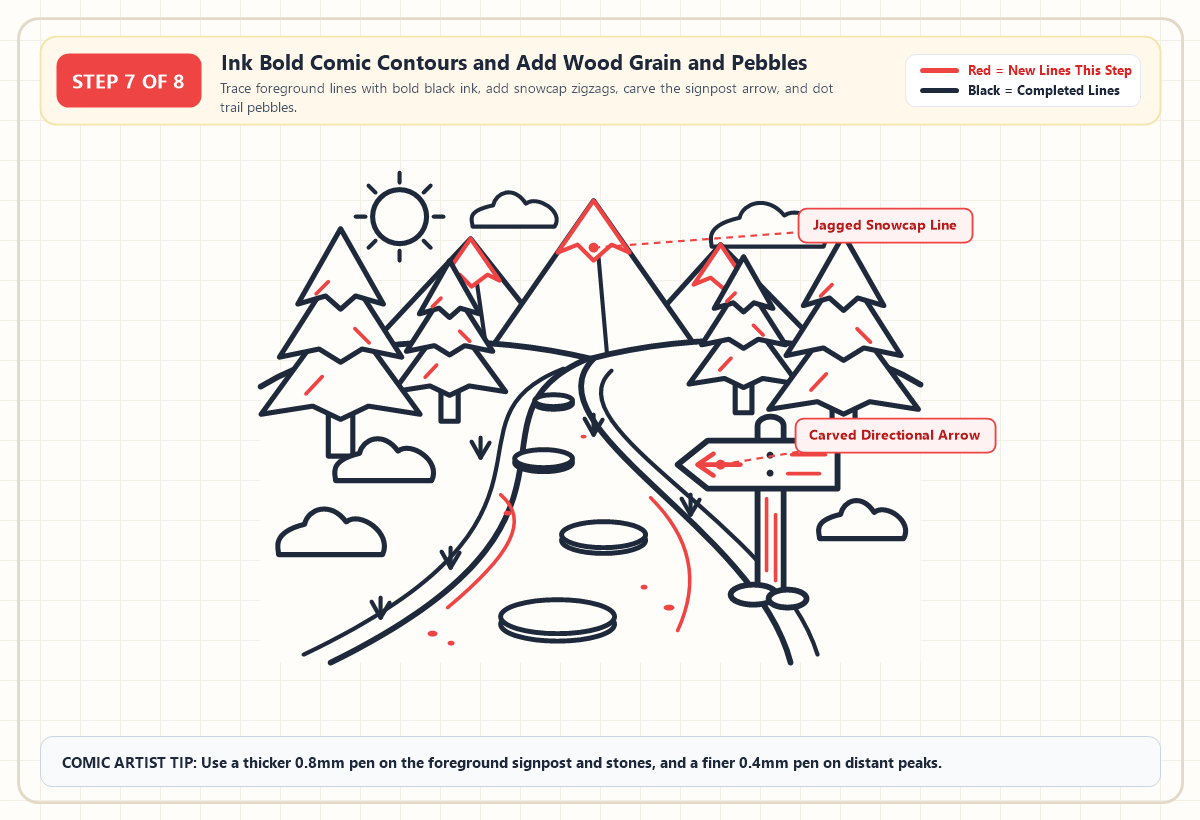
Take your 0.8mm waterproof black fineliner and trace cleanly over the foreground stepping stones, the wooden signpost, the S-curve trail borders, and the four pine trees. Switch to your finer 0.4mm pen for the distant mountain peaks, clouds, and sun rays so the background feels lighter and further away. Add zigzag snowcap lines across all three mountain summits, carve a bold directional arrow and horizontal wood grain lines onto the signpost plank, and scatter two curved dirt rut lines plus a handful of tiny oval pebbles along the path.
Step 8: Layers Warm Ochre Dirt With Forest Greens and Alpine Sky Gradients
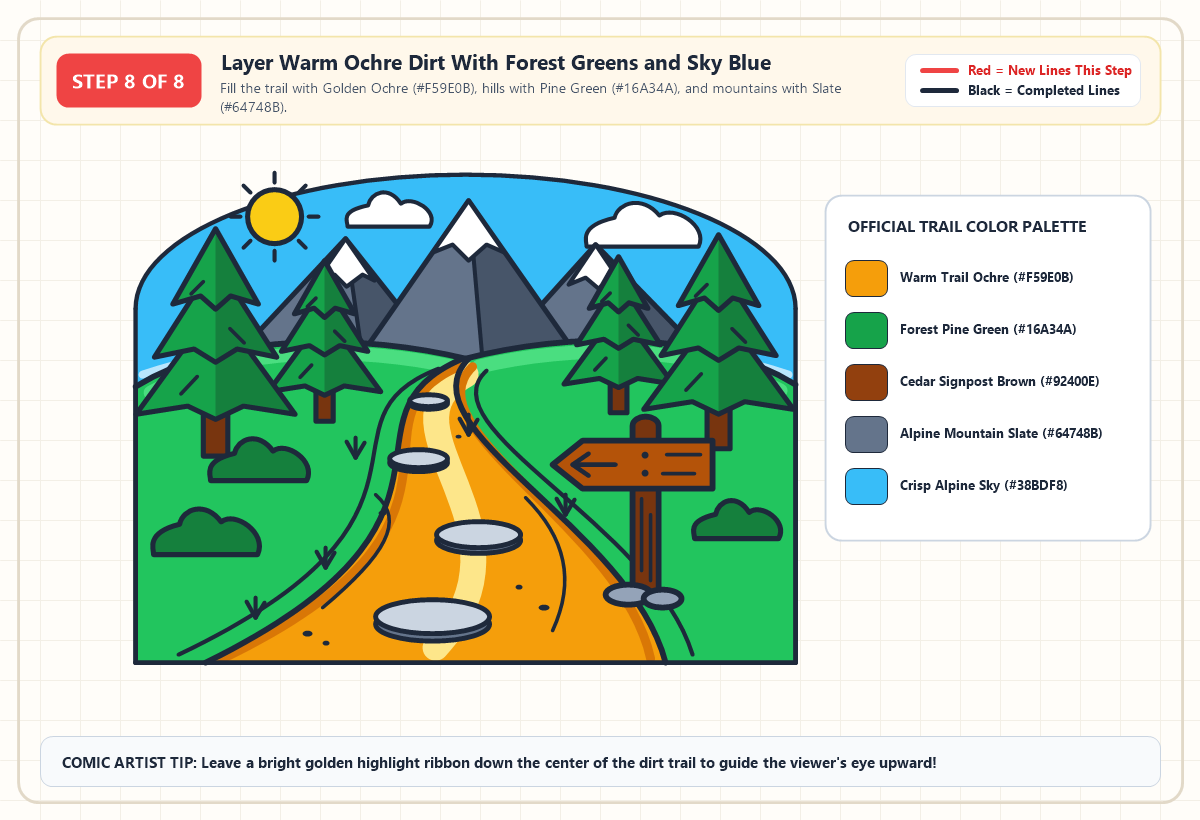
Great landscape coloring relies on warm-to-cool contrast warm golden tones pull the foreground trail forward while cool slate and cyan tones push the mountains and sky backward. Fill the winding dirt trail with Warm Trail Ochre (#F59E0B), leaving a bright Pale Gold highlight ribbon (#FDE68A) snaking down the center and shading the outer embankment edges with deeper Amber (#D97706). Color the rolling meadows vibrant Grass Green (#22C55E), layer rich Forest Pine Green (#16A34A and #15803D) across the evergreen tiers and bushes, and paint the wooden signpost warm Cedar Bark Brown (#92400E and #B45309). Shade the distant mountain faces in cool Alpine Slate (#64748B left face and #475569 right shadow face) beneath pure white snowcaps, and wash the sky with Crisp Alpine Cyan (#38BDF8).
Printable Trail Drawing PDF
Download the printable PDF to use now or save for later — it prints on A4 and Letter paper.
Print PDFComparing Woodland Forest Trails With Alpine Mountain Paths and Color Swatches
Many beginner illustrators wonder whether to enclose their path under a dark forest canopy or open the horizon up to distant mountain peaks. While both scenes use the exact same pinched S-curve ground blueprint, a deep woodland trail crowds thick oak trunks right up to the dirt borders and arches leafy branches overhead, whereas an alpine hiking trail opens the upper third of the page to jagged peaks, evergreen pines, and bright sky. If you enjoy pairing land and water wilderness scenes in your sketchbook, you can combine this mountain trail with our step-by-step touring kayak drawing guide and use the reference matrix below to match exact Hex codes, Copic markers, and Crayola crayons for every zone of your landscape.
| Landscape Zone & Feature | Alpine Hiking Trail (This Guide) | Deep Woodland Trail Variation | Official Hex Code | Copic Sketch & Crayola Match |
|---|---|---|---|---|
| Winding Dirt Path & Ruts | Sunlit golden-ochre dirt ribbon with a bright cream center highlight and pebble dots | Cooler shaded umber soil speckled with fallen autumn leaves and exposed tree roots | Warm Trail Ochre (#F59E0B) |
Copic YR24 (Pale Sepia) / Crayola Raw Sienna |
| Hillsides & Evergreen Pines | Open grassy meadows (#22C55E) framed by tiered zig-zag spruce and pine trees |
Dense overlapping deciduous tree trunks with mossy green bank borders | Forest Pine Green (#16A34A) |
Copic G17 (Forest Green) / Crayola Forest Green |
| Wooden Signpost & Trunks | Rustic cedar timber post with a pointed arrow plank nailed across the front | Weathered hollow logs, wooden footbridges, or painted tree-trunk trail blazes | Cedar Signpost Brown (#92400E) |
Copic E37 (Sepia) / Crayola Chestnut |
| Distant Peaks & Stepping Stones | Faceted slate-grey mountain triangles with white snowcaps and flat oval stones | Misty blue-grey background tree silhouettes fading into forest fog | Alpine Mountain Slate (#64748B) |
Copic C5 (Cool Gray No. 5) / Crayola Timberwolf |
| Sky Dome & Sunburst Glow | Wide open cyan sky arch (#38BDF8) with a warm yellow sun (#FACC15) and puffy clouds |
Small patches of pale sky peeking through an arched overhead leaf canopy | Crisp Alpine Sky (#38BDF8) |
Copic B02 (Robin's Egg Blue) / Crayola Sky Blue |
Fixing Three Perspective Mistakes Beginners Make When Sketching Landscape Paths
Even when you follow an eight-stage breakdown, three sneaky perspective habits can flatten the depth of your landscape. Checking your pencil sketch against these quick fixes before you pick up your black fineliner will keep your trail lying flat on the hillsides.
- Drawing both trail edges the same width from bottom to top If the top of your path near the horizon is more than a quarter-inch wide, the trail will pop upright like a vertical ribbon or ladder. Always pinch the two S-curves together until they nearly touch at the horizon notch, then flare them wide apart at the bottom edge of the paper.
- Sketching round basketball circles for stepping stones A circular stone lying flat on a horizontal path gets squashed vertically by foreshortening when viewed from standing eye level. Draw every stepping stone as a wide, flat horizontal pancake oval, and make sure each stone shrinks as it climbs closer to the vanishing point.
- Making background pine trees just as tall as foreground trees If the inner pine trees near the central horizon notch are the same height as the outer foreground trees, your hillside will look like a flat stage curtain. Shrink the inner mid-ground trees by at least thirty percent so the viewer's eye feels the hills rolling backward toward the mountains.
Frequently Asked Questions About Sketching Nature Trails and Perspective
How do you make a trail drawing look flat on the ground instead of standing straight up?
To make a trail lie flat on the ground, pinch the top of the path to a tiny vanishing point on the horizon line and flare the bottom edges wide apart at the lower corners of your paper. Drawing wide, parallel lines from bottom to top removes perspective and makes the path look like a vertical wall.
Why do stepping stones and trees look smaller further up a trail?
Objects along a receding trail obey linear perspective and foreshortening, meaning both their width and vertical spacing compress as they approach the horizon line. Flattening your stepping stones into narrow horizontal ovals and shrinking mid-ground pine trees by 30 percent tricks the viewer's brain into seeing deep three-dimensional distance.
What is the visual difference between drawing a forest woodland trail and a mountain hiking trail?
A forest woodland trail is enclosed by thick tree trunks, arched overhead branches, and dappled green canopy shadows that hide most of the sky. A mountain hiking trail opens up above the timberline with low evergreens, rocky switchbacks, a wooden trailhead signpost, and jagged snow-capped peaks rising above a high horizon line.
How do you shade a dirt trail to create depth and atmospheric perspective?
Shade the outer dirt embankments right next to the grass with a deeper amber-ochre tone while leaving a bright golden-cream highlight ribbon running down the center of the path. In the background, shift your mountain peaks toward cool slate grey so distant landforms recede naturally behind the warm foreground greens.
Populating Your Finished Wilderness Path With Wildlife and Campers
Now that your winding golden-ochre trail sweeps cleanly from the wide foreground stepping stones back to the snow-capped mountain horizon, you have a ready-made stage for an entire outdoor story. You can sketch a canvas dome tent pitched beside the left pine trees, add a wooden log footbridge crossing a mountain stream, or perch a songbird right on top of the directional arrow plank using our step-by-step guide on how to draw a cardinal. And if your wilderness hike needs an enthusiastic four-legged trail buddy trotting happily down the dirt path, jump over to our easy tutorial on how to draw Odie and add a floppy-eared cartoon pup leading the expedition!