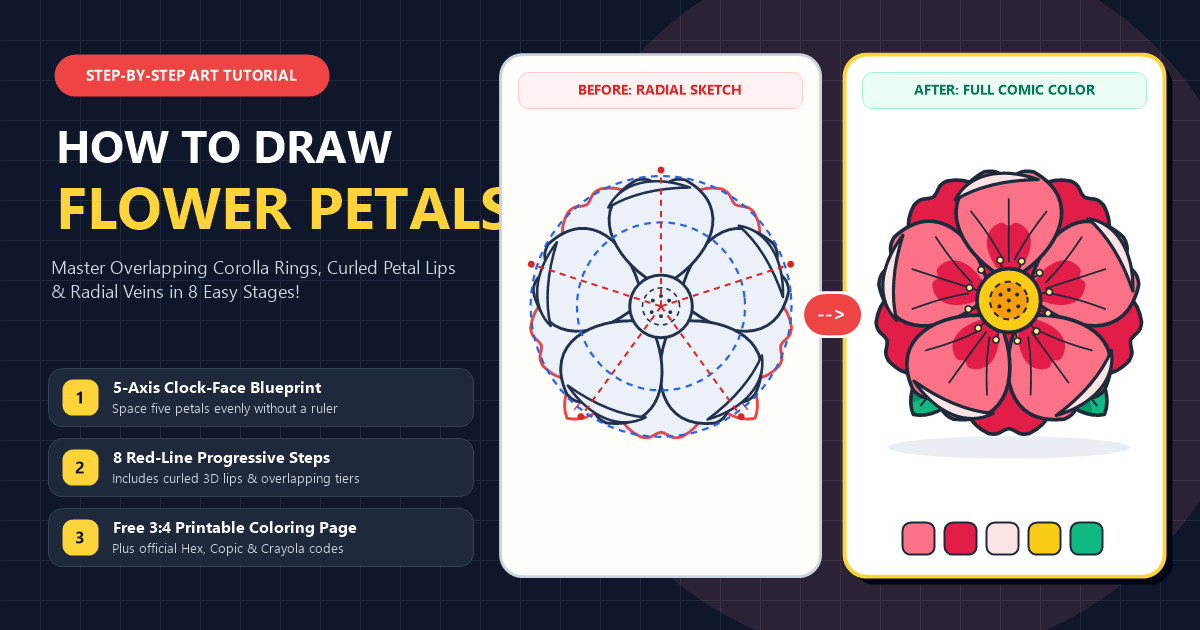
Most beginner flower drawings end up looking like stiff ceiling fan blades because the artist spaces every petal with empty gaps and draws the edges flat as cardboard. Learning how to draw flower petals that actually curl, overlap, and catch the light takes a completely different habit. Real blooms never sit side by side in polite isolation. Their bases crowd tightly around a central pollen button, their bellies swell outward like cupped hands, and their outer margins fold over toward the sun. Once you trade rigid ovals for four everyday handwriting curves O, U, C, and S you can build a lush, two-tier blossom in less than fifteen minutes. Grab a pencil and follow the red guide lines in each stage below.
Gathering Simple Drawing Supplies Before Your First Sketch
You only need four basic desk tools to sketch clean guidelines and ink crisp botanical contours without smudging your paper. Pressing too hard with a dark pencil on your first pass makes it nearly impossible to erase the inner spacing rings later.
- HB Graphite Pencil: Sketch your concentric circle guides and five clock-face spokes with whisper-light pressure so they disappear cleanly after inking.
- Kneaded or Soft Vinyl Eraser: Gently lift away the blue construction circles once your overlapping petal margins are locked in place.
- Two Waterproof Black Fineliners (0.5mm and 0.2mm): Use a bold 0.5mm nib for the outer petal silhouettes and a delicate 0.2mm nib for interior radial veins and stamen filaments.
- Smooth Bristol Paper and Five Markers or Colored Pencils: Heavyweight smooth paper lets you blend deep raspberry throat shadows (
#E11D48) into bright coral pink (#FB7185) without pilling.
Understanding Why Botanical Artists Build Flower Petals With Concentric Circles
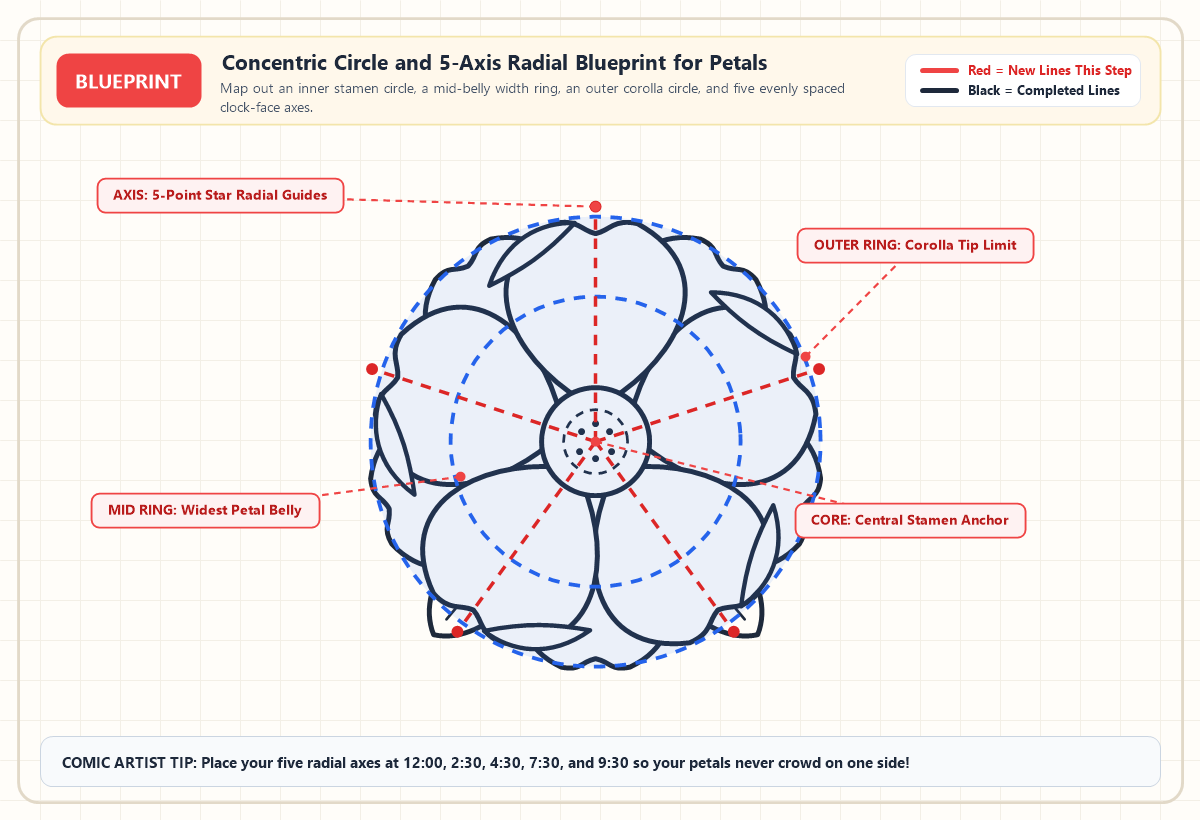
Botanical illustrators keep a five-petal corolla balanced by mapping three concentric circles and five clock-face axes before drawing a single petal edge. Instead of guessing where each petal ends, you anchor the stamen core in the middle, mark a middle ring where the petal bellies reach their widest flare, and trace an outer boundary ring where the tips stop.
To space five petals evenly without a protractor, picture an analog clock face centered on your stamen core. Place five light tick marks at 12:00, 2:30, 4:30, 7:30, and 9:30. That simple star arrangement prevents the classic lopsided crowding that happens when you draw petals clockwise one after another. Once you feel comfortable with this front-facing radial map, you can compress the outer circle into a shallow horizontal oval to foreshorten side-view blooms a technique we use extensively in our step-by-step spiral rose drawing guide.
Following the Eight Step Visual Blueprint for How to Draw Flower Petals
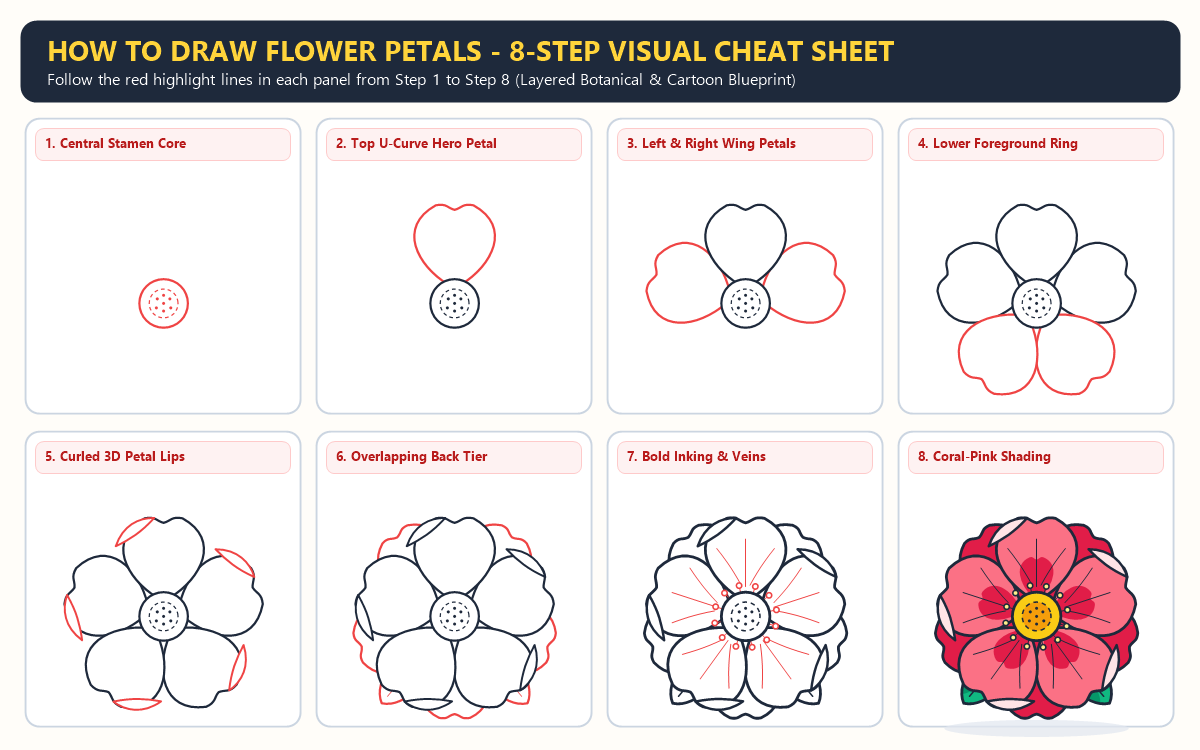
In each step below, bright red lines highlight the exact new strokes you need to add, while solid black lines show the lines you already completed. Work from the central anchor outward and let front petals mask the lines behind them.
Easy Flower Petals Drawing Step by Step
The new lines in each picture show what to add next. Simple shapes will come together to make your flower petals. Let’s begin!
Step 1: Sketching the Central Stamen Core and Pollen Ring
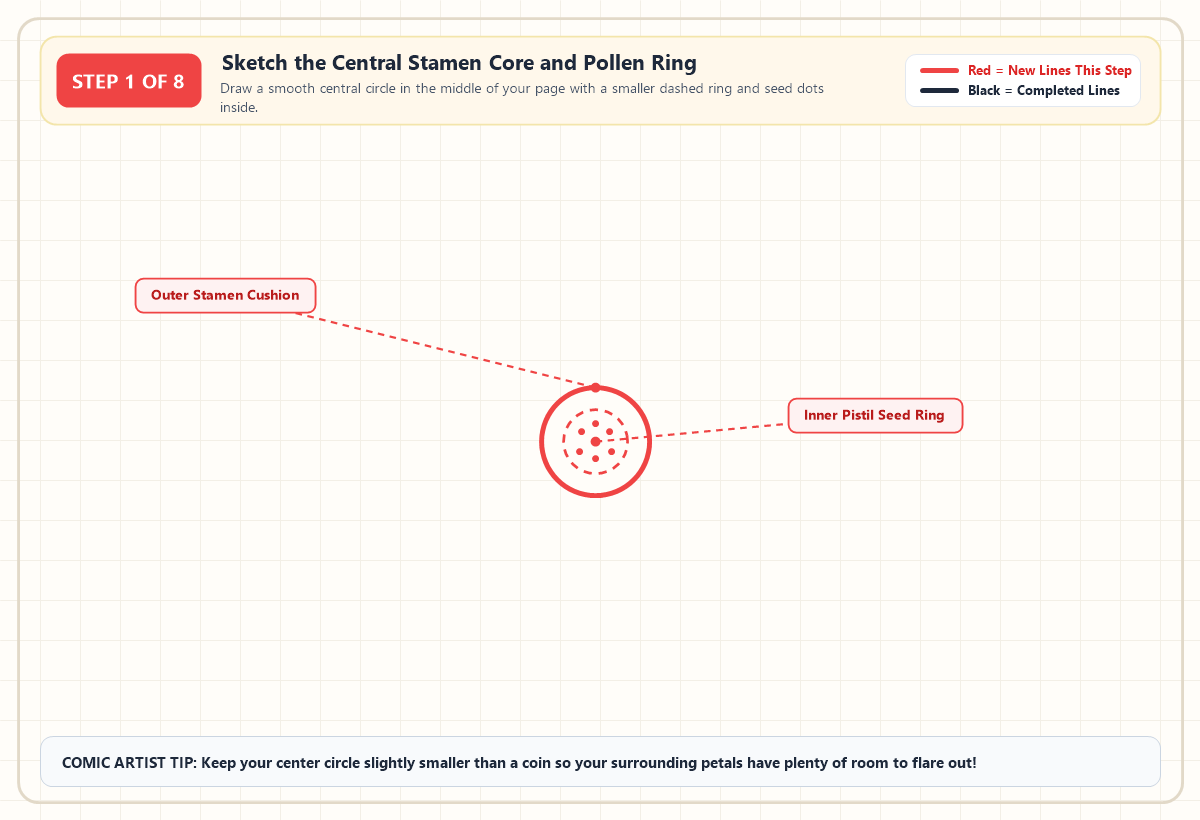
Start right in the middle of your paper by drawing a smooth, coin-sized circle for the central stamen cushion. Inside that circle, sketch a smaller dashed ring to mark the pistil boundary, then dot the very center with seven tiny seed specks. Keeping this central anchor compact gives your surrounding petals roughly three times the core's width to flare out and breathe.
Step 2: Shaping the Top Hero Petal With a Wide U Curve
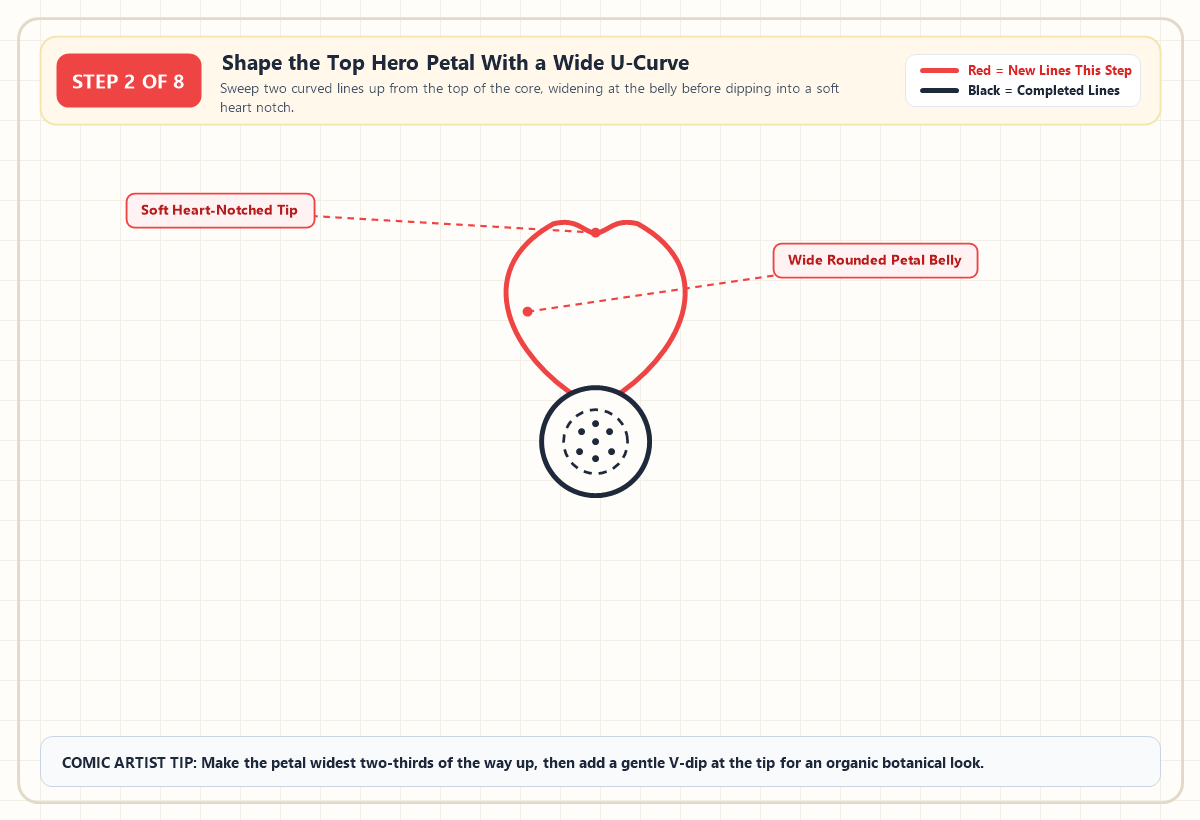
From the upper rim of your stamen core at the 12:00 position, sweep two outward-bowing C curves upward toward your outer boundary guide. Let the petal swell to its widest point about two-thirds of the way up, then bring both sides inward to meet at a shallow, heart-shaped V notch at the top peak. That tiny notch at the margin immediately makes the petal look organic and botanical rather than geometric.
Step 3: Adding the Left and Right Wing Petals Around the Core
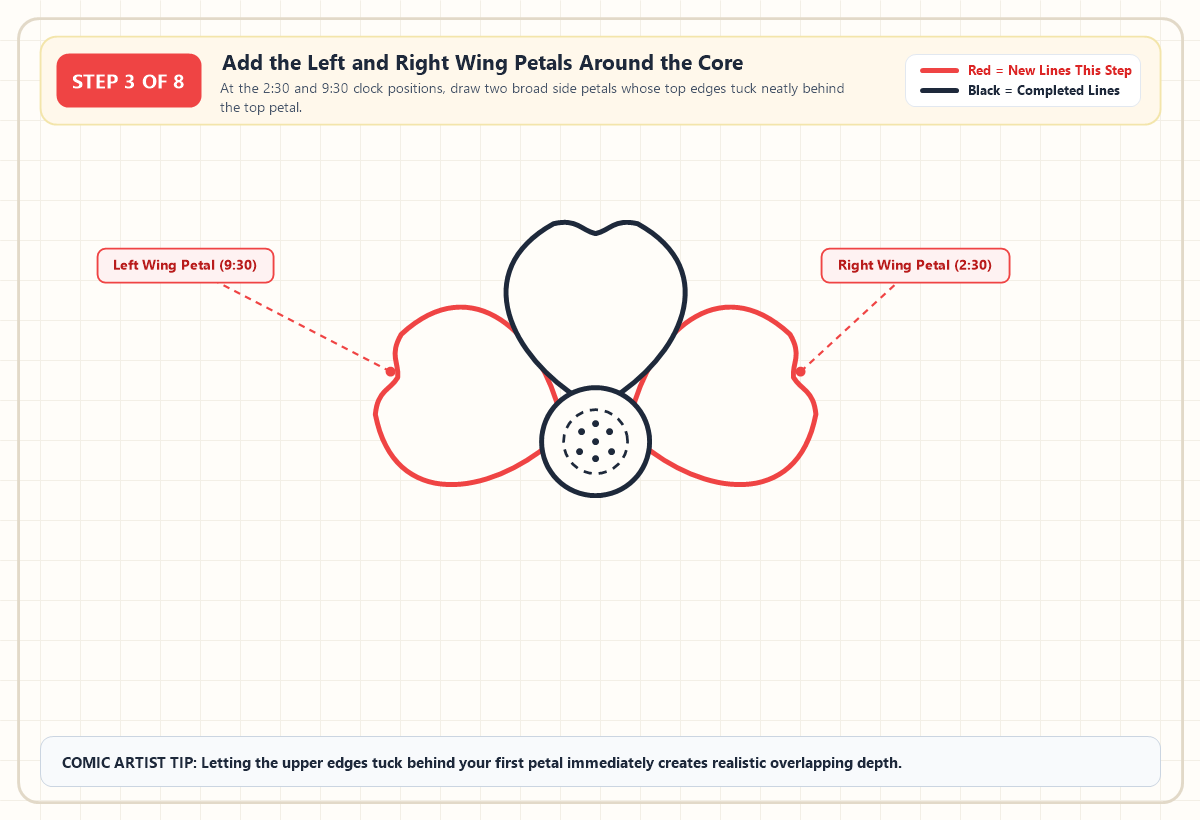
Look at the 9:30 and 2:30 clock positions on either side of your center button and sweep out two wide wing petals using the same heart-notched silhouette. Start each upper edge slightly behind the lower curve of your top hero petal instead of leaving a gap between them. Letting the top petal overlap both side wings establishes your first layer of three-dimensional depth.
Step 4: Completing the Foreground Ring With Two Lower Petals
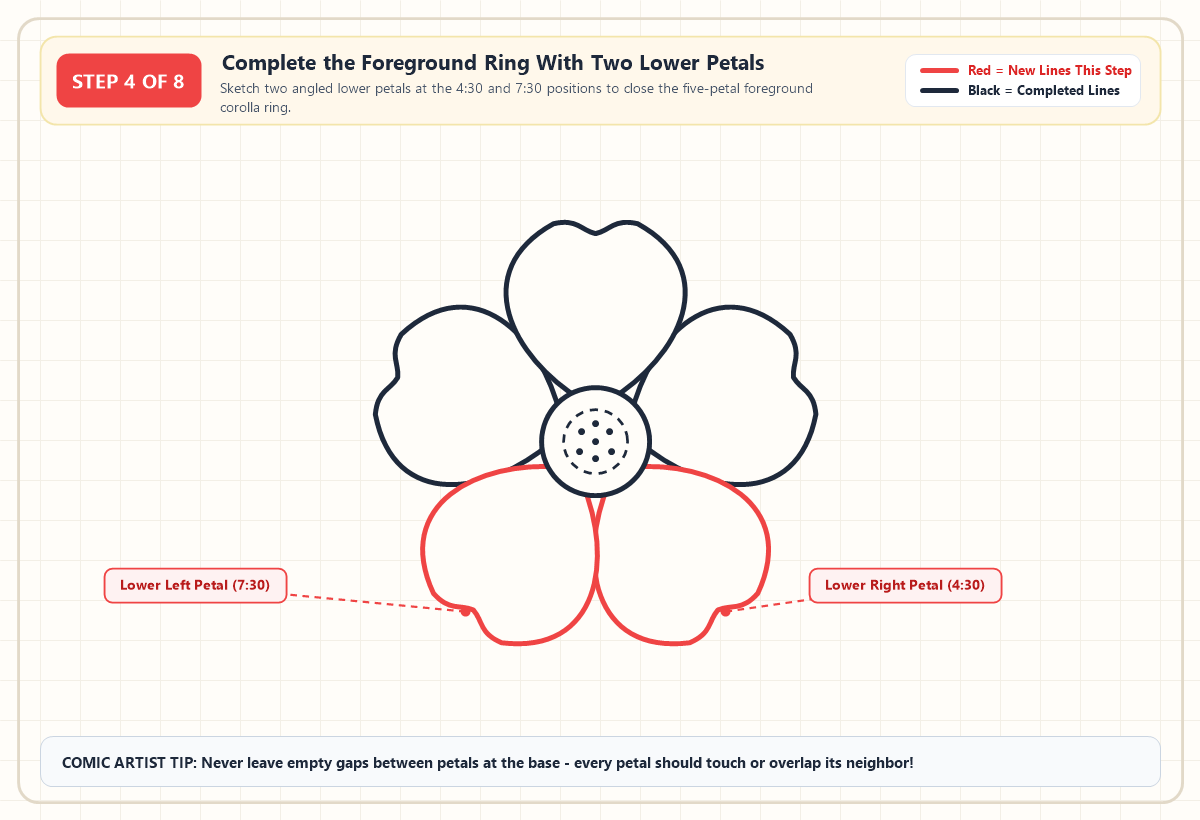
Finish the front ring by sketching two angled lower petals pointing toward the 7:30 and 4:30 clock marks. Let their upper outer edges overlap in front of the left and right wing petals while their inner edges meet snuggly near the bottom center. Notice how zero empty paper shows between the petal bases around the stamen ring every petal either overlaps or tucks beneath its neighbor.
Step 5: Folding Curled Petal Lips Along the Outer Margins
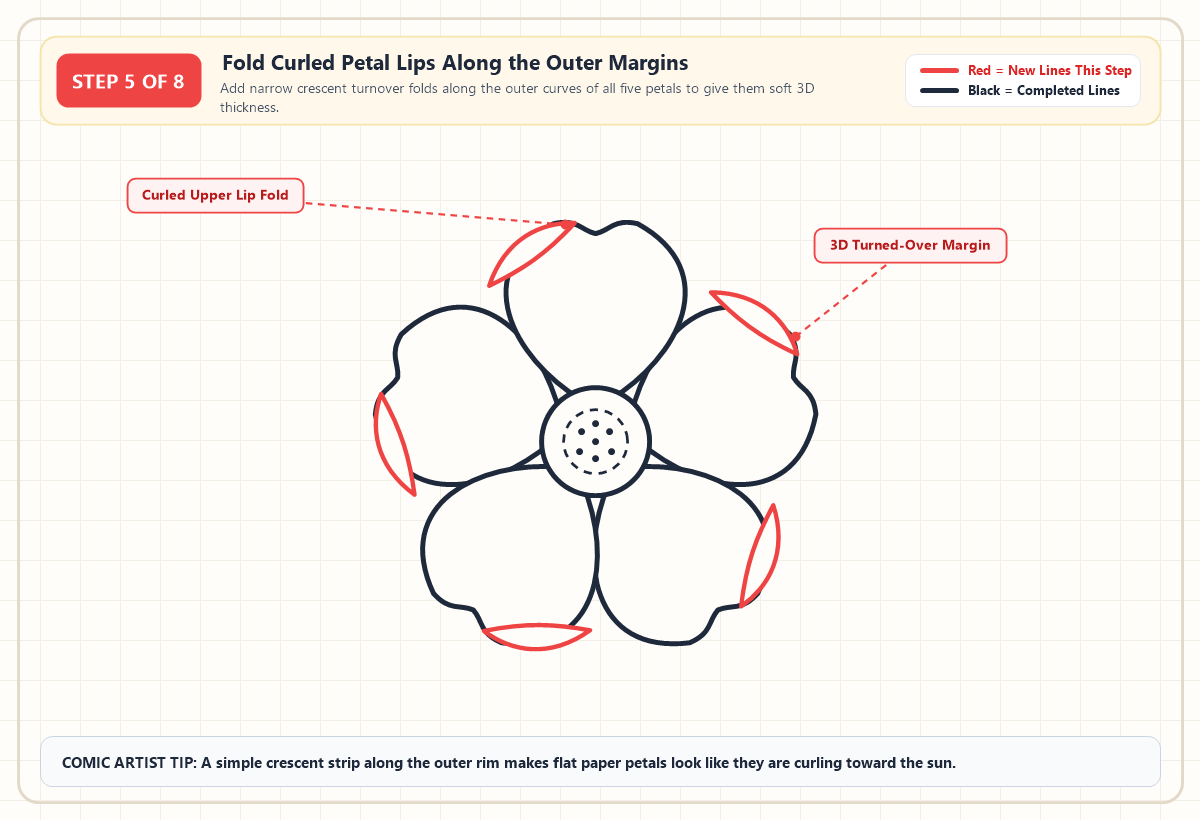
Now turn those flat two-dimensional silhouettes into supple, curving forms by adding a narrow crescent lip along the outer left lobe of each foreground petal. Draw a smooth interior curve that starts halfway up the outer rim, bows gently inward, and tapers back into the top peak just before the heart notch. This simple folded-over ribbon tricks the eye into seeing the underside of the petal curling forward toward the light.
Step 6: Tucking Five Overlapping Back Tier Petals Into the Gaps
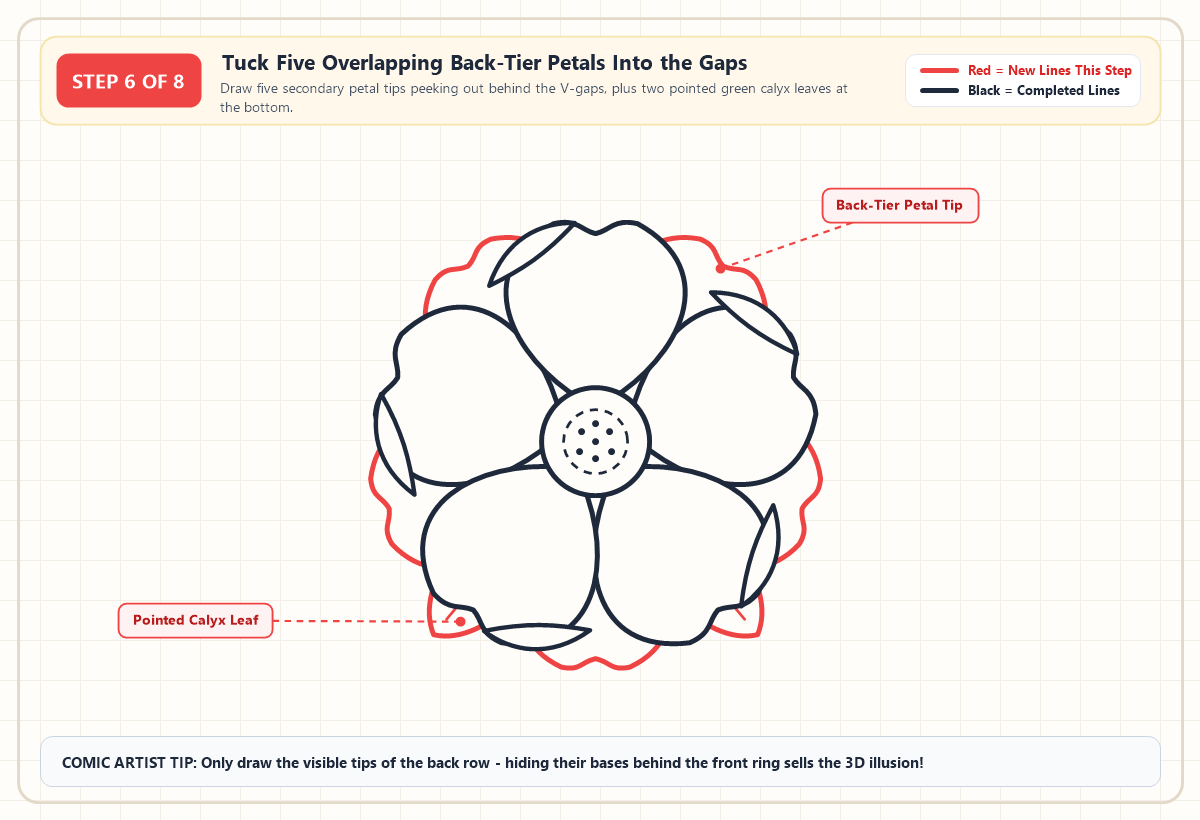
Behind each V-shaped valley where two foreground petals meet, sketch a rounded, heart-notched tip peeking out from a second tier of petals. You only need to draw the outer third of these five background petals because their bases remain hidden behind the front ring. To ground the composition and break up the circular symmetry, tuck two pointed calyx leaves peeking out beneath the lower left and lower right petals.
Step 7: Inking Bold Contours and Delicate Radial Vein Lines
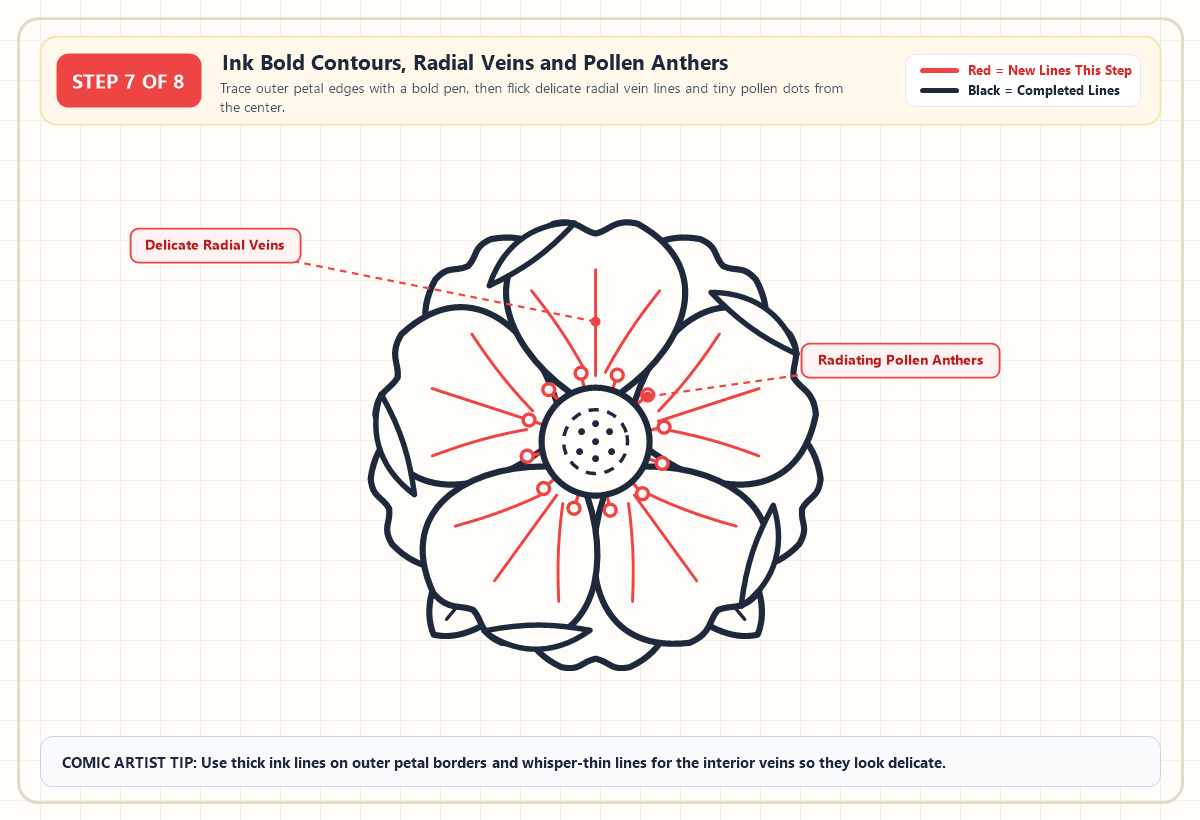
Switch to your 0.5mm black fineliner to trace the outer petal contours, folded lips, and stamen core, then erase all remaining pencil guidelines. Pick up your fine 0.2mm pen and flick three delicate vein lines radiating outward from the base of each foreground petal one straight center midrib flanked by two gently curving side veins that stop well before the tip. Finish the ink stage by adding twelve short stamen filaments tipped with small unfilled pollen circles around the rim of the central core.
Step 8: Layering Warm Coral Pink Gradients and Core Cast Shadows
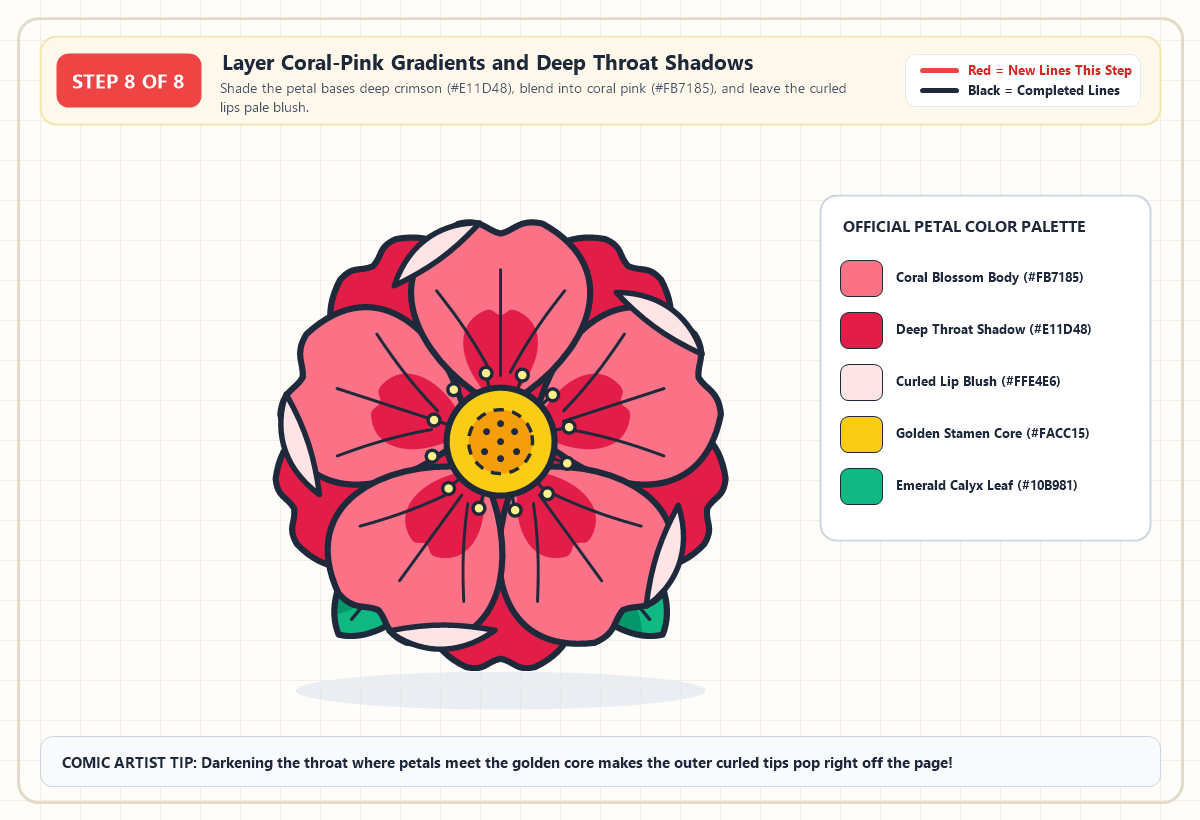
Bring your blossom to life by laying down a deep raspberry-crimson shadow (#E11D48) across the inner third of every foreground petal and across the entire back-tier petal ring. Blend the main body of the five front petals with warm coral pink (#FB7185), leaving the five curled outer lips pale rose blush (#FFE4E6) so they catch the brightest highlight. Fill the central stamen cushion with sunny golden yellow (#FACC15) and a warm amber inner ring (#F59E0B), dot the anthers pale lemon (#FEF08A), and color the two basal leaves vibrant emerald (#10B981).
Printable Flower Petals Drawing PDF
Download the printable PDF to use now or save for later — it prints on A4 and Letter paper.
Print PDFComparing Four Classic Flower Petal Styles and Official Color Codes
Once you master this five-petal overlapping blueprint, you can draw dozens of different botanical species simply by changing the tip margin and color gradient. If you swap the broad rounded belly for narrower, deeper-notched petals in soft pastel pink, you have the exact foundation used in our delicate five-petal cherry blossom branch tutorial. Use the reference matrix below to match our official digital Hex codes with physical Copic Sketch markers and Crayola colored pencils.
| Botanical Zone & Role | Official Hex Code | Copic Sketch Equivalent | Crayola Equivalent | Shading & Blending Placement Tip |
|---|---|---|---|---|
| Foreground Petal Body | #FB7185 |
RV14 (Begonia Pink) |
Warm Coral / Salmon |
Sweep smooth strokes from the mid-belly out toward the heart-shaped tip |
| Deep Throat & Back Tier | #E11D48 |
RV29 (Crimson) |
Red Violet / Raspberry |
Flick outward from the stamen rim to sink the inner throat and back row into shadow |
| Curled Outer Lip Highlight | #FFE4E6 |
RV000 (Pale Purple) |
Blush Pink / White |
Leave the turned-over crescent margin extra pale so the 3D fold pops forward |
| Stamen Cushion & Pistil | #FACC15 |
Y17 (Golden Yellow) |
Dandelion / Goldenrod |
Shade the inner dashed ring slightly warmer with #F59E0B (YR14 Caramel) |
| Basal Calyx Leaves | #10B981 |
G05 (Emerald Green) |
Jungle Green |
Darken the lower half of each leaf along the central midrib with #059669 |
Fixing Three Proportion Mistakes Beginners Make When Sketching Flower Petals
Even experienced sketchers occasionally end up with stiff or paper-thin blooms when they rush the construction phase. Watch out for these three common proportion traps on your next practice sheet.
- Leaving Propeller Gaps Between Petals: When petals only touch at a tiny point on the center circle with empty white wedges between them, the flower looks like a mechanical fan. Always widen the petal bellies until neighboring edges overlap by at least fifteen percent.
- Drawing Ruler-Straight Veins From Rim to Tip: Running heavy, straight lines all the way from the center core to the outer margin makes petals look like striped umbrellas. Flick your vein strokes lightly from the base, curve them with the belly of the petal, and lift your pen two-thirds of the way up.
- Usingentical Line Weight Everywhere: If your interior vein lines are just as thick as the outer petal silhouette, the texture overwhelms the form. Keep outer borders bold (
0.5mm) and interior veins and folds noticeably thinner (0.2mm).
Frequently Asked Questions About Sketching Botanical and Cartoon Petals
How do you make flower petals look 3D and not flat?
Overlap the edges of neighboring petals instead of leaving empty gaps, add narrow crescent turnover folds along the outer tips, and shade the inner throat darker where each petal tucks beneath the central stamen core. Adding a second tier of petal tips behind the front ring immediately creates depth.
How do you space five flower petals evenly without a protractor?
Use the clock-face method around your central stamen circle by placing five light guideline ticks at 12:00, 2:30, 4:30, 7:30, and 9:30. Drawing your top petal at 12:00 first gives you a visual anchor so the two side wings and two bottom legs balance naturally.
What is the easiest flower petal shape for beginners to practice first?
The rounded heart-notched teardrop is the easiest shape for beginners because it starts narrow at the flower center, swells wide near the top, and uses a shallow V-dip at the tip to forgive slight hand wobbles. Once you master that single stroke, you can draw cherry blossoms, cosmos, and wild roses.
Should you shade flower petals from the center outward or from the tips inward?
Always shade from the center throat outward toward the tips first, using flicking strokes that follow the curved midrib of each petal. Because the central stamen core and overlapping bases trap shadow, darkening the inner third of every petal makes the sunlit outer margins glow.
Bringing Your Full Botanical Bouquet to Life With Leaves and Stems
Now that you can build a dimensional, two-tier blossom with curled lips and radial throat shading, try sketching three flowers at slightly different angles on the same page. Print out the vertical 3:4 coloring sheet above to experiment with sunset orange, lavender, or sakura pink palettes before committing ink to your main sketchbook. When you are ready to connect your blooms into a full botanical arrangement, head over to our botanical leaf veins and serrated edge sketching guide to frame your petals with curved stems and lifelike foliage.