
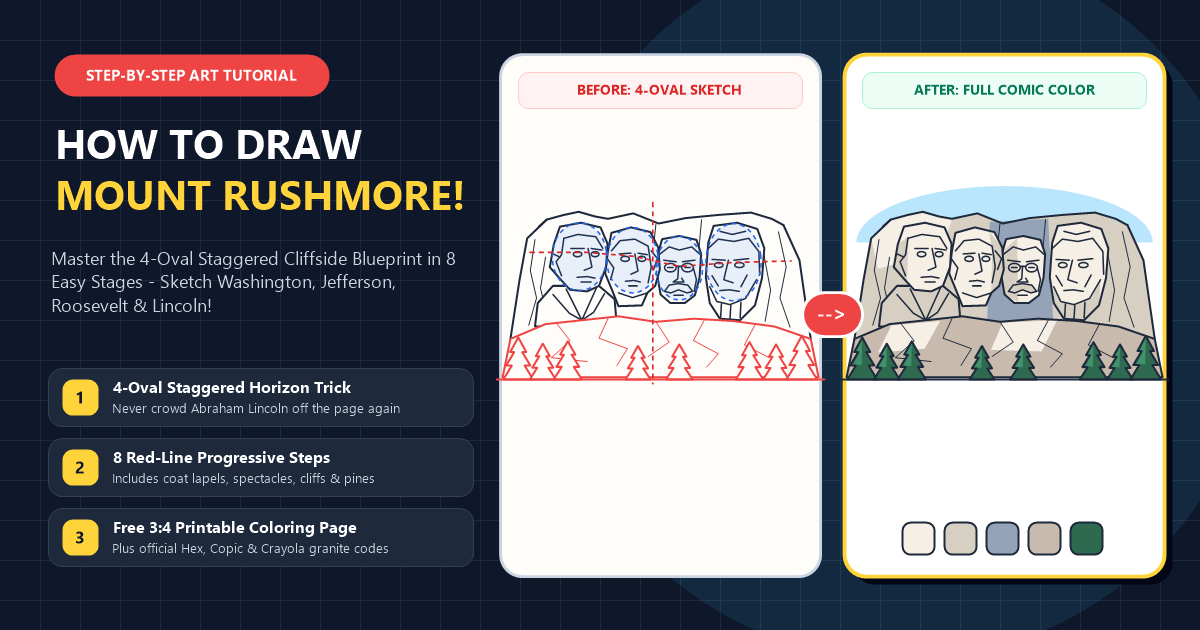
The quickest way to ruin a sketch when learning how to draw Mount Rushmore is lining all four presidents up like equal-sized bowling pins on a flat horizontal shelf. Within three minutes, George Washington and Thomas Jefferson eat up two-thirds of your paper, Theodore Roosevelt gets squished into a narrow strip, and poor Abraham Lincoln falls right off the right edge of the page.
When master sculptor Gutzon Borglum and his son Lincoln Borglum blasted 450,000 tons of Harney Peak granite out of the Black Hills of South Dakota between 1927 and 1941, they didn't carve four heads in a flat row. Guided by a 1:12 plaster scale model where one inch equaled one foot of mountain stone, they staggered each 60-foot face at a different depth, height, and head tilt to follow solid uncracked bedrock. Once you map four staggered ovals and build the faces with crisp O, U, Vư, and L chisel strokes, all four presidents lock into place on the very first try.
Gathering Simple Drawing Supplies Before Your First Sketch
You don't need professional drafting compasses or twenty gray markers to capture the chiseled majesty of South Dakota's famous cliffside. A light graphite pencil for your four oval guides and three contrasting stone tones will make your drawing pop off the page like sunlit granite.
- HB or 2B Graphite Pencil: Essential for sketching feather-light oval placement guides and the center divide line before committing to permanent ink.
- Kneaded or Vinyl Eraser: Lets you cleanly lift overlapping construction ovals where Washington's shoulder crosses in front of Jefferson's neck.
- Waterproof Black Fineliner Pens (0.5mm and 0.8mm): Use a thicker 0.8mm nib for the jagged outer cliff walls and a fine 0.5mm tip for Roosevelt's pince-nez spectacles and Lincoln's beard grooves.
- Warm Cream-Gray, Cool Slate, and Pine Green Markers or Pencils: Gives you instant three-dimensional contrast between sunlit Harney Peak granite, deep canyon shadows, and the dark Black Hills ponderosa pine forest below.
Understanding Why Gutzon Borglum Designed Mount Rushmore With Four Staggered Ovals
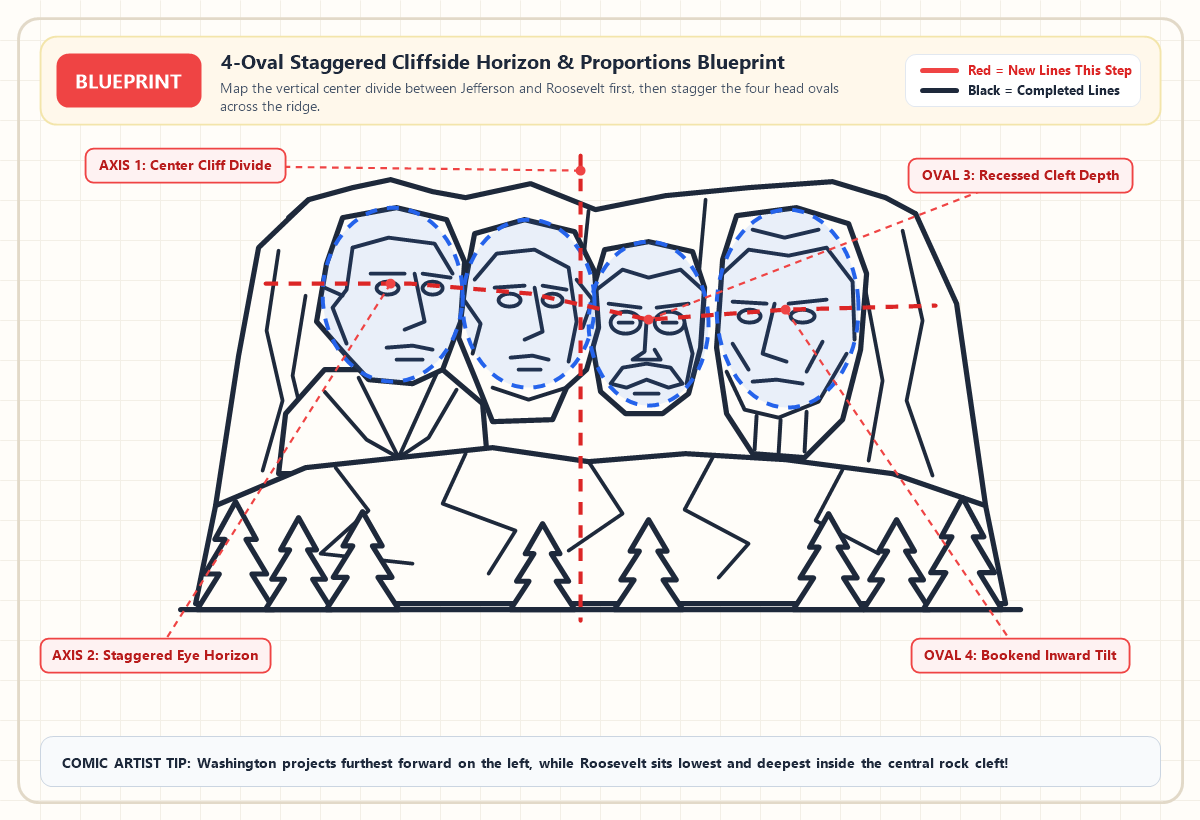
The four 60-foot portraits on Mount Rushmore sit at staggered heights, depths, and head angles because Gutzon Borglum had to blast past fractured surface rock to reach solid granite. Instead of fourentical circles on a level line, the monument works like a four-part theatrical stage where two outer bookends frame two recessed inner portraits.
From left to right, George Washington projects furthest forward on the high left shoulder of the cliff, anchored by his wide colonial coat lapels. Thomas Jefferson tucks immediately behind Washington's left shoulder and tilts his chin slightly upward toward the morning sun. Theodore Roosevelt sits lowest and deepest inside a carved granite canyon between Jefferson and Lincoln, while Abraham Lincoln anchors the far-right cliff wall and angles his bearded profile slightly left back toward the group. If you practice the simple shape-stacking habits in our foundational beginner sketching guide, dividing your paper down the center seam between Jefferson and Roosevelt guarantees all four ovals fit with generous breathing room for the surrounding cliffs.
Following the Eight Step Visual Blueprint for How to Draw Mount Rushmore
Every stage below uses a two-color progressive stroke system where bright red lines highlight the exact new strokes to add in that step and dark black lines show completed work from earlier stages. Keep your pencil pressure whisper-light during Step 1 so you can erase the four guide ovals cleanly before inking.
Easy Mount Rushmore Drawing Step by Step
The new lines in each picture show what to add next. Simple shapes will come together to make your mount rushmore. Let’s begin!
Step 1: Sketching the Jagged Black Hills Horizon and Four Guide Ovals
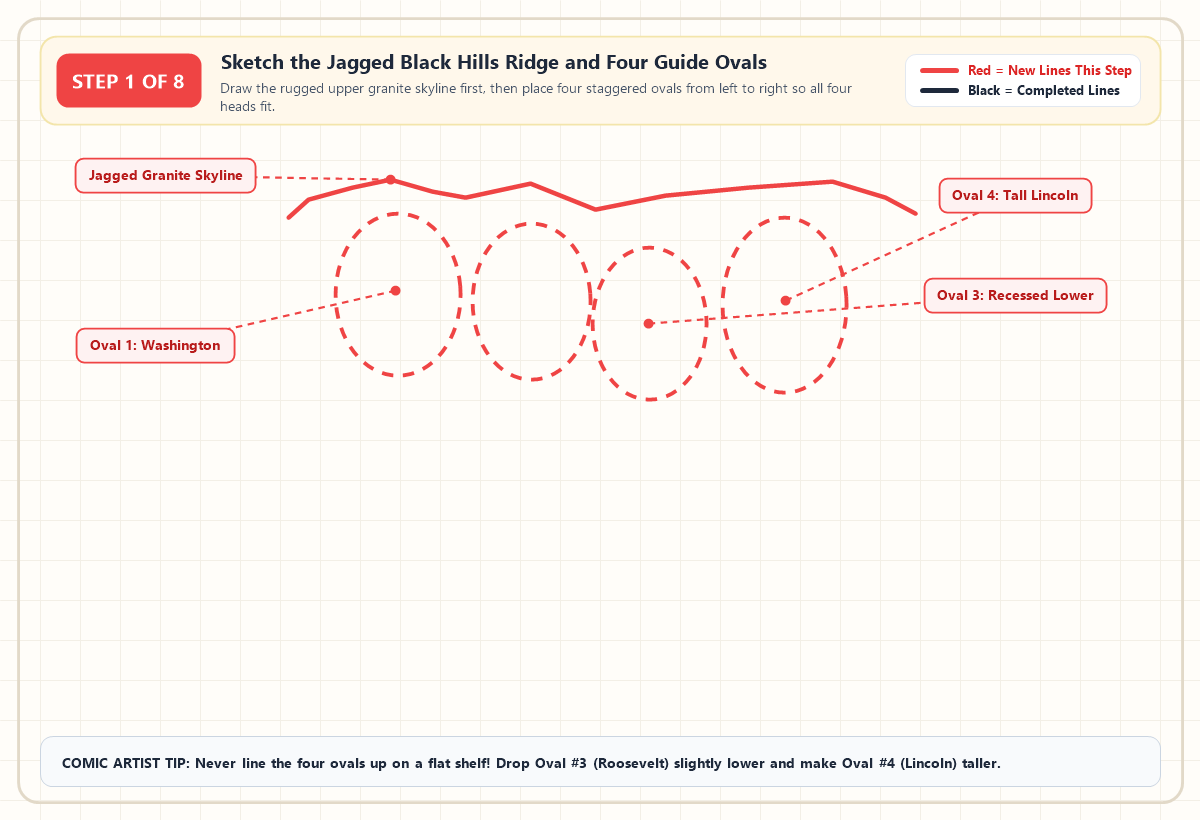
Start across the upper third of your paper by drawing a rugged, zig-zagging horizontal line made of short, straight angled segments for the top ridge of the mountain. Right below that skyline, lightly sketch four vertical ovals side by side, making sure Oval #1 (Washington) sits high on the left, Oval #2 (Jefferson) tucks slightly lower beside it, Oval #3 (Roosevelt) drops lowest in the middle cleft, and Oval #4 (Lincoln) stretches slightly taller on the right.
Step 2: Carving George Washington on the Far Left Cliff Shoulder
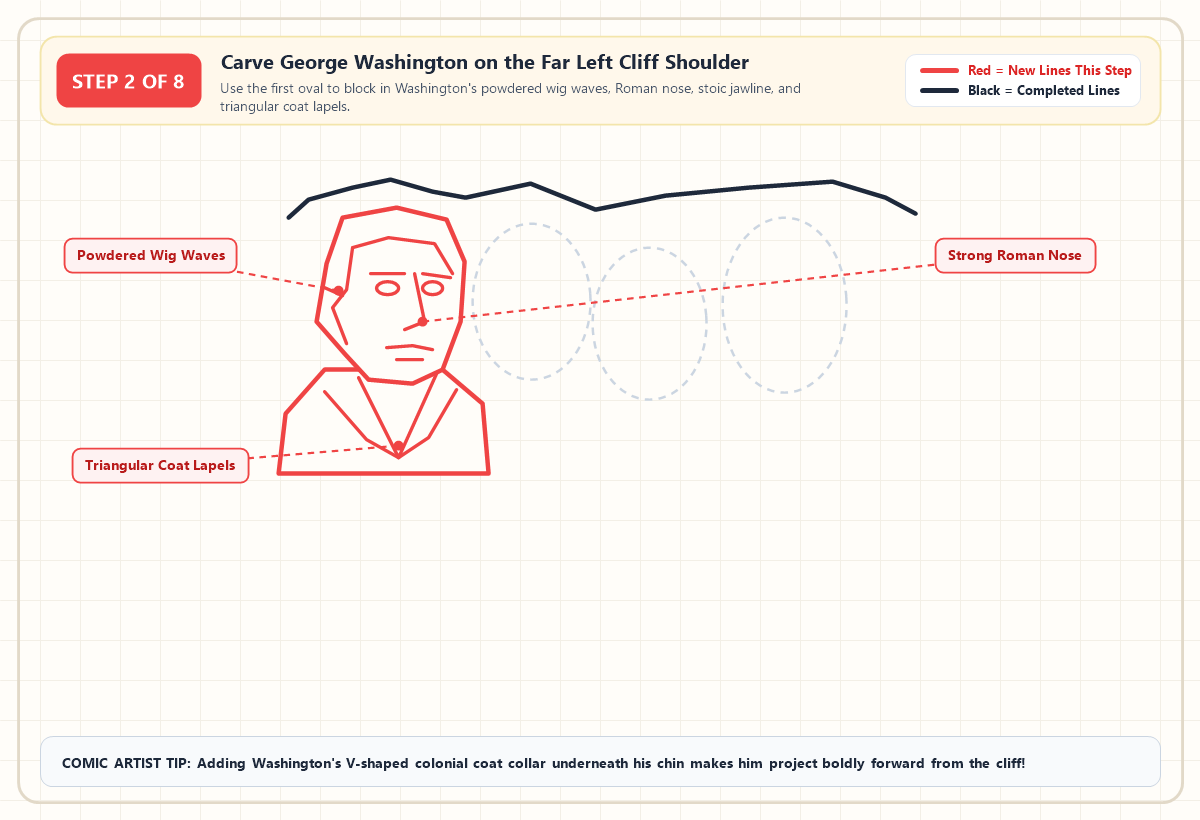
Use Oval #1 on the far left to sculpt George Washington, whose 60-foot head projects furthest out from the mountain wall. Frame his high forehead with rolled colonial wig waves on both sides, draw two calm almond eyes under a straight brow bar, add a strong Roman nose with a crisp L angle, and anchor his chin above a wide trapezoidal bust featuring V-shaped colonial coat lapels.
Step 3: Adding Thomas Jefferson Recessed Beside Washington
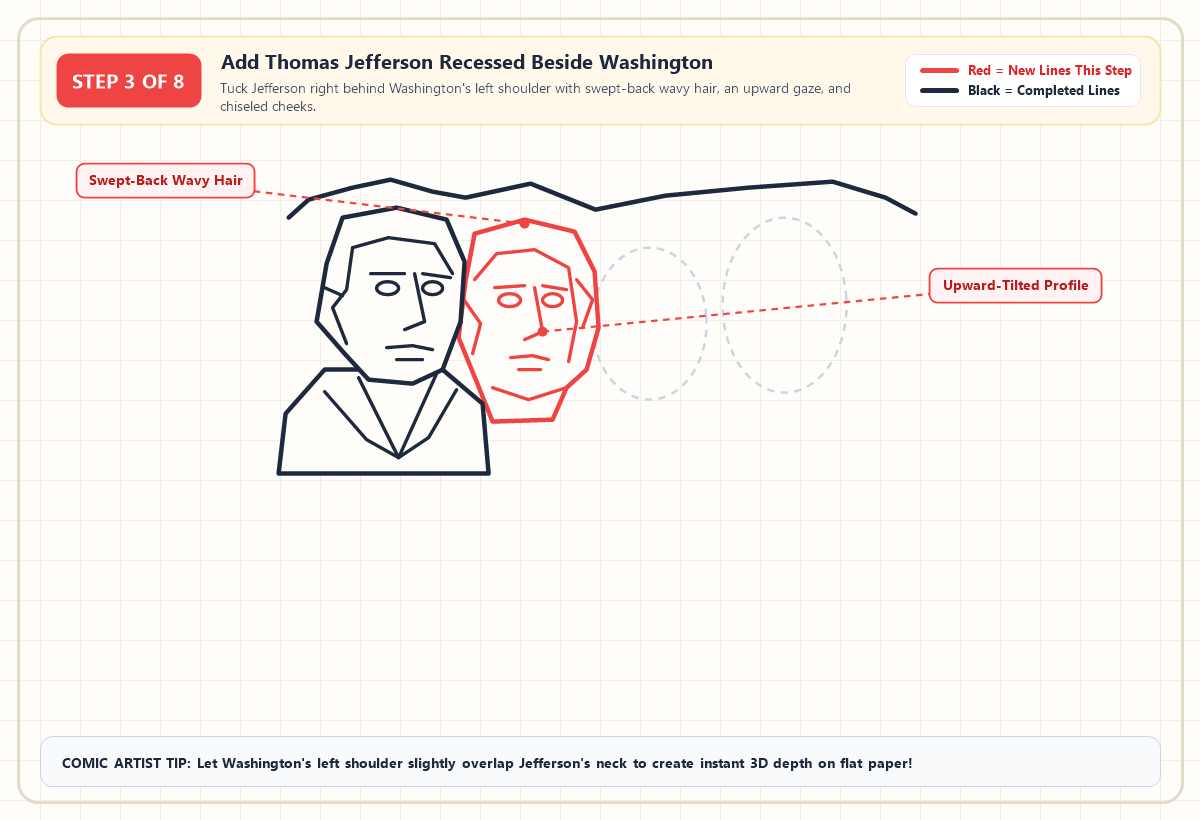
Move to Oval #2 immediately to the right of Washington and tuck Thomas Jefferson's right cheek and neck slightly behind Washington's shoulder. Sketch thick, wavy colonial hair sweeping back from his temples, place his eyes and straight pointed nose tilted slightly upward toward the right, and close his square chin above a short collar line.
Step 4: Drawing Theodore Roosevelt With His Signature Spectacles and Mustache
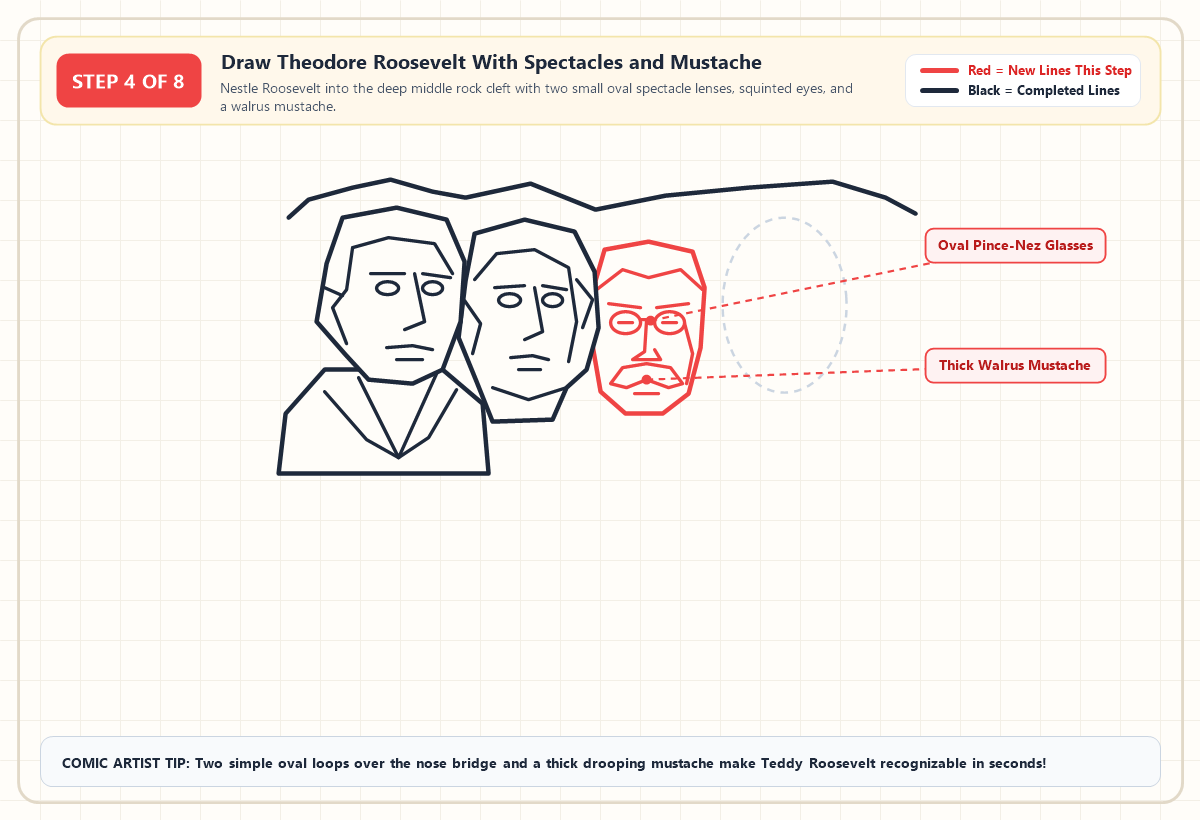
Inside Oval #3 which sits deepest and lowest in the central granite pocket draw Theodore Roosevelt's broad, squared-off head and parted hairline. Add two small oval loops connected by a tiny bridge bar over his nose for his famous pince-nez eyeglasses, draw squinted eyes inside the lenses, and carve a thick, drooping walrus mustache curving over his upper lip.
Step 5: Sculpting Abraham Lincoln With His Tall Brow and Chiseled Beard
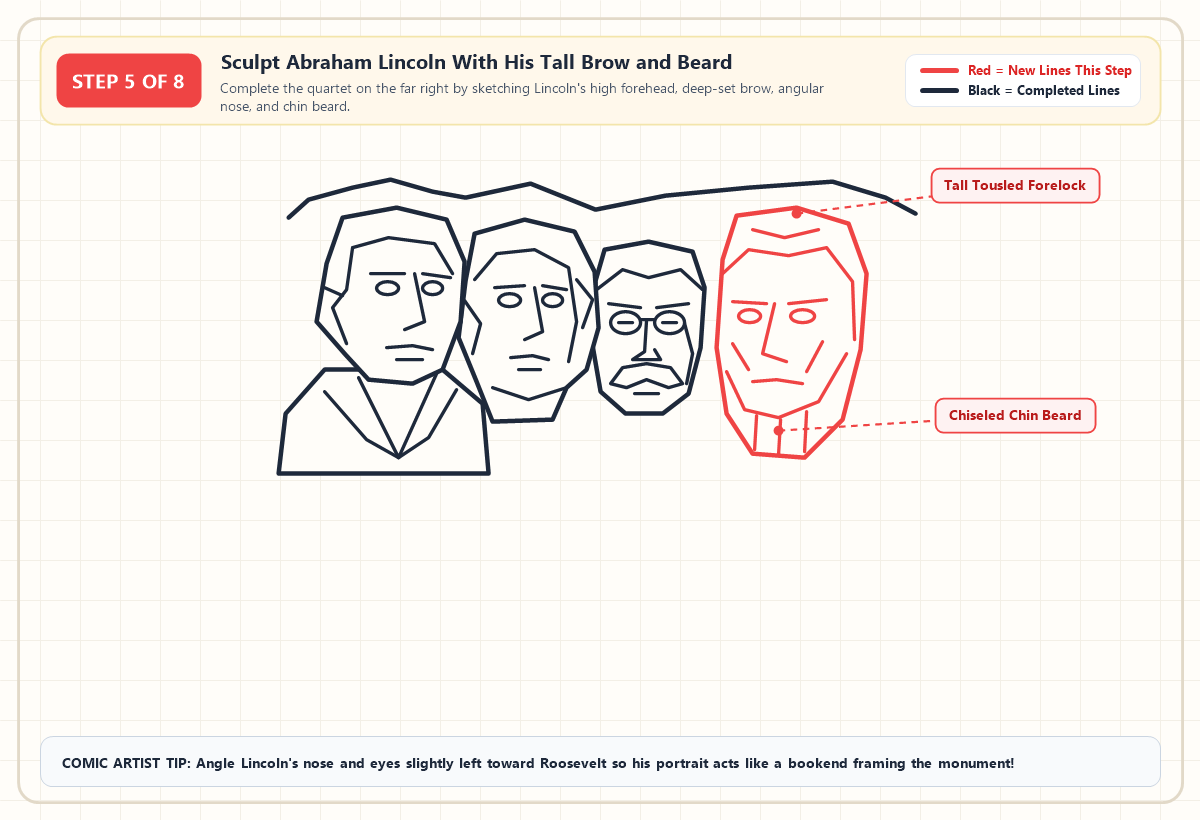
On the far right inside Oval #4, sculpt Abraham Lincoln's elongated head angled slightly inward toward Roosevelt so he bookends the entire composition. Crown his tall forehead with a tousled forelock of hair, sketch deep-set eyes beneath heavy brow ledges, draw a long angular nose and hollow cheek lines, and wrap his lower jaw in a blocky, chiseled chin beard without a heavy upper-lip mustache.
Step 6: Framing the Monument With Vertical Granite Cliffs and Craggy Fissures
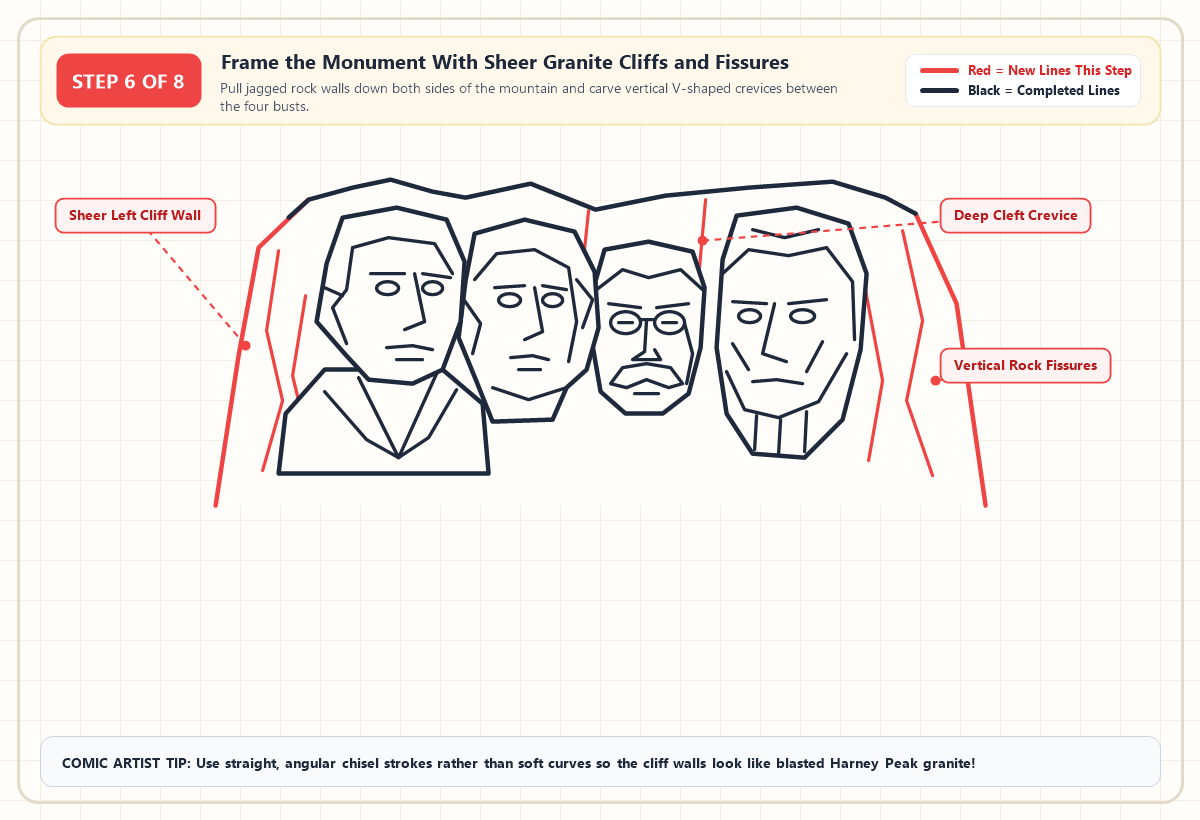
Now connect all four presidential busts into the living mountain by pulling steep, angled cliff walls down the left side of Washington and the right side of Lincoln. Add vertical V-shaped rock fissures, flat chiseled planes, and two deep vertical canyon lines framing Theodore Roosevelt so the portraits look carved directly out of solid bedrock rather than floating in midair.
Step 7: Inking the Talus Boulder Slope and Black Hills Pine Forest
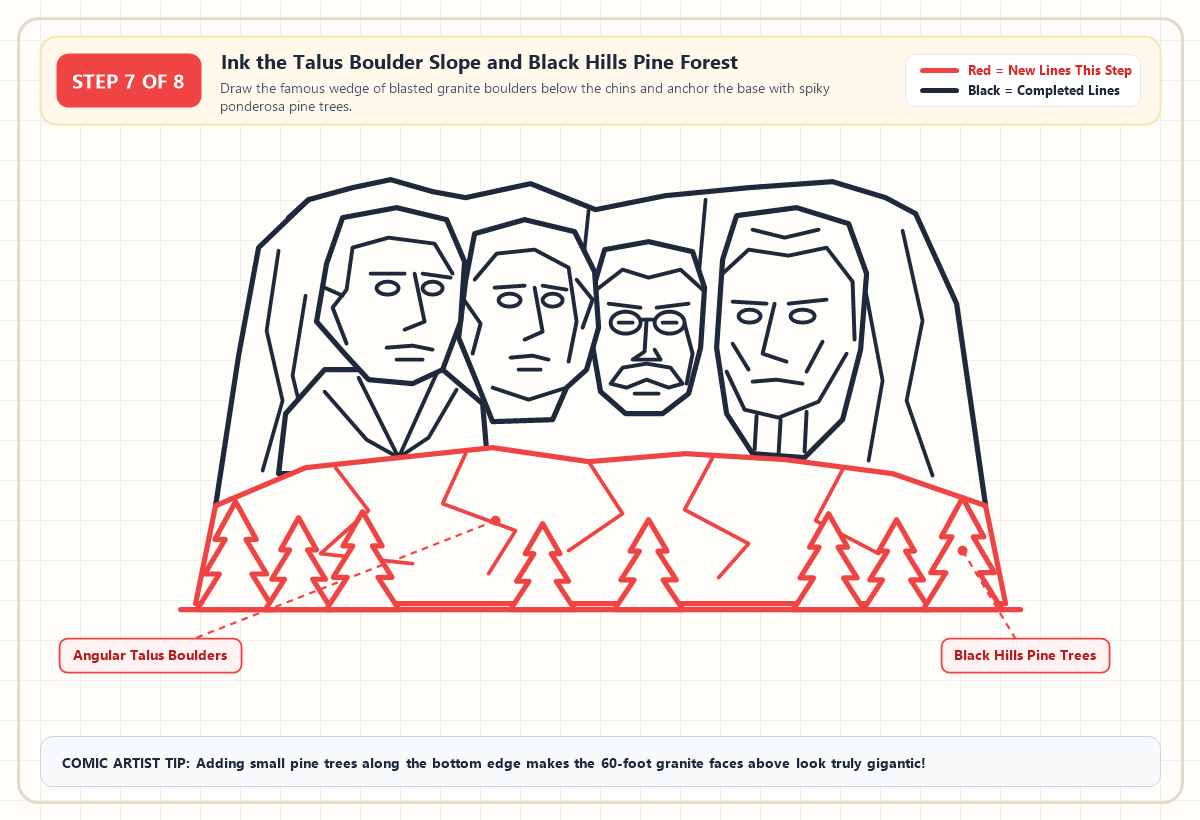
Trace over your final lines with a black fineliner pen and erase any leftover pencil ovals, then draw the wide apron of jagged, broken rock slabs known to geologists as the talus slope fanning downward beneath the four chins. Along the very bottom edge, add a row of spiky triangular ponderosa pine trees to establish scale and make the 60-foot faces above look truly colossal.
Step 8: Coloring the Sunlit Harney Peak Granite and Deep Cliff Shadows
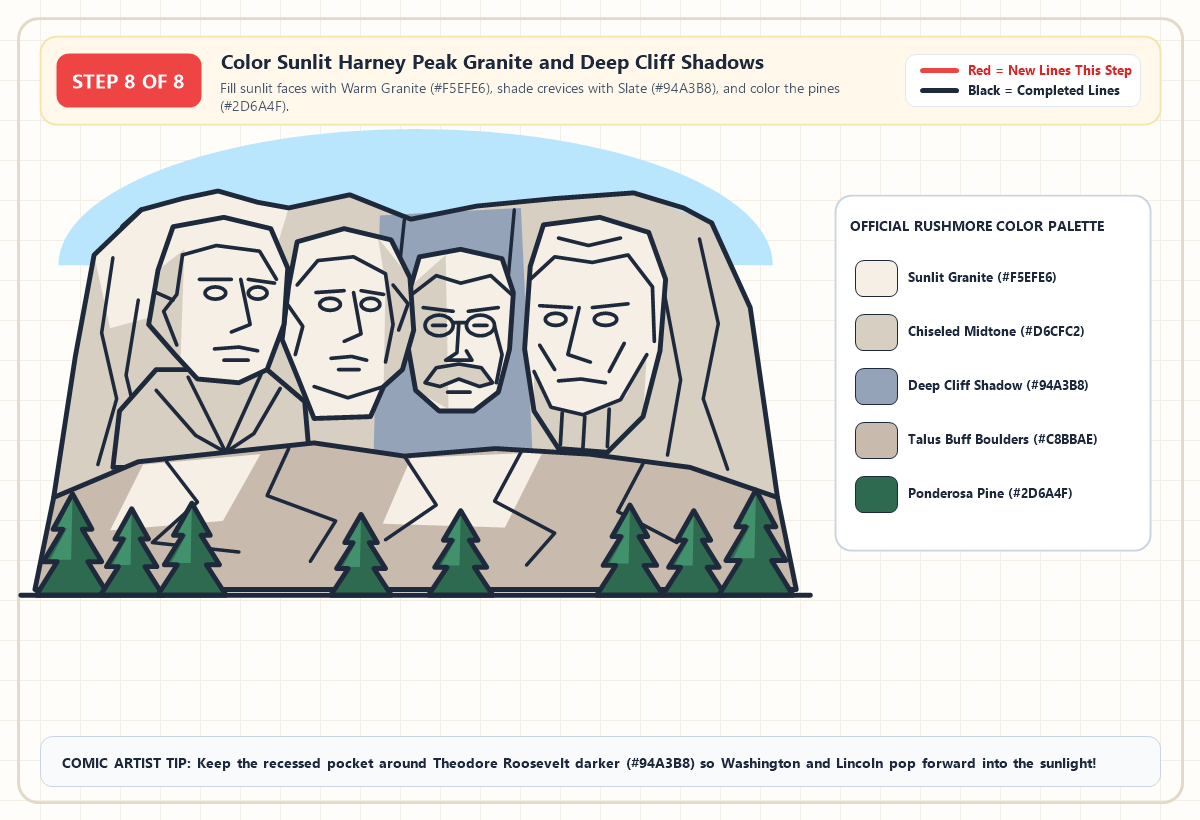
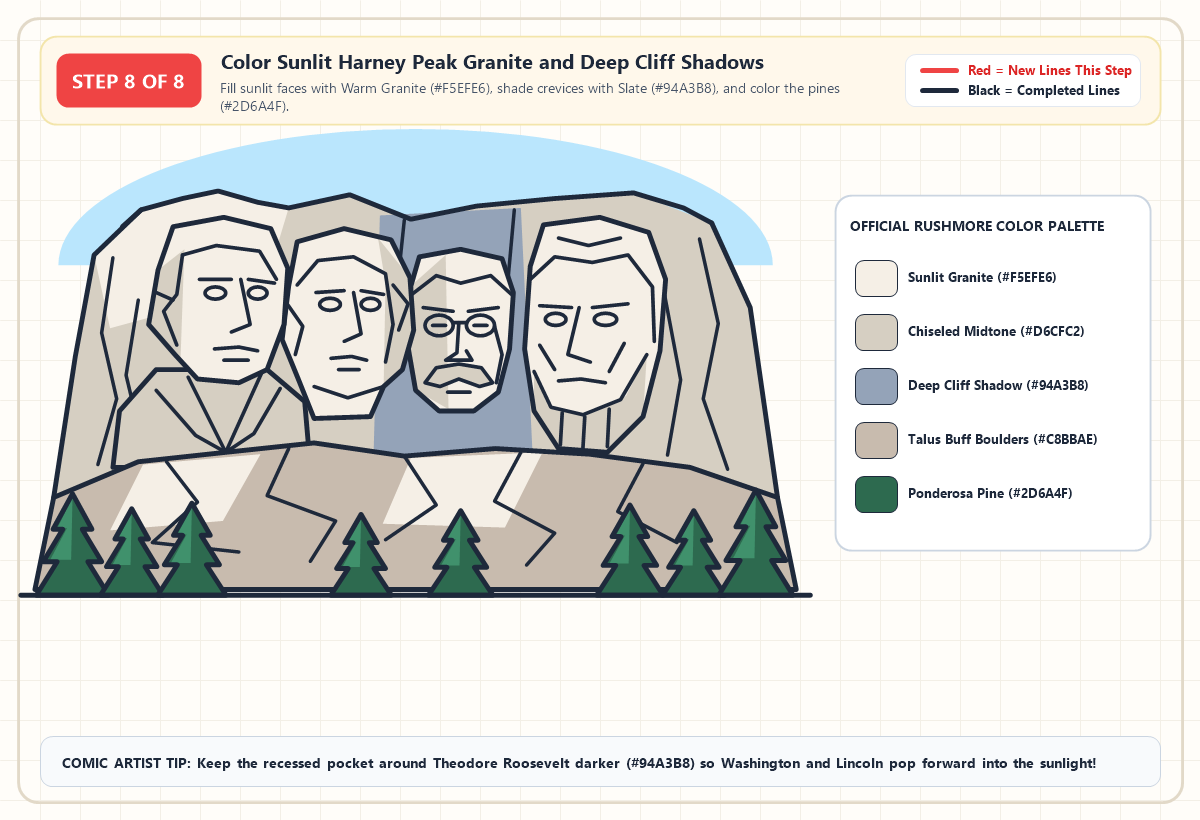
Bring the Black Hills to life by filling the sunlit foreheads, noses, and upper ledges with warm cream-gray (#F5EFE6) rather than cold silver. Shade the side cheeks, Washington's coat collar, and outer cliff flanks with a warm pebble midtone (#D6CFC2), drop a cool slate shadow (#94A3B8) into the deep canyon recess around Theodore Roosevelt, color the talus boulders in buff stone (#C8BBAE), and finish the ponderosa pines in rich forest green (#2D6A4F).
Printable Mount Rushmore Drawing PDF
Download the printable PDF to use now or save for later — it prints on A4 and Letter paper.
Print PDFComparing Sunlit South Dakota Granite With Classic Vintage Postcard Tones
Coloring Mount Rushmore with a single flat gray crayon flattens all four faces into a lifeless concrete wall. Real Harney Peak granite contains sparkling crystals of quartz, feldspar, and mica that glow warm ivory-buff in morning sunlight while casting cool blue-slate shadows inside deep chisel grooves.
Whether you want realistic South Dakota daylight or a bold vintage National Park poster palette similar to the warm stone shading techniques used in our classical museum architecture drawing tutorial use the reference matrix below to match your digital Hex codes, Copic Sketch markers, or Crayola crayons.
| Monument Zone & Lighting Role | Sunlit Black Hills Realism | Vintage Park Poster Style | Official Hex Code | Copic Sketch & Crayola Equivalents |
|---|---|---|---|---|
| Sunlit Foreheads, Noses & Cheekbones | Pale warm ivory-cream granite catching direct morning light | Warm parchment cream with crisp black comic ink contours | #F5EFE6 |
Copic W1 (Warm Gray No. 1) / Crayola Timberwolf (Light Touch) |
| Chiseled Side Planes & Coat Lapels | Medium warm pebble gray on side cheeks, wigs, and collars | Soft sandstone tan-gray for vintage screen-print warmth | #D6CFC2 |
Copic W3 (Warm Gray No. 3) / Crayola Gray + Almond Blend |
| Deep Central Cleft & Brow Shadows | Cool blue-slate shadow recessed around Theodore Roosevelt | Bold muted navy-slate for dramatic comic book depth | #94A3B8 |
Copic C4 (Cool Gray No. 4) / Crayola Cadet Blue + Slate |
| Blasted Talus Scree Boulders | Weathered buff-brown granite rubble piled below the chins | Earthy ochre-tan facets contrasting against the pale faces | #C8BBAE |
Copic E43 (Dull Ivory) / Crayola Tumbleweed or Beaver |
| Black Hills Ponderosa Pine Forest | Deep evergreen needles anchoring the lower cliff base | Punchy emerald-pine silhouettes framing the monument | #2D6A4F |
Copic G28 (Ocean Green) / Crayola Pine Green or Forest Green |
Fixing Three Proportion Mistakes Beginners Make When Sketching Mount Rushmore
Even experienced sketchers occasionally misjudge the spacing when fitting four famous portraits onto a single cliffside. Check your pencil rough against these three diagnostic fixes before touching pen to paper.
- Crowding Abraham Lincoln Off the Right Margin: If Lincoln's beard touches the edge of your paper, you started Washington too far toward the middle. Always mark a tiny vertical tick at the exact horizontal center of your sheet first Washington and Jefferson belong entirely to the left of that mark, while Roosevelt and Lincoln belong to the right.
- Drawing Soft Balloon Cheeks Instead of Carved Stone: Smooth, rounded
Ccurves make the presidents look like rubbery cartoon balloons rather than blasted rock. Replace curved jawlines and noses with two or three short, straight angled chisel segments so every portrait looks hewn out of solid granite. - Lining All Four Eyes Up on a Flat Ruler Line: On the real monument, Washington's eyes sit highest on the left, Jefferson's tilt slightly upward, Roosevelt's drop noticeably lower inside the cleft, and Lincoln's rise back up on the right. Following that gentle shallow
Vdip across the eye line immediately gives your drawing authentic photographic accuracy.
Frequently Asked Questions About Sketching Mount Rushmore
Who are the four presidents on Mount Rushmore in order from left to right?
From left to right when looking at the cliff face, the four presidents on Mount Rushmore are George Washington, Thomas Jefferson, Theodore Roosevelt, and Abraham Lincoln. Sculptor Gutzon Borglum chose these four leaders to symbolize the birth, territorial expansion, industrial conservation, and national preservation of the United States during its first 150 years.
How do you space the four faces on Mount Rushmore without running out of paper?
Divide your drawing area in half with a light vertical center line before sketching a single face. That center line represents the deep rock seam between Thomas Jefferson and Theodore Roosevelt, allowing you to place two staggered ovals on the left half and two staggered ovals on the right half with room left over for the outer cliff walls.
Why is Theodore Roosevelt tucked further back than the other presidents?
When Gutzon Borglum's blaster crews began carving the middle section of the cliff in the 1930s, they hit soft, cracked mica schist and deep rock fissures that couldn't support a 60-foot face. Borglum had to dynamite roughly 120 feet deeper into the mountain canyon until he reached flawless Harney Peak granite strong enough to hold Roosevelt's delicate spectacles and mustache.
What colors make Mount Rushmore look like real carved granite?
Skip pure white or dark charcoal gray and build your drawing with three warm-to-cool stone values instead. Use a pale ivory-gray (#F5EFE6) on the sunlit foreheads and noses, a warm pebble midtone (#D6CFC2) on the side planes and Washington's coat lapels, and a cool slate shadow (#94A3B8) inside the recessed pocket framing Theodore Roosevelt.
Expanding Your Landmark Sketchbook Across the Black Hills and Beyond
Now that you've carved Washington, Jefferson, Roosevelt, and Lincoln into the South Dakota skyline using the 4-oval staggered blueprint, your sketchbook is ready for full scenic compositions. Try framing the base of your granite cliff with a foreground hiking path and pine-lined overlook by pairing this monument with our winding mountain trail drawing guide to create a complete National Park poster from top to bottom.